# SpringBoot
Author:Earl
🔎该文档介绍SpringBoot2.0的使用和特性
Git仓库:https://github.com/Earl-Li/springboot-demo.git
last update | 2023-01-14
# 搭建SpringBoot应用
需求:浏览发送/hello请求,服务器响应Hello,SpringBoot2
使用原生spring的弊端:使用原生spring的方式,需要导入spring和springMVC依赖,编写配置文件,开发代码,将tomcat引入idea,将应用部署在tomcat上启动运行,依赖管理麻烦,配置文件麻烦
# maven配置
注意:需要在maven的settings.xml中profiles标签配置jdk的版本为8,避免编译过程使用其他版本
<mirrors>
  <mirror>
    <id>nexus-aliyun</id>
    <mirrorOf>central</mirrorOf>
    <name>Nexus aliyun</name>
    <url>http://maven.aliyun.com/nexus/content/groups/public</url>
  </mirror>
</mirrors>
<profiles>
     <profile>
          <id>jdk-1.8</id>
          <activation>
            <activeByDefault>true</activeByDefault>
            <jdk>1.8</jdk>
          </activation>
          <properties>
            <maven.compiler.source>1.8</maven.compiler.source>
            <maven.compiler.target>1.8</maven.compiler.target>
            <maven.compiler.compilerVersion>1.8</maven.compiler.compilerVersion>
          </properties>
     </profile>
</profiles>
2
3
4
5
6
7
8
9
10
11
12
13
14
15
16
17
18
19
20
21
22
# web应用搭建
使用SpringBoot搭建一个简单的web应用实例
# 配置pom.xml
- 在pom.xml中引入父工程spring-boot-starter-parent
- 在pom.xml中引入web的场景启动器依赖spring-boot-starter-web
    <!--向pom.xml中导入父工程spring-boot-starter-parent-->
    <parent>
        <groupId>org.springframework.boot</groupId>
        <artifactId>spring-boot-starter-parent</artifactId>
        <version>2.3.4.RELEASE</version>
    </parent>

    <!--配置web的场景启动器,用于springboot的web场景启动器的依赖
        导入这个依赖,web场景开发的日志,springMVC、spring核心等等的依赖都被导入进来
    -->
    <dependencies>
        <dependency>
            <groupId>org.springframework.boot</groupId>
            <artifactId>spring-boot-starter-web</artifactId>
        </dependency>
    </dependencies>
2
3
4
5
6
7
8
9
10
11
12
13
14
15
16
# 主程序类
- 编写主程序类如MainApplication
- 必须用@SpringBootApplication注解告诉springBoot这是一个springboot应用,也称主程序类或主配置类
- 在主程序类的主方法中编写代码SpringApplication.run(MainApplication.class,args)传入主程序类的class对象和主方法的args,该方法的作用相当于让主程序类对应的springboot应用跑起来
- 可以直接运行主方法,也可以直接点debug运行SpringBoot应用
/**
 * @author Earl
 * @version 1.0.0
 * @描述 主程序类,必须使用@SpringBootApplication注解告诉springBoot这是一个springboot应用,并且在主程序类的主方法中编写
 * SpringApplication.run(MainApplication.class,args)传入主程序类的class对象和主方法的args,该方法的作用相当于让主程序类对应的springboot
 * 应用跑起来
 * @创建日期 2023/05/17
 * @since 1.0.0
 */
@SpringBootApplication
public class MainApplication {
    public static void main(String[] args) {
        SpringApplication.run(MainApplication.class,args);
    }
}
2
3
4
5
6
7
8
9
10
11
12
13
14
15
# 业务代码
- 在主程序类所在的包下创建控制器,编写对应/hello请求路径的对应控制器方法,并响应浏览器一段字符串,注意这里的/hello就是webapp的路径,即http://localhost:8080/hello
//@ResponseBody//注意:这个注解可以标注在控制器类上,表示所有的控制器方法直接返回对象给浏览器。
//还可以直接用复合注解代替@ResponseBody和@Controller
//@Controller
@RestController
public class HelloController {
    @RequestMapping("/hello")
    //@ResponseBody
    public String handle01(){
        return "Hello,Spring Boot 2!";
    }
}
2
3
4
5
6
7
8
9
10
11
# 测试
直接运行主程序的主方法即可(对比以前还需要整Tomcat和很多配置文件)
也可以直接点击debug按钮或者运行符号
经过测试,浏览器访问确实Ok
# 简化配置
springBoot最强大的功能是简化配置(比如改tomcat端口号,以前需要打开tomcat的配置文件改端口号)
springboot可以直接在类路径下的一个属性配置文件中修改所有的配置信息,该文件有固定名字application.properties
springboot本身有默认配置,在application.properties文件中可以进行修改的配置可以参考官方文档的Application Properties
比如服务器的端口名固定为server.port;除此外还有配置的默认值信息
使用ctrl+f能在文档中进行搜索,IDEA对属性名还有提示功能
#application.properties文件中的配置示例,注意配置名是固定的
server.port=8888
2
# 简化部署
使用springboot的spring-boot-maven-plugin插件把springboot应用打成一个可执行的jar包
这个jar包称为小胖jar(fat.jars),包含整个运行环境,可以直接通过DOS窗口的当前目录使用命令:
java -jar boot-01-helloworld-1.0-SNAPSHOT.jar直接运行,经验证OK
实际生产环境部署也是直接引入打包插件打成小胖jar,直接在目标服务器执行即可,注意:要关闭DOS命 令窗口的快速编辑模式,否则鼠标只要一点DOS命令窗口,springboot应用的启动进程就会卡住,以前 需要打成war包部署到服务器上
小胖jar中BOOT-INF下的lib下是第三方的所有jar包,BOOT-INF下的classes下是我们自己写的代码和配置 文件
pom.xml插件配置代码
<!--导入springboot把应用打成小胖jar的插件,注意:按视频那样不加版本号会报红,打包需要maven的clean和package操作-->
<build>
    <plugins>
        <plugin>
            <groupId>org.springframework.boot</groupId>
            <artifactId>spring-boot-maven-plugin</artifactId>
            <version>2.3.4.RELEASE</version>
        </plugin>
    </plugins>
</build>
2
3
4
5
6
7
8
9
10
# 其他事项
- DOS窗口检查java和mvn版本的命令
- java -version
- mvn -v
# 自动配置原理
SpringBoot两大优秀特性 : 依赖管理|自动配置
# 依赖管理
# 父工程做依赖管理
在pom.xml使用父工程spring-boot-starter-parent进行依赖版本号管理
使用父工程进行依赖管理
<parent>
	<groupId>org.springframework.boot</groupId>
	<artifactId>spring-boot-starter-parent</artifactId>
	<version>2.3.4.RELEASE</version>
</parent>
1
2
3
4
5
6父工程的pom.xml中还有父工程spring-boot-dependencies
<parent>
	<groupId>org.springframework.boot</groupId>
	<artifactId>spring-boot-dependencies</artifactId>
	<version>2.3.4.RELEASE</version>
</parent>
1
2
3
4
5在spring-boot-dependencies的pom.xml中的properties标签中声明了几乎开发中使用的所有jar包的版本
使用ctrl+f可以搜索响应的依赖信息
需要使用未被starter启动器引入的依赖,只需引入相关的groupId和artifactId,无需添加版本信息,默认使用父工程中设置的默认版本,注意引入非版本仲裁的jar要写版本号。
如果想自己指定依赖的版本,直接在pom.xml中新建properties标签,依照spring-boot-dependencies中的依赖版本属性名格式配置自己想要的版本,springboot会自动根据就近原则选取用户自己配置的版本
<properties>
	<mysql.version>5.1.43</mysql.version>
</properties>
1
2
3
导入starter场景启动器
<!--配置web的场景启动器,用于springboot的web场景启动器的依赖
        导入这个依赖,web场景开发的日志,springMVC、spring核心等等的依赖都被导入进来
    -->
    <dependencies>
        <dependency>
            <groupId>org.springframework.boot</groupId>
            <artifactId>spring-boot-starter-web</artifactId>
        </dependency>
    </dependencies>
1
2
3
4
5
6
7
8
9官方文档的starter相关信息位置:Using Spring Boot下的starters
starter是一组依赖集合的描述,只要引入一个starter,这个starter开发场景的所有依赖都被引入了
原理实际上是依赖的传递性,因为starter-*依赖依赖于开发某个场景所需要的全部依赖
Spring官方starter的命名规范:
spring-boot-starter-**为某种场景第三方提供的starter的命名规范:
*-spring-boot-starter所有starter的最基本依赖都是spring-boot-starter依赖
所有场景启动器最底层的依赖
<dependency>
	<groupId>org.springframework.boot</groupId>
	<artifactId>spring-boot-starter</artifactId>
	<version>2.3.4.RELEASE</version>
	<scope>compile</scope>
</dependency>
1
2
3
4
5
6
7
# 自动配置
在spring-boot-starter-web的pom.xml下配置了Tomcat、SpringMVC等依赖
自动配置Tomcat
<dependency>
	<groupId>org.springframework.boot</groupId>
	<artifactId>spring-boot-starter-tomcat</artifactId>
	<version>2.3.4.RELEASE</version>
	<scope>compile</scope>
</dependency>
1
2
3
4
5
6- 自动引入Tomcat依赖
- 自动配置Tomcat,关于如何配置和启动Tomcat后面再讲
自动配置SpringMVC
自动引入SpringMVC全套组件
<dependency>
  <groupId>org.springframework</groupId>
  <artifactId>spring-web</artifactId>
  <version>5.2.9.RELEASE</version>
  <scope>compile</scope>
</dependency>
<dependency>
  <groupId>org.springframework</groupId>
  <artifactId>spring-webmvc</artifactId>
  <version>5.2.9.RELEASE</version>
  <scope>compile</scope>
</dependency>
1
2
3
4
5
6
7
8
9
10
11
12自动配好了SpringMVC的常用组件(功能)
DispatcherServlet
characterEncoding?是视图解析器的属性吗,作为属性为什么可以作为IoC容器的组件?
viewResolver 视图解析器
mutipartResolver 文件上传解析器
...SpringBoot已经帮用户配置好了所有的web开发常见场景,会自动在容器中生效,生效原理以后再说
以上组件都可以获取IoC容器并获取组件名字打印查看
springboot中默认的包扫描规则
官方文档的Using Spring Boot下的Structuring Your Code下有默认包扫描规则
默认规则为主程序所在的包及该包下的所有子包都能被扫描到,无需再配置包扫描
如果必须要扫描主程序类所在包外的包或类,可以在标注主程序类的@SpringBootApplication注解中为其属性scanBasePackages赋值更大的扫描范围即可
//由于@SpringBootApplication由@ComponentScan注解复合而成,所以不能直接在主程序类上使用@ComponentScan扩大扫描范围,会提示注解重复
@SpringBootApplication(scanBasePackages = "com.atlisheng")
1
2可以直接把@SpringBootApplication注解拆成三个注解,并在注解之一@ComponentScan中扩大包扫描的范围,这样不会报注解重复异常
@SpringBootApplication(scanBasePackages = "com.atlisheng")
等同于
@SpringBootConfiguration
@EnableAutoConfiguration
@ComponentScan("com.atlisheng")
1
2
3
4
5
自动配置的默认值
SpringBoot的自动配置都有默认值,如果想要修改直接在application.properties文件中修改对应的key和value即可
默认配置最终都是映射到某个类上,如:
MultipartProperties配置文件的值最终会绑定每个类上,这个类会在容器中创建对象
研究如何映射绑定和使用后面介绍
自动配置按需加载
- 引入了哪些场景启动器,对应的自动配置才会开启
- SpringBoot所有的自动配置功能都在spring-boot-starter包依赖的spring-boot-autoconfigure 包里面,在外部libirary中的autoconfigure中可以找到,里面按照amqp、aop、拼接码、缓存、批处理等等场景按包进行了分类,这些自动配置类中发红的对象就是没有生效的,比如批处理,导入批处理场景启动器spring-boot-starter-batch部分报红的对象就会恢复正常
# 底层注解
# @Configuration
@Configuration配置类
原生Spring向IoC容器中添加bean对象的方式:
- 在xml文件中用bean标签向IoC容器添加bean对象(组件)
- 在类上标注@Component、@Controller、@Service、@Repository注解代表该类是一个组件
配置类示例:
@Configuration(proxyBeanMethods = true)//告诉SpringBoot这是一个配置类,可以取代配置文件的作用,注意:配置类也是IoC容器的一个组件
//@Configuration(proxyBeanMethods = false)
public class MyConfig {
    @Bean//配置类中使用@Bean注解标注方法可以给容器注册组件,默认是单实例的,
    // 方法名将作为组件的id,返回类型就是组件类型。返回的值就是组件在容器中的实例
    public User user01(){
        User zhangsan = new User("zhangsan", 18);
        //user组件依赖了Pet组件
        zhangsan.setPet(tomcatPet());
        return zhangsan;
    }
    @Bean("tom")
    public Pet tomcatPet(){
        return new Pet("tomcat");
    }
}
1
2
3
4
5
6
7
8
9
10
11
12
13
14
15
16Configuration配置类测试代码
public static void main(String[] args) {
    ConfigurableApplicationContext run = SpringApplication.run(MainApplication.class, args);
    //从容器中获取组件
    Pet tom01=run.getBean("tom",Pet.class);
    Pet tom02=run.getBean("tom",Pet.class);
    System.out.println("组件:"+((tom01==tom02)?"单实例":"多实例"));

    //配置类也是一个组件,可以从容器中获取,从对象引用可以看出配置类是一个被CGLIB增强的代理对象
    MyConfig bean = run.getBean(MyConfig.class);
    System.out.println(bean);
    //com.atlisheng.boot.config.MyConfig$$EnhancerBySpringCGLIB$$a82a58f4@47ffe971

    //外部调用配置类的组件注册方法无论多少遍获取的都是注册在容器中的单实例对象
    //如果@Configuration(proxyBeanMethods = true)默认值就是true,此时配置类使用代理对象调用组件注册方法,SpringBoot总会检查该组件是否已在容器中存在如果有会自动保持组件单实例
    //如果@Configuration(proxyBeanMethods = false),此时配置类不会使用调用组件注册方法,SpringBoot不会保持该组件的单实例
    User user=bean.user01();
    User user1=bean.user01();
    System.out.println("组件:"+((user==user1)?"单实例":"多实例"));

    User user01 = run.getBean("user01", User.class);
    Pet tom = run.getBean("tom", Pet.class);
    System.out.println("用户"+(user01.getPet()==tom?"user01依赖于组件tom":"user01不依赖于组件tom"));
}
1
2
3
4
5
6
7
8
9
10
11
12
13
14
15
16
17
18
19
20
21
22
23
使用@Configuration(意为配置)标注类可以告诉SpringBoot这个类是一个配置类,可以取代Spring配置文件的作用,配置文件的功能这个类都有,配置类本身也是IoC容器的组件
在配置类中使用@Bean注解标注组件注册方法,方法返回的对象会被作为组件自动纳入IoC容器的管理
以方法名作为组件的id,返回的类型就是组件类型,返回的值就是组件在容器中的实例
添加@Bean注解的value属性可以手动设置组件的id
默认被注册组件是单实例的
@Configuration注解的proxyBeanMethods属性
proxyBeanMethods属性为true时(即Full模式,全配置):
此时配置类在容器中是被CGLIB增强的代理对象,使用代理对象调用组件注册方法,SpringBoot总会检查该组件是否已在容器中存在如果有会自动保持组件单实例
实现原理是容器中有自动去容器中找组件
proxyBeanMethods属性为false时(即Lite模式,轻量级配置):
此时配置类在容器中是普通对象,调用组件注册方法时,SpringBoot不会保持目标组件的单实例
proxyBeanMethods属性可以用来方便的处理组件依赖的场景
如User中有Pet属性,user想获取容器中已经注册的Pet组件,直接在Full模式下调用配置类的pet组件注册方法即可,注意Lite模式下这种方式为user获取的pet属性不是已经在容器中注册的组件
proxyBeanMethods属性的最佳实践
# @Import
@Import导入组件
@Import注解的作用也是给IoC容器中导入一个组件
@Import注解需要标注在配置类或者组件类的类名上
- 该注解的value属性是一个class数组,可以导入用户或者第三方的类的class对象
- 作用是将指定类型的组件导入IoC容器,调用对应类型的无参构造创建出对应的组件对象
- 通过@Import注解导入的组件的默认名字是对应类型的全限定类名
~@Import注解使用实例
@Import({User.class, DBHelper.class})
@Configuration(proxyBeanMethods = false) //告诉SpringBoot这是一个配置类 == 配置文件
public class MyConfig {
}
1
2
3
4~@Import注解的测试代码
public static void main(String[] args) {
    ConfigurableApplicationContext run = SpringApplication.run(MainApplication.class, args);
    //从容器中根据类型获取该类型对应的所有组件名字
    String[] users = run.getBeanNamesForType(User.class);
    Arrays.stream(users).forEach(user2->{
        System.out.println(user2);
    });
    //从容器中根据类型获取单个组件
    DBHelper bean1 = run.getBean(DBHelper.class);
    System.out.println(bean1);
}
1
2
3
4
5
6
7
8
9
10
11@Import注解还有高级用法,参考:08_尚硅谷_组件注册-@Import-给容器中快速导入一个组件 (opens new window)
# @Conditional
@Conditional条件装配
@Conditional条件装配注解的作用是:满足Conditional指定的条件,则对标注组件进行组件注入
- @Conditional是一个根注解,其下派生出非常多的派生注解
- 派生注解可以标注在组件注册方法上,表示条件装配只对该方法对应的组件生效
- 派生注解也可以标注在配置类或者组件类上,表示条件装配对配置类下的所有组件均有效或对组件类有效
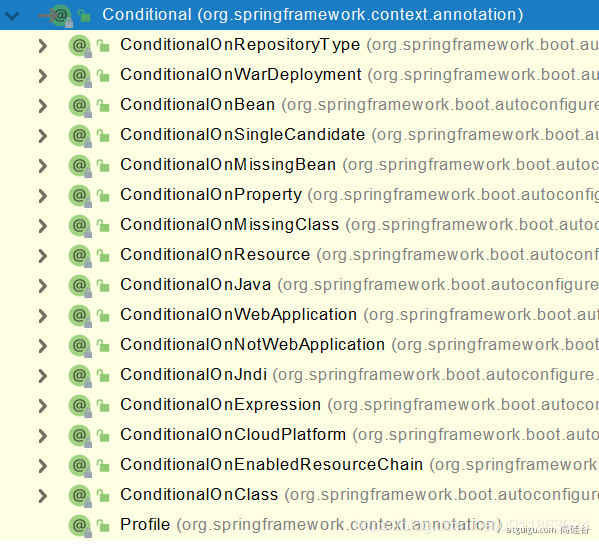
@Conditional的常用派生注解
@ConditionalOnBean
当容器中存在用户指定的组件时才向容器注入指定的组件
@ConditionalOnMissingBean
当容器中没有用户指定的组件时才向容器注入指定的组件,没有指定就表示容器中没有当前组件就配置当前组件,配置了当前组件就不配置了
@ConditionalOnClass
当容器中存在用户指定的类时才向容器注入指定的组件
@ConditionalOnMissingClass
当容器中没有用户指定的类时才向容器注入指定的组件
@ConditionalOnResource
当类路径下存在用户指定的资源时才向容器注入指定的组件
@ConditionalOnJava
当Java是用户指定的版本号时才向容器注入指定的组件
@ConditionalOnWebApplication
当应用是一个web应用时才向容器注入指定的组件
@ConditionalOnWebApplication
当应用不是一个web应用时才向容器注入指定的组件
@ConditionalOnSingleCandidate
当特定组件只有一个实例或者多个实例中有一个主实例时才向容器注入指定的组件
@ConditionalOnProperty
当配置文件中配置了特定属性时才向容器注入指定的组件
以@ConditionalOnBean举例说明@Conditional派生注解的用法
~@ConditionalOnBean和@ConditionalOnMissingBean代码实例:
@Configuration(proxyBeanMethods = true)
//@ConditionalOnBean(name="tom")//标注在类上表示当容器中有组件tom时这个类中所有的注册组件才生效
@ConditionalOnMissingBean(name="tom")//标注在类上表示当容器中没有组件tom时这个类中所有的注册组件才生效
public class MyConfig {
    @Bean
    //需求:因为user01依赖于tom,如果容器中没有tom组件就不要在容器中注册user01组件了
    //@ConditionalOnBean(name="tom")
    //@ConditionalOnBean中有很多属性,value、name等,分别表示class对象或者组件id
    //@ConditionalOnBean(name="tom")标注在组件注册方法上时,当容器中有tom时再通过组件注册方法注册user01
    //Q:判断放在什么时候,如果user01组件先注册怎么办?暂时对结果没有影响
    public User user01(){
        User zhangsan = new User("zhangsan", 18);
        //user组件依赖了Pet组件
        zhangsan.setPet(tomcatPet());
        return zhangsan;
    }
    //@Bean("tom")
    @Bean("tom22")
    public Pet tomcatPet(){
        return new Pet("tomcat");
    }
}
1
2
3
4
5
6
7
8
9
10
11
12
13
14
15
16
17
18
19
20
21
22~测试代码:
public static void main(String[] args) {
    ConfigurableApplicationContext run = SpringApplication.run(MainApplication.class, args);
    boolean tom = run.containsBean("tom");
    System.out.println("容器中Tom组件:"+(tom?"存在":"不存在"));

    boolean user01 = run.containsBean("user01");
    System.out.println("容器中user01组件:"+(user01?"存在":"不存在"));

    boolean tom22 = run.containsBean("tom22");
    System.out.println("容器中tom22组件:"+(tom22?"存在":"不存在"));
}
1
2
3
4
5
6
7
8
9
10
11
# @ImportResource
@ImportResource导入Spring配置文件
有些公司还在使用spring.xml配置IoC组件,这些xml文件需要使用
BeanFactory applicationContext=new ClassPathXmlApplicationContext("spring.xml");获取Bean工厂才能创建对应的IoC容器并生成对应的组件,无法直接生效在springboot的IoC容器中生成对应的组件,使用SpringBoot需要对应去添加配置类和@Bean注解来生成组件,很麻烦
SpringBoot提供@ImportResource注解配置在随意配置类上导入Spring配置文件,使配置文件中的组件在springboot的IoC容器中生效,无需添加配置类和@Bean注解
~beans.xml配置代码
<?xml version="1.0" encoding="UTF-8"?>
<beans xmlns="http://www.springframework.org/schema/beans"
       xmlns:xsi="http://www.w3.org/2001/XMLSchema-instance"
       xsi:schemaLocation="http://www.springframework.org/schema/beans http://www.springframework.org/schema/beans/spring-beans.xsd">
    <bean id="user01" class="com.atlisheng.boot.bean.User">
        <property name="name" value="zhangsan"/>
        <property name="age" value="18"/>
    </bean>
    <bean id="cat" class="com.atlisheng.boot.bean.Pet">
        <property name="name" value="tomcat"/>
    </bean>
</beans>
1
2
3
4
5
6
7
8
9
10
11
12~@ImportResource注解用法实例
@Configuration
@ImportResource("classpath:beans.xml")
public class MyConfig {
    ...
}
1
2
3
4
5~测试代码
public static void main(String[] args) {
    ConfigurableApplicationContext run = SpringApplication.run(MainApplication.class, args);
    boolean haha = run.containsBean("haha");
    boolean hehe = run.containsBean("hehe");
    System.out.println("haha:"+(haha?"存在":"不存在"));
    System.out.println("hehe:"+(hehe?"存在":"不存在"));
}
1
2
3
4
5
6
7
# @ConfigurationProperties
@ConfigurationProperties配置绑定
配置绑定就是使用Java读取配置文件中的内容,并将数据封装到JavaBean中,如数据库连接信息封装到数据源中,对于配置项上百行的配置文件有时需要使用正则表达式来进行匹配寻找,非常麻烦
~传统方式代码
public class getProperties {
     public static void main(String[] args) throws FileNotFoundException, IOException {
         Properties pps = new Properties();
         pps.load(new FileInputStream("a.properties"));
         Enumeration enum1 = pps.propertyNames();//得到配置文件的名字
         while(enum1.hasMoreElements()) {
             String strKey = (String) enum1.nextElement();
             String strValue = pps.getProperty(strKey);
             System.out.println(strKey + "=" + strValue);
             //封装到JavaBean。
         }
     }
 }
2
3
4
5
6
7
8
9
10
11
12
13
springboot提供了两种配置绑定的方案
方案一:@ConfigurationProperties + @Component
步骤一:在配置文件application.properties中对目标类Car依据属性进行了如下配置
mycar.brand=BYD
mycar.price=100000
1
2步骤二:确认目标类Car被纳入了IoC容器管理,只有被纳入IoC容器管理的组件才能享受类似配置绑定等其他spring强大功能
步骤三:在目标类上使用@ConfigurationProperties(prefix = "mycar")注解通知springboot自动根据前缀mycar查找application.properties对应含有前缀的key如mycar.brand和mycar.price,并将值通过目标类的set注入注入属性值,注意value属性和prefix属性互为别名,使用哪一个都可以
~配置绑定代码
@Component
@ConfigurationProperties(prefix = "mycar")
@ConfigurationProperties(prefix = "mycar")
public class Car {
    private String brand;
    private Integer price;
	...这种方式必须写set方法...
}
1
2
3
4
5
6
7
8
方案二:@EnableConfigurationProperties + @ConfigurationProperties
步骤一:在配置文件application.properties中对目标类Car进行属性配置
步骤二:在配置类上使用@EnableConfigurationProperties注解对配置类进行标注,注解的value属性为目标类的class对象,这一步的目的:
根据class对象开启目标类的配置绑定功能
把目标类这个组件自动注册到容器中
@EnableConfigurationProperties(Car.class)
public class MyConfig {
...
}
1
2
3
4
步骤三:在目标类上使用@ConfigurationProperties注解指定前缀属性prefix进行配置绑定
@ConfigurationProperties(prefix = "mycar")
public class Car {
...
}
1
2
3
4
# 自动配置原理
# 包扫描规则
# @SpringBootApplication
核心注解@SpringBootApplication是一个复合注解,用来标注主程序类,该注解相当于@ComponentScan、@SpringBootConfiguration、@EnableAutoConfiguration三个注解的合成注解,从这三个注解的功能就能反应@SpringBootApplication的核心功能
@Target(ElementType.TYPE)
@Retention(RetentionPolicy.RUNTIME)
@Documented
@Inherited
@SpringBootConfiguration
@EnableAutoConfiguration
@ComponentScan(excludeFilters = {
    @Filter(type = FilterType.CUSTOM, classes = TypeExcludeFilter.class),
    @Filter(type = FilterType.CUSTOM, classes = AutoConfigurationExcludeFilter.class) })
public @interface SpringBootApplication {
...
}
1
2
3
4
5
6
7
8
9
10
11
12
# @SpringBootConfiguration
@Configuration注解是@SpringBootConfiguration元注解,表明@SpringBootConfiguration标注的类也是一个配置类,即主程序类是一个核心配置类
@Target(ElementType.TYPE)
@Retention(RetentionPolicy.RUNTIME)
@Documented
@Configuration
public @interface SpringBootConfiguration {
	@AliasFor(annotation = Configuration.class)
	boolean proxyBeanMethods() default true;
}
1
2
3
4
5
6
7
8
# @ComponentScan
包扫描注解,指定要扫描哪些包,包扫描注解@ComponentScan有两个SpringBoot自定义的扫描器
雷丰阳的spring注解视频中有介绍:尚硅谷Spring注解驱动教程(雷丰阳源码级讲解) (opens new window)
# @EnableAutoConfiguration
@EnableAutoConfiguration也是一个合成注解,由注解@AutoConfigurationPackage以及组件导入@Import(AutoConfigurationImportSelector.class)构成
@Target(ElementType.TYPE)
@Retention(RetentionPolicy.RUNTIME)
@Documented
@Inherited
@AutoConfigurationPackage
@Import(AutoConfigurationImportSelector.class)
public @interface EnableAutoConfiguration {
    String ENABLED_OVERRIDE_PROPERTY = "spring.boot.enableautoconfiguration";
    Class<?>[] exclude() default {};
    String[] excludeName() default {};
}
1
2
3
4
5
6
7
8
9
10
11@AutoConfigurationPackage
@AutoConfigurationPackage注解的作用就是实现了默认包扫描范围为主程序类所在包及其所有子包
@AutoConfigurationPackage意为自动配置包,由其源码:@Import(AutoConfigurationPackages. Registrar.class),可知该注解就是给容器导入Registrar组件,通过Registrar组件的registerBeanDefinitions方法给容器导入一系列组件
@Target(ElementType.TYPE)
@Retention(RetentionPolicy.RUNTIME)
@Documented
@Inherited
@Import(AutoConfigurationPackages.Registrar.class)//给容器中导入一个组件
public @interface AutoConfigurationPackage {
    String[] basePackages() default {};
    Class<?>[] basePackageClasses() default {};
}
1
2
3
4
5
6
7
8
9Registrar类的registerBeanDefinitions方法分析
static class Registrar implements ImportBeanDefinitionRegistrar, DeterminableImports {
    @Override
    public void registerBeanDefinitions(AnnotationMetadata metadata, BeanDefinitionRegistry registry) {
        register(registry, new PackageImports(metadata).getPackageNames().toArray(new String[0]));
    }
    @Override
    public Set<Object> determineImports(AnnotationMetadata metadata) {
        return Collections.singleton(new PackageImports(metadata));
    }
}
1
2
3
4
5
6
7
8
9
10通过Registrar组件的registerBeanDefinitions(AnnotationMetadata metadata, BeanDefinitionRegister)方法执行批量导入组件的操作,这些组件即主程序类MainApplication所在包及其所有子包下的组件
AnnotationMetadata metadata是注解源信息,该注解指的是@AutoConfigurationPackage,注解的源信息包括了该注解的标注位置MainApplication的全限定类名以及该注解有哪些属性值
[因为@AutoConfigurationPackage合成了注解@EnableAutoConfiguration,最终相当于@AutoConfigurationPackage注解标注在主程序类MainApplication上,在registerBeanDefinitions方法中new PackageImports(metadata).getpackageName(). toArray(new Array[0])通过元注解信息获取到组件所在的包名,即主程序类所在的包名,封装在数组中然后使用register方法进行注册,这就是默认包扫描范围在主程序类MainApplication所在包及其所有子包下的原因]
# 加载自动配置类
初始化时加载的相关自动配置类
@Import(AutoConfigurationImportSelector.class)
@Import(AutoConfigurationImportSelector.class)注解是@EnableAutoConfiguration注解的组分之一
利用selector机制引入AutoConfigurationImportSelector组件给容器批量导入组件
AutoConfigurationImportSelector中的selectImports方法返回的字符串数组中规定了要批量导入组件的列表,该列表是调用getAutoConfigurationEntry(annotationMetadata)获取的;重点就是方法:getAutoConfigurationEntry(annotationMetadata)
public class AutoConfigurationImportSelector implements DeferredImportSelector, BeanClassLoaderAware,ResourceLoaderAware, BeanFactoryAware, EnvironmentAware, Ordered {
    ...
	@Override
	public String[] selectImports(AnnotationMetadata annotationMetadata) {
		if (!isEnabled(annotationMetadata)) {
			return NO_IMPORTS;
		}
		AutoConfigurationEntry autoConfigurationEntry = getAutoConfigurationEntry(annotationMetadata);
		return StringUtils.toStringArray(autoConfigurationEntry.getConfigurations());
	}
    ...
}
1
2
3
4
5
6
7
8
9
10
11
12getAutoConfigurationEntry(annotationMetadata)方法解析:
该方法获取所有需要自动配置的集合
getCandidateConfigurations(annotationMetadata, attributes)方法,作用是获取所有备选的配置,返回configurations;
接下来依次对configurations移除重复的选项,排除一些配置选项,以及一些额外操作封装成AutoConfigurationEntry进行返回,在没有重复项和需排除项的情况下configurations中一共有127个组件,这127个组件默认需要导入容器,现在的重点变成了获取备选配置的方法getCandidateConfigurations(annotationMetadata, attributes)
protected AutoConfigurationEntry getAutoConfigurationEntry(AnnotationMetadata annotationMetadata) {
    if (!isEnabled(annotationMetadata)) {
        return EMPTY_ENTRY;
    }
    AnnotationAttributes attributes = getAttributes(annotationMetadata);
    List<String> configurations = getCandidateConfigurations(annotationMetadata, attributes);
    configurations = removeDuplicates(configurations);
    Set<String> exclusions = getExclusions(annotationMetadata, attributes);
    checkExcludedClasses(configurations, exclusions);
    configurations.removeAll(exclusions);
    configurations = getConfigurationClassFilter().filter(configurations);
    fireAutoConfigurationImportEvents(configurations, exclusions);
    return new AutoConfigurationEntry(configurations, exclusions);
}
1
2
3
4
5
6
7
8
9
10
11
12
13
14getCandidateConfigurations(annotationMetadata, attributes)方法解析:
SpringFactoriesLoader.loadFactoryNames( getSpringFactoriesLoaderFactoryClass(), getBeanClassLoader())方法使用Spring工厂加载器加载一些资源,重点是loadFactoryNames方法
protected List<String> getCandidateConfigurations(AnnotationMetadata metadata, AnnotationAttributes attributes) {
    List<String> configurations = SpringFactoriesLoader.loadFactoryNames( getSpringFactoriesLoaderFactoryClass(),getBeanClassLoader());
    Assert.notEmpty(configurations,"No auto configuration classes found in META-INF/spring.factories. If you "+"are using a custom packaging, make sure that file is correct.");
    return configurations;
}
1
2
3
4
5loadFactoryNames方法中的重点是loadSpringFactories(classLoader)方法,利用loadSpringFactories方法加载得到一个Map集合,Map集合的value是一个List集合;这个Map集合中保存的就是所有的组件,只要看懂loadSpringFactories方法就能知道从哪里获取的所有组件
public final class SpringFactoriesLoader {
    ...
    public static List<String> loadFactoryNames(Class<?> factoryType, @Nullable ClassLoader classLoader) {
        String factoryTypeName = factoryType.getName();
        return (List)loadSpringFactories(classLoader).getOrDefault( factoryTypeName, Collections.emptyList());
    }
}
1
2
3
4
5
6
7
loadSpringFactories(classLoader)方法解析
classLoader.getResources("META-INF/spring.factories"):从META-INF/spring.factories位置加载一个文件,默认扫描当前系统中所有META-INF/spring.factories位置的文件,在引入的第三方jar包中,有些jar包有META-INF/spring.factories这个文件,如spring-boot、spring-boot-autoconfigure(最核心的);有些包则没有这个文件
在最核心的jar包spring-boot-autoconfigure-2.3.4.RELEASE.jar中的META-INF/spring.factories中第21行开始配置了@EnableAutoConfiguration注解由@Import(AutoConfigurationImportSelector.class)引入的全部127个自动配置组件,即该文件这127行写死了spring-boot一启动就要给容器加载的所有配置类,这些类也都在spring-boot-autoconfigure这个jar包下
虽然127个场景的所有自动配置启动的时候默认全部加载,但是最终会按需分配,通过IoC容器的组件数量只有135个,包括我们自己配置的组件和其他组件,显然127个组件并未全部生效
private static Map<String, List<String>> loadSpringFactories(@Nullable ClassLoader classLoader) {
    MultiValueMap<String, String> result = (MultiValueMap)cache.get(classLoader);
    if (result != null) {
        return result;
    } else {
        try {
            Enumeration<URL> urls = classLoader != null ? classLoader.getResources("META-INF/spring.factories") : ClassLoader.getSystemResources("META-INF/spring.factories");
            LinkedMultiValueMap result = new LinkedMultiValueMap();
            while(urls.hasMoreElements()) {
                URL url = (URL)urls.nextElement();
                UrlResource resource = new UrlResource(url);
                Properties properties = PropertiesLoaderUtils.loadProperties(resource);
                Iterator var6 = properties.entrySet().iterator();
                while(var6.hasNext()) {
                    Entry<?, ?> entry = (Entry)var6.next();
                    String factoryTypeName = ((String)entry.getKey()).trim();
                    String[] var9 = StringUtils.commaDelimitedListToStringArray((String)entry.getValue());
                    int var10 = var9.length;
                    for(int var11 = 0; var11 < var10; ++var11) {
                        String factoryImplementationName = var9[var11];
                        result.add(factoryTypeName, factoryImplementationName.trim());
                    }
                }
            }
            cache.put(classLoader, result);
            return result;
        } catch (IOException var13) {
            throw new IllegalArgumentException("Unable to load factories from location [META-INF/spring.factories]", var13);
        }
    }
}
1
2
3
4
5
6
7
8
9
10
11
12
13
14
15
16
17
18
19
20
21
22
23
24
25
26
27
28
29
30
31
组件按需配置机制
在对应127个组件的自动配置类中都有派生条件装配注解,如:
AopAutoConfiguration有@ConditionalOnClass(Advice.class),意思是当类路径中存在Advice这个类这个组件才会生效,也即只有导入了aop相关的包aspectj,对应的组件才会生效
BatchAutoConfiguration有@ConditionalOnClass(JobLauncher.class,DataSource.class),也只有导入批处理的包,这个类下的组件才会生效
@Configuration(proxyBeanMethods = false)
@ConditionalOnClass({ JobLauncher.class, DataSource.class })
@AutoConfigureAfter(HibernateJpaAutoConfiguration.class)
@ConditionalOnBean(JobLauncher.class)
@EnableConfigurationProperties(BatchProperties.class)
@Import(BatchConfigurerConfiguration.class)
public class BatchAutoConfiguration {
    ...
}
1
2
3
4
5
6
7
8
9总结,派生条件装配注解的value发红对应组件就不会生效
启动全部加载,最终按照条件装配规则按需配置
# 自动配置流程
以AopAutoconfiguration分析自动配置功能(经确认AopAutoconfiguration确实在127个中)
@Configuration(proxyBeanMethods = false)//表明这是一个配置类
@ConditionalOnProperty(prefix = "spring.aop", name = "auto", havingValue = "true", matchIfMissing = true)//判断配置文件中是否有spring.aop.auto=true,有就生效,matchIfMissing = true意思是没有以上配置默认就是上述配置,满足上述条件允许注册AopAutoConfiguration类中的组件
public class AopAutoConfiguration {

    //AopAutoConfiguration中两个类之一AspectJAutoProxyingConfiguration
	@Configuration(proxyBeanMethods = false)//配置类,非单实例
	@ConditionalOnClass(Advice.class)//判断整个应用中是否存在Advice这个类,Advice属于aspectj包下的Advice,由于没有导入aop场景,没有导入Aspectj的相关依赖,所以AspectJAutoProxyingConfiguration自动配置类下的所有组件都不生效
	static class AspectJAutoProxyingConfiguration {
		@Configuration(proxyBeanMethods = false)
		@EnableAspectJAutoProxy(proxyTargetClass = false)
		@ConditionalOnProperty(prefix = "spring.aop", name = "proxy-target-class", havingValue = "false",
				matchIfMissing = false)
		static class JdkDynamicAutoProxyConfiguration {

		}
		@Configuration(proxyBeanMethods = false)
		@EnableAspectJAutoProxy(proxyTargetClass = true)
		@ConditionalOnProperty(prefix = "spring.aop", name = "proxy-target-class", havingValue = "true",
				matchIfMissing = true)
		static class CglibAutoProxyConfiguration {
		}
	}

    //AopAutoConfiguration中的另一个类ClassProxyingConfiguration
	@Configuration(proxyBeanMethods = false)
	@ConditionalOnMissingClass("org.aspectj.weaver.Advice")//应用中没有Advice这个类就加载该类的所有组件,正好和上面的互斥
	@ConditionalOnProperty(prefix = "spring.aop", name = "proxy-target-class", havingValue = "true",matchIfMissing = true)//是否配置了spring.aop.proxy-target-class = true,没有配默认就是true,所以下列组件生效了
	static class ClassProxyingConfiguration {
        //以下是开启简单的AOP功能,在spring注解哪个课的aop原理有介绍
		ClassProxyingConfiguration(BeanFactory beanFactory) {
			if (beanFactory instanceof BeanDefinitionRegistry) {
				BeanDefinitionRegistry registry = (BeanDefinitionRegistry) beanFactory;
				AopConfigUtils.registerAutoProxyCreatorIfNecessary(registry);
				AopConfigUtils.forceAutoProxyCreatorToUseClassProxying(registry);
			}
		}
	}
}
1
2
3
4
5
6
7
8
9
10
11
12
13
14
15
16
17
18
19
20
21
22
23
24
25
26
27
28
29
30
31
32
33
34
35
36
37
38以CacheAutoconfiguration分析自动配置功能(经确认CacheAutoconfiguration确实在127个中)
@Configuration(proxyBeanMethods = false)
@ConditionalOnClass(CacheManager.class)//判断应用中有CacheManager缓存管理器这个类存在,该类在spring-context即spring的核心包下,是有的
@ConditionalOnBean(CacheAspectSupport.class)//判断应用中是否有CacheAspectSupport这种类型的组件,经过查询容器中相关类型组件的数量,发现是0,说明容器中没有配置缓存支持的组件,以下所有配置全部失效,相当于整个缓存的所有配置都没有生效
@ConditionalOnMissingBean(value = CacheManager.class, name = "cacheResolver")
@EnableConfigurationProperties(CacheProperties.class)
@AutoConfigureAfter({ CouchbaseDataAutoConfiguration.class, 		    HazelcastAutoConfiguration.class,HibernateJpaAutoConfiguration.class, RedisAutoConfiguration.class })
@Import({ CacheConfigurationImportSelector.class, CacheManagerEntityManagerFactoryDependsOnPostProcessor.class })
public class CacheAutoConfiguration {
	...
}
1
2
3
4
5
6
7
8
9
10以DispatcherServletAutoconfiguration分析自动配置功能(经确认确实在127个中)
web下的servlet包下有很多自动配置类,不止DispatcherServletAutoconfiguration
@AutoConfigureOrder(Ordered.HIGHEST_PRECEDENCE)//先不管,是说当前类的生效顺序,相当于指定当前类生效的优先级
@Configuration(proxyBeanMethods = false)
@ConditionalOnWebApplication(type = Type.SERVLET)//判断是否原生servlet的web应用,因为springboot2支持两种方式的web开发,一种响应式编程,一种原生servlet技术栈,当前是原生web开发
@ConditionalOnClass(DispatcherServlet.class)//当前应用有没有DispatcherServlet这个类,导了springMVC就肯定有这个类,有所以生效
@AutoConfigureAfter(ServletWebServerFactoryAutoConfiguration.class)//先不管,在括号内的自动配置类配置完后再来配置当前类,即想要配置当前类必须先配好web服务器先配好
public class DispatcherServletAutoConfiguration {

	public static final String DEFAULT_DISPATCHER_SERVLET_BEAN_NAME = "dispatcherServlet";

	public static final String DEFAULT_DISPATCHER_SERVLET_REGISTRATION_BEAN_NAME = "dispatcherServletRegistration";

    //总类配置有效才有必要继续看DispatcherServletConfiguration
	@Configuration(proxyBeanMethods = false)
	@Conditional(DefaultDispatcherServletCondition.class)//有该条件才能生效,为什么生效后面再说
	@ConditionalOnClass(ServletRegistration.class)//应用中有没有ServletRegistration类型的组件,该组件导入tomcat核心包就有,所以有效
	@EnableConfigurationProperties(WebMvcProperties.class)//开启WebMvcProperties的配置绑定功能,把WebMvcProperties类的组件放在IoC容器中,经过测试,确实有一个
	protected static class DispatcherServletConfiguration {

        @Bean(name = DEFAULT_DISPATCHER_SERVLET_BEAN_NAME)//成功注册组件dispatcherServlet
        public DispatcherServlet dispatcherServlet(WebMvcProperties webMvcProperties) {
            DispatcherServlet dispatcherServlet = new DispatcherServlet();

            //这里为配置属性的代码
            ...

            return dispatcherServlet;
        }

        @Bean
        @ConditionalOnBean(MultipartResolver.class)//容器中如果有MultipartResolver类型的组件就生效,利用自己的一段代码判断生效的,在spring注解版中会讲
        @ConditionalOnMissingBean(name = DispatcherServlet.MULTIPART_RESOLVER_BEAN_NAME)//容器中没有名为multipartResolver的组件就生效,结合起来就是组件中有MultipartResolver类型的组件但是名字不为multipartResolver
        public MultipartResolver multipartResolver(MultipartResolver resolver) {
            //spring给@Bean标注的方法传入对象参数,这个参数会自动从容器中找并自动装配
            //很多用户不知道springMVC的底层原理,没有为MultipartResolver组件取名multipartResolver,spring也可以通过这个方法找到并返回给用户相应的名字不为multipartResolver的MultipartResolver组件,防止有些用户配置的文件上传解析器不符合规范,一返回到容器中,该组件的名字默认就变成了方法名multipartResolver,就符合规范了
            return resolver;
        }

	}
	...
}
1
2
3
4
5
6
7
8
9
10
11
12
13
14
15
16
17
18
19
20
21
22
23
24
25
26
27
28
29
30
31
32
33
34
35
36
37
38
39
40HttpEncodingAutoconfiguration分析自动配置功能(经确认确实在127个中)
请求参数和响应参数不乱码的原因就在于HttpEncodingAutoConfiguration
@Configuration(proxyBeanMethods = false)
@EnableConfigurationProperties(ServerProperties.class)//开启了ServerProperties类的配置绑定
@ConditionalOnWebApplication(type = ConditionalOnWebApplication.Type.SERVLET)//判断是否为原生的servlet应用
@ConditionalOnClass(CharacterEncodingFilter.class)//判断应用中是否有CharacterEncodingFilter这个组件,只要导入springMVC的jar包就肯定有这个filter
@ConditionalOnProperty(prefix = "server.servlet.encoding", value = "enabled", matchIfMissing = true)//判断server.servlet.encoding=enabled是否成立,没有配置也默认是enabled,故以上判断均生效
public class HttpEncodingAutoConfiguration {

	private final Encoding properties;

	public HttpEncodingAutoConfiguration(ServerProperties properties) {
		this.properties = properties.getServlet().getEncoding();
	}

	@Bean//这个characterEncodingFilter是springMVC解决编码问题的过滤器,请求和响应都可以设置
	@ConditionalOnMissingBean//不写属性表示当前组件容器中没有就生效,有就不生效,这里也显示出springBoot的设计思想,SpringBoot默认在底层配置好所有的组件,但是如果用户配置了就以用户的优先
	public CharacterEncodingFilter characterEncodingFilter() {
		CharacterEncodingFilter filter = new OrderedCharacterEncodingFilter();
		filter.setEncoding(this.properties.getCharset().name());
		filter.setForceRequestEncoding(this.properties.shouldForce(Encoding.Type.REQUEST));
		filter.setForceResponseEncoding(this.properties.shouldForce(Encoding.Type.RESPONSE));
		return filter;
	}
	...
}
1
2
3
4
5
6
7
8
9
10
11
12
13
14
15
16
17
18
19
20
21
22
23
24
# 总结
- SpringBoot先加载所有的自动配置类 xxxxxAutoConfiguration
- 每个自动配置类按照条件进行生效,默认都会绑定配置文件指定的值。(xxxxProperties里面读取,xxxProperties和配置文件进行了绑定,在xxxxxAutoConfiguration中会大量看到@EnableConfigurationProperties(XxxxProperties.class)注解,而配置文件中各种配置代表什么意思官方文档中的Application Properties都可以查到,学好技术改配置比如使用redis就一句话的事)
- 生效的配置类会给容器中装配很多组件
- 只要容器中有这些组件,相当于这些功能就有了
- 只要用户有自己配置的,就以用户的优先,即定制化配置:
- 办法一:用户直接自己用@Bean替换底层的组件
- 办法二:用户查看目标组件获取的配置文件的对应值去属性配置文件自己修改即可,比如上述例子中的字符编码格式:
- 点开对应的CharacterEncodingFilter类查看@ConditionalOnProperty注解的前缀prefix="server.servlet.encoding"
- 在HttpEncodingAutoConfiguration中观察到通过this.properties.getCharset()方法获取属性值
- 即属性配置文件的key对应为server.servlet.encoding.charset=GBK
- 自动配置原理全流程:
- xxxxxAutoConfiguration加载自动配置类 ---> 根据条件注册组件 ---> 组件从xxxxProperties里面拿值 ----> xxxxProperties绑定的就是application.properties里面的值
# 最佳实践
# SpringBoot开发技巧
引入场景依赖
- 比如开发缓存、消息队列等首先看SpringBoot或者第三方有没有开发相关的场景依赖,第三方技术提供的starter和Spring官方提供的starter列表:官方文档 (opens new window)(Using Spring Boot--->Starters)
查看自动配置了哪些组件(选做,因为比较偏底层原理,关心源码比较有用)
- 自己分析,引入场景对应的自动配置一般都会生效,但是逐行分析比较麻烦
- 配置文件中添加debug=true开启自动配置报告,会在控制台输出哪些配置类生效,哪些未生效,未生效会提示Did not match:不生效的原因
- 控制台的Negative matches下展示未生效的组件列表
- 控制台的Positive matches下展示生效的组件列表
修改配置项
参考官方文档的Application Properties:官方文档 (opens new window)
自己到XxxxProperties查看绑定了配置文件的哪些配置然后自己分析更改
~示例修改spring.banner;banner是springboot启动时的图标,可以使用本地的图片替换,可以通过指定spring.banner.image.location的值,默认值是找classpath:banner.gif或者jpg或png;可以直接把图片的名字改成banner,也可以指定spring.banner.image.location=图片名.jpg;
自己添加或者替换组件
- 通过@Bean、@Component...,因为用户有的以用户优先
自定义器 XXXXXCustomizer
- 以后会讲
...
# Lombok简化开发
使用Lombok的步骤
步骤一:添加Lomback依赖
步骤二:IDEA中File->Settings->Plugins,搜索安装Lombok插件
步骤三:使用Lombok
- 通过注解@Data标注类在编译阶段生成setter/getter方法
- 通过注解@ToString标注类在编译阶段生成toString方法
- 通过注解@AllArgsConstructor标注类在编译阶段生成所有属性的有参构造器
- 通过注解@NoArgsConstructor标注类在编译阶段生成无参构造器
- 通过注解@EqualsAndHashCode标注类在编译阶段生成Equals和HashCode方法
- 通过注解@Slf4j标注类自动给类添加log属性用来记录日志以简化日志开发
SpringBoot2默认管理的lombok版本1.18.12,需要用户自己引入依赖,Lombok的作用是在程序编译阶段自动生成程序的setter/getter方法、toString方法、构造方法、Equals和HashCode方法
~Lombok依赖
<dependency>
    <groupId>org.projectlombok</groupId>
    <artifactId>lombok</artifactId>
</dependency>
1
2
3
4用法实例
@Slf4j
@Data
@ToString
@NoArgsConstructor
@AllArgsConstructor
@EqualsAndHashCode
public class User {
    private String name;
    private Integer age;
    private Pet pet;

    public User(String name, Integer age) {
    	log.info("有参构造方法执行了!");
        this.name = name;
        this.age = age;
    }
}
1
2
3
4
5
6
7
8
9
10
11
12
13
14
15
16
17
# spring-boot-devtools
使用spring-boot-devtools的步骤
步骤一:官方文档-->Using Spring Boot-->Developer Tools-->拷贝依赖信息
~dev-tools依赖
<dependencies>
    <dependency>
        <groupId>org.springframework.boot</groupId>
        <artifactId>spring-boot-devtools</artifactId>
        <optional>true</optional>
    </dependency>
</dependencies>
1
2
3
4
5
6
7
spring-boot-devtools的作用是热更新,修改代码或者修改web页面后只需要按Ctrl+F9(作用是让项目重新编译一遍,编译完毕devtools就能自动帮助用户重新加载),页面就能实时生效;不需要再重启服务器。devtools的实质是自动重启服务器
- 注意:如果没有修改任何资源,ctrl+f9不会生效
需要使用真正的热更新Reload需要使用付费的插件JRebel
# Spring Initailizr
Spring Initailizr的使用
- Spring Initailizr (opens new window)是创建Spring Boot项目初始化向导,创建工程的时候不选择maven或者空工程,直接创建Spring Initailizr工程
Spring Initailizr的作用
# 配置文件
# yaml配置文件
SpringBoot兼容两种配置文件格式,properties文件和yaml,注意yaml的后缀可以是.yaml,也可以是.yml;SpringBoot中需要起名application.yml,如果两种类型的文件都有,两个文件都会生效,且同名配置以properties文件优先加载
YAML 是 "YAML Ain't Markup Language"(YAML 不是一种标记语言)的递归缩写。在开发的这种语言时,YAML 的意思其实是:"Yet Another Markup Language"(仍是一种标记语言),标记语言表示文件是用标签写的
YAML非常适合用来做以数据为中心的配置文件,即存储配置数据而不是定义一些行为动作,spring的配置首选yaml,优点就是能够清晰的看见属性配置的从属关系
# 基本语法
配置数据的格式
- key: value;[所有冒号和value之间有空格,且key和value严格区分大小写]
使用缩进表示层级关系
[XMl通过标签表示层级关系,而YAML通过缩进表示层级关系,缩进一般不允许使用tab,只允许使用空格,但是IDEA中可以使用tab空格数不重要,但是要保证相同层级的元素要对齐,不同层级的空格数可以不一样]
- '#'表示注释
- 字符串无需加引号,默认行为与加单引号相同,可以按需加单双引号
- 单引号会转义字符串中的'转义字符',双引号不会转义字符串中的'转义字符'
# 数据类型
字面量:字面量是单个的、不可再分的值。对应的java类型有date、boolean、string、number、null
key: value1对象:表示对象有两种写法,对应的java对象有map、hash、set[set集合不是只有value吗,不应该在数组的表示方法中吗]、object
#行内写法: 注意大括号中的冒号要有空格,不然展示的是字符串
k: {k1:v1,k2:v2,k3:v3}

#或

#对象表示法,注意表示的对象如果作为数组或集合的元素可以用'-'代替'k:'
k:
  k1: v1
  k2: v2
  k3: v3
1
2
3
4
5
6
7
8
9
10数组以及以数组为基础的集合:一组按次序排列的值。对应的java对象array、list、queue
#行内写法:
k: [v1,v2,v3]

#或者

#普通写法:一个'-'代表一个元素,'-'和值之间用空格隔开
k:
 - v1
 - v2
 - v3
1
2
3
4
5
6
7
8
9
10
# yaml实例
目标类
@ConfigurationProperties(prefix = "person")
@Component
@ToString
@Data
public class Person {
    private String userName;
    private Boolean boss;
    private Date birth;
    private Integer age;
    private Pet pet;
    private String[] interests;
    private List<String> animal;
    private Map<String, Object> score;
    private Set<Double> salarys;
    private Map<String, List<Pet>> allPets;
}

@ToString
@Data
public class Pet {
    private String name;
    private Double weight;
}
1
2
3
4
5
6
7
8
9
10
11
12
13
14
15
16
17
18
19
20
21
22
23application.yml对应配置
person:
  userName: "zhangsan \n 李四"
  #单引号会将其中的特殊字符转换成普通字符,与不加单引号双引号的默认行为相同
  #双引号不会将其中的特殊字符转换成普通字符,如"zhangsan \n 李四"整体作为字符串输出到控制台,换行符仍然生效
  #即单引号会转义字符串中的'转义字符',双引号不会转义字符串中的'转义字符'
  boss: true
  birth: 2019/12/9
  age: 19
  #interests: [抽烟,喝酒,烫头]
  interests:
    - 抽烟
    - 喝酒
    - 烫头
  animal: [阿猫,阿狗]
  #score:
    #English: 80
    #Math: 90
  score: {english: 80,math: 90}
  salarys:
    - 9999.98
    - 9999.99
  pet:
    name: 阿狗
    weight: 99.99
  allPets:
    sick:
      - {name: 阿狗,weight: 99.99}
      - name: 阿猫
        weight: 88.88
      - name: 阿虫
        weight: 77.77
    health:
      - {name: 阿花,weight: 199.99}
      - {name: 阿明,weight: 199.99}
1
2
3
4
5
6
7
8
9
10
11
12
13
14
15
16
17
18
19
20
21
22
23
24
25
26
27
28
29
30
31
32
33
34
# 配置注解处理器
注解处理器的作用是针对用户自定义类添加了@ConfigurationProperties注解后在属性配置文件中提供提示功能
^注意1: 用户自己的类进行配置绑定添加了@ConfigurationProperties(prefix = "person")注解后,springBoot会提示配置注解处理器没有配置,这意味着自定义类在配置文件中没有属性名提示功能,处理办法参见官方文档的附录--->Configuration Metadata--->Configuration the Annotation Processer(拷贝spring-boot-configuration-processor依赖到pom.xml,需要重新启动一下应用把资源加载一下)
~引入Configuration the Annotation Processer依赖
<dependency>
    <groupId>org.springframework.boot</groupId>
    <artifactId>spring-boot-configuration-processor</artifactId>
    <optional>true</optional>
</dependency>
2
3
4
5
[^注意3]: 添加依赖Configuration the Annotation Processer只是为了开发方便,需要在打包插件中用exclude标签配置打包时不要将Configuration the Annotation Processer一并进行打包
~排除Configuration the Annotation Processer依赖的插件打包行为
<!-- 下面插件作用是工程打包时,不将spring-boot-configuration-processor打进包内,让其只在编码的时候有用 -->
<build>
    <plugins>
        <plugin>
            <groupId>org.springframework.boot</groupId>
            <artifactId>spring-boot-maven-plugin</artifactId>
            <configuration>
                <excludes>
                    <exclude>
                        <groupId>org.springframework.boot</groupId>
                        <artifactId>spring-boot-configuration-processor</artifactId>
                    </exclude>
                </excludes>
            </configuration>
        </plugin>
    </plugins>
</build>
2
3
4
5
6
7
8
9
10
11
12
13
14
15
16
17
# SpringBoot-Web开发
Web开发的官方文档位于Spring Boot Features--->Developing Web Application
# Web开发简介
# SpringMVC自动配置概览
SpringBoot-Web开发为SpringMVC自动配置的组件列表
[没有说全,只说了大部分内容]
Inclusion of
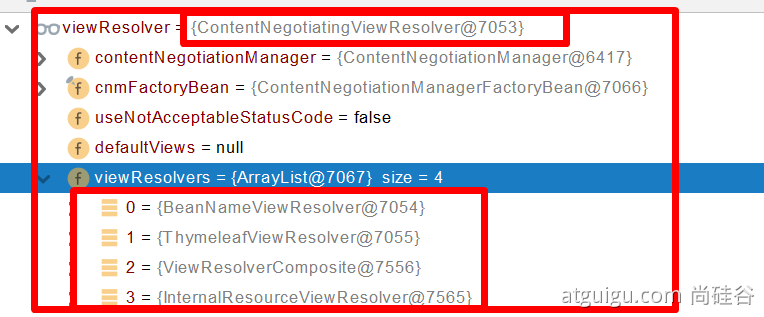
ContentNegotiatingViewResolverandBeanNameViewResolverbeans.- 内容协商视图解析器和BeanName视图解析器
Support for serving static resources, including support for WebJars (covered later in this document (opens new window))).
静态资源的访问组件(包括webjars)
Automatic registration of
Converter,GenericConverter, andFormatterbeans.- 自动注册所有的转换器和格式化器【用来类型转换的转换器】
Support for
HttpMessageConverters(covered later in this document (opens new window)).支持
HttpMessageConverters【后来配合内容协商理解原理】
Automatic registration of
MessageCodesResolver(covered later in this document (opens new window)).自动注册
MessageCodesResolver【国际化用,一般用不到,因为一般针对国内外用户做两套网站,因为语言和文化的区别】
Static
index.htmlsupport.静态index.html 页支持
【将欢迎页放到指定位置会自动支持欢迎页机制】
Custom
Faviconsupport (covered later in this document (opens new window)).- 自定义
Favicon
- 自定义
Automatic use of a
ConfigurableWebBindingInitializerbean (covered later in this document (opens new window)).自动使用
ConfigurableWebBindingInitializer【DataBinder负责将请求数据绑定到JavaBean上,如WebDataBinder】
没有喜欢的也可以自定义数据绑定器
SpringBoot自定义组件的三种方案
If you want to keep those Spring Boot MVC customizations and make more MVC customizations (opens new window) (interceptors, formatters, view controllers, and other features), you can add your own
@Configurationclass of typeWebMvcConfigurerbut without@EnableWebMvc.不用@EnableWebMvc注解。使用
@Configuration+WebMvcConfigurer自定义规则If you want to provide custom instances of
RequestMappingHandlerMapping,RequestMappingHandlerAdapter, orExceptionHandlerExceptionResolver, and still keep the Spring Boot MVC customizations, you can declare a bean of typeWebMvcRegistrationsand use it to provide custom instances of those components.声明
WebMvcRegistrations改变默认底层组件If you want to take complete control of Spring MVC, you can add your own
@Configurationannotated with@EnableWebMvc, or alternatively add your own@Configuration-annotatedDelegatingWebMvcConfigurationas described in the Javadoc of@EnableWebMvc.使用
@EnableWebMvc+@Configuration+DelegatingWebMvcConfiguration 全面接管SpringMVC
# 静态资源规则与定制化
静态资源指图片、视频、JS文件、CSS文件等等
# 静态资源访问
静态资源目录
只要以下目录放在类路径下[resources目录下]都可以作为静态资源目录
【
/staticor/publicor/resourcesor/META-INF/resources】
静态资源的请求路径
当前项目根路径即/ + 带后缀的静态资源名 【如:http://localhost:8080/1.png】
静态资源的访问前缀
静态资源的请求路径默认无前缀
可以通过spring.mvc.static-path-pattern属性配置静态资源访问前缀,设置前缀后的请求路径为:
当前项目根路径即/ +spring.mvc.static-path-pattern+ 带后缀的静态资源名【如:http://localhost:8080/res/1.png】
spring:
  mvc:
    static-path-pattern: /res/**
1
2
3
改变默认的静态资源路径
通过spring.web.resources.static-locations属性指定新的静态资源目录,指定的新目录可以是一个数组,即可以配置多个静态目录,此时默认静态资源目录除
/META-INF/resources外的确全部失效spring: web: resources: static-locations: [classpath:/app1]1
2
3
4
WebJars
作用是把一些前端资源文件以jar包的方式作为maven依赖导入应用
把常见的一些Bootstrap、JQuery、CSS等资源文件弄成了jar包,实际jar包解压之后里面还是原版资源文件,jar包可以作为依赖导入maven
~导入jquery的依赖
<dependency>
    <groupId>org.webjars</groupId>
    <artifactId>jquery</artifactId>
    <version>3.5.1</version>
</dependency>
1
2
3
4
5WebJars官网:https://www.webjars.org/
访问地址:http://localhost:8080/webjars/jquery/3.5.1/dist/jquery.js (opens new window) 【项目根路径'/'后面地址webjars/jquery/3.5.1/dist/jquery.js是按照对应依赖jar包里面的类路径写的】
# 欢迎页支持
SpringBoot支持两种欢迎页设置方式
静态资源目录下的index.html
当设置了访问前缀,所有的欢迎页都会失效;未设置访问前缀,所有静态资源目录下的欢迎页均有效
spring:
  #mvc:
  #  static-path-pattern: /res/**  #这个会导致所有静态资源目录下index.html的欢迎页功能失效
  web:
    resources:
      static-locations: [classpath:/app1]
1
2
3
4
5
6
使用Controller处理"/"跳转index.html
- 这个暂时还没说
# 自定义Favicon
Favicon的作用是设置网页标签上的小图标,访问该应用的任何请求都会展示该小图标,小图标是浏览器显示在Title前面的图标
设置方式
将目标小图标命名成favicon.ico放在静态资源目录下即可
【注意设置了访问前缀会导致Favicon功能失效,添加了静态资源应该clear和package一下,避免资源没有打包到target】
spring:
  #mvc:
  #  static-path-pattern: /res/**  #这个设置会导致Favicon功能失效
1
2
3
# 静态资源配置原理
SpringBoot启动默认加载自动配置类xxxAutoConfiguration类,相关的xxxAutoConfiguration有:
- DispatcherServlertConfiguration【配置DispatcherServlet规则的】
- HttpEncodingAutoConfiguration【配置编解码的】
- MultipartAutoConfiguration【配置文件上传的】
- ServletWebServerAutoConfiguration【配置服务器的】
- WebMvcAutoConfiguration【这个是SpringMVC的自动配置,SpringMVC的功能大多集中在这个类中】
WebMvcAutoConfiguration源码解析
重点一:配置类组件WebMvcAutoConfigurationAdapter中进行配置绑定的两个类
- WebMvcProperties:绑定spring.mvc前缀的配置属性
- ResourceProperties:绑定spring.spring.resources前缀的配置属性
重点二:WebMvcAutoConfiguration配置类给容器中配置的组件
ResourceProperties resourceProperties:获取和spring.resources配置绑定所有值的对象
WebMvcProperties mvcProperties:获取和spring.mvc配置绑定所有值的对象
ListableBeanFactory beanFactory:Spring的beanFactory(bean工厂),即IoC容器 【以下ObjectProvider
<Xxx>表示找到容器中的所有Xxx组件】ObjectProvider<HttpMessageConverters>:找到所有的HttpMessageConvertersObjectProvider<ResourceHandlerRegistrationCustomizer>:找到资源处理器的自定义器ObjectProvider<DispatcherServletPath>:找DispatcherServlet能处理的路径ObjectProvider<ServletRegistrationBean<?>>:找到所有给应用注册Servlet、Filter、Listener的组件
重点三:静态资源的默认处理规则
WebJars对应静态资源的相关规则
- 如果有/webjars/**请求,去类路径下找/META-INF/resources/webjars/,且相应静态资源应用缓存策略,缓存时间由spring.resources.cache.period配置属性控制
静态资源路径的相关配置规则
通过spring.mvc.static-path-pattern属性获取静态资源目录是否有前缀,没配置也有默认值staticPathPattern=/**,即匹配所有请求,通过this.resourceProperties.getStaticLocations()去找静态资源,staticLocations是一个字符串数组,有四个字符串默认值:被定义成常量的字符串数组{ "classpath:/META-INF/resources/","classpath:/resources/", "classpath:/static/", "classpath:/public/" },即静态资源默认的四个位置,且这里的静态资源也有缓存策略
重点四:欢迎页处理规则
- 通过spring.mvc.static-path-pattern属性(指定静态资源请求前缀,默认是没有前置,即/**)创建welcomePageHandlerMapping
- 如果欢迎页存在且静态资源请求路径没有前缀,则重定向到静态资源目录的index.html,所以有自定义静态资源请求前缀欢迎页就找不到了,在创建对象welcomePageHandlerMapping的第一个if中写死了
- 否则如果欢迎页存在,但是staticPathPattern不为/**,直接设置viewName为index转到Controller看是否存在控制器方法能处理"/index"请求
【WebMvcAutoConfiguration的源码逐行解析】
@Configuration(proxyBeanMethods = false)
@ConditionalOnWebApplication(type = Type.SERVLET)//判断是否原生servlet的web应用,是就生效
@ConditionalOnClass({ Servlet.class, DispatcherServlet.class, WebMvcConfigurer.class })//应用中有Servlet类、DispatcherServlet类、WebMvcConfigurer类就生效,这些是导了spring-webmvc就一定会有的
@ConditionalOnMissingBean(WebMvcConfigurationSupport.class)//容器中没有WebMvcConfigurationSupport这个组件就生效,只要有这个组件下面这个类的所有配置都不生效,在这儿规定了后面介绍的全面接管SpringMVC,全面的定制SpringMVC,只要用户配置了,自动配置SpringMVC就不生效
@AutoConfigureOrder(Ordered.HIGHEST_PRECEDENCE + 10)
@AutoConfigureAfter({ DispatcherServletAutoConfiguration.class, TaskExecutionAutoConfiguration.class,
		ValidationAutoConfiguration.class })
public class WebMvcAutoConfiguration {
	...

	@Bean//OrderedHiddenHttpMethodFilter是HiddenHttpMethodFilter的子类,SpringMVC兼容Rest风格的过滤器组件,接收前端发送的put、delete请求,SpringBoot默认就配置了HiddenHttpMethodFilter组件
	@ConditionalOnMissingBean(HiddenHttpMethodFilter.class)
	@ConditionalOnProperty(prefix = "spring.mvc.hiddenmethod.filter", name = "enabled", matchIfMissing = false)//如果spring.mvc.hiddenmethod.filter.name属性为true就开启HiddenHttpMethodFilter组件的功能,默认值为false,所以在表单发送请求的前提下还要在全局配置文件中配置spring.mvc.hiddenmethod.filter.name=true
	public OrderedHiddenHttpMethodFilter hiddenHttpMethodFilter() {
		return new OrderedHiddenHttpMethodFilter();
	}

	@Bean//OrderedFormContentFilter表单内容的过滤器
	@ConditionalOnMissingBean(FormContentFilter.class)
	@ConditionalOnProperty(prefix = "spring.mvc.formcontent.filter", name = "enabled", matchIfMissing = true)
	public OrderedFormContentFilter formContentFilter() {
		return new OrderedFormContentFilter();
	}

	...


    //重点一
	@Configuration(proxyBeanMethods = false)//配置类WebMvcAutoConfigurationAdapter是一个WebMvcConfigurer组件
	@Import(EnableWebMvcConfiguration.class)
	@EnableConfigurationProperties({ WebMvcProperties.class, ResourceProperties.class })//这行代码表示配置类与WebMvcProperties、ResourceProperties直接进行绑定,简介与配置文件中的配置数据进行绑定
    //WebMvcProperties:该类上@Configurationproperties(prefix="spring.mvc")表明其跟配置文件的spring.mvc前缀存在配置绑定关系
    //ResourceProperties:该类上@Configurationproperties(prefix="spring.resources")表明其跟配置文件的spring.resources前缀存在配置绑定关系
	@Order(0)
	public static class WebMvcAutoConfigurationAdapter implements WebMvcConfigurer {

		...属性


        //重点二
        //这个配置类只有一个有参构造器,仅有一个有参构造器的所有参数都会从IoC容器中确定,以下是从容器中确定的参数
        //ResourceProperties resourceProperties:获取和spring.resources配置绑定所有值的对象
        //WebMvcProperties mvcProperties:获取和spring.mvc配置绑定所有值的对象
        //ListableBeanFactory beanFactory:Spring的beanFactory(bean工厂),即IoC容器
        //以下ObjectProvider<Xxx>表示找到容器中的所有Xxx组件
        //ObjectProvider<HttpMessageConverters>:找到所有的HttpMessageConverters
        //ObjectProvider<ResourceHandlerRegistrationCustomizer>:找到资源处理器的自定义器
        //ObjectProvider<DispatcherServletPath>:找DispatcherServlet能处理的路径
        //ObjectProvider<ServletRegistrationBean<?>>:找到所有给应用注册Servlet、Filter、Listener的组件
		public WebMvcAutoConfigurationAdapter(ResourceProperties resourceProperties, WebMvcProperties mvcProperties,
				ListableBeanFactory beanFactory, ObjectProvider<HttpMessageConverters> messageConvertersProvider,
				ObjectProvider<ResourceHandlerRegistrationCustomizer> resourceHandlerRegistrationCustomizerProvider,
				ObjectProvider<DispatcherServletPath> dispatcherServletPath,
				ObjectProvider<ServletRegistrationBean<?>> servletRegistrations) {
			...给属性赋值
		}

		...无关代码

		@Bean//配置视图资源解析器InternalResourceViewResolver,配置条件容器中没有就配置,用户配置了就不自动配置了
		@ConditionalOnMissingBean
		public InternalResourceViewResolver defaultViewResolver() {
			InternalResourceViewResolver resolver = new InternalResourceViewResolver();
			resolver.setPrefix(this.mvcProperties.getView().getPrefix());
			resolver.setSuffix(this.mvcProperties.getView().getSuffix());
			return resolver;
		}

		...无关代码

		@Bean//添加国际化支持组件localeResolver()
		@ConditionalOnMissingBean
		@ConditionalOnProperty(prefix = "spring.mvc", name = "locale")
		public LocaleResolver localeResolver() {
			if (this.mvcProperties.getLocaleResolver() == WebMvcProperties.LocaleResolver.FIXED) {
				return new FixedLocaleResolver(this.mvcProperties.getLocale());
			}
			AcceptHeaderLocaleResolver localeResolver = new AcceptHeaderLocaleResolver();
			localeResolver.setDefaultLocale(this.mvcProperties.getLocale());
			return localeResolver;
		}

		...无关代码

		@Override//格式化器,一般用来格式化货币日期
		public void addFormatters(FormatterRegistry registry) {
			ApplicationConversionService.addBeans(registry, this.beanFactory);
		}


        //重点三(*****核心在此处)
		@Override//添加资源处理器,所有的资源处理默认规则都在这
		public void addResourceHandlers(ResourceHandlerRegistry registry) {
			if (!this.resourceProperties.isAddMappings()) {//ResourceProperties中的addMapping属性,对应配置文件中的spring.resources.add-mapping属性,可选值true和false,默认是true。如果配置成false,就会执行日志输出,下面所有的配置都不生效,下面的配置是:静态资源的规则配置,可以通过设置spring.resources.add-mapping为false禁用所有静态资源的路径映射,所有的静态资源都无法访问
				logger.debug("Default resource handling disabled");//日志信息是静态资源已经被禁用掉了
				return;
			}
			Duration cachePeriod = this.resourceProperties.getCache().getPeriod();//通过spring.resources.cache.period获取缓存策略,cache.period是缓存资源刷新时间,从ResourceProperties中可以看出以秒为单位,意为所有的静态资源浏览器默认可以存多少秒
			CacheControl cacheControl = this.resourceProperties.getCache().getCachecontrol().toHttpCacheControl();

            //WebJars的相关规则
            //开始注册webJars下的所有请求,如果有/webjars/**请求,去类路径下找/META-INF/resources/webjars/,且相应静态资源应用缓存策略,缓存时间由spring.resources.cache.period配置属性控制
			if (!registry.hasMappingForPattern("/webjars/**")) {
           customizeResourceHandlerRegistration(registry.addResourceHandler("/webjars/**")
						.addResourceLocations("classpath:/META-INF/resources/webjars/")
				.setCachePeriod(getSeconds(cachePeriod)).setCacheControl(cacheControl));
			//所有webjars请求都去类路径下找/META-INF/resources/webjars/,直接从External Libraries下找吗?在target下的/META-INF/resources/下没看见对应资源,但是还是能够访问,且该静态资源能够在缓存中按照缓存策略设置的时间缓存一段时间,在响应头的Cache-Control能够看到缓存的最大时间
            }

            //静态资源路径的相关配置规则
			String staticPathPattern = this.mvcProperties.getStaticPathPattern();//通过spring.mvc.static-path-pattern属性获取静态资源目录是否有前缀,没配置也有默认值staticPathPattern=/**,即匹配所有请求
			if (!registry.hasMappingForPattern(staticPathPattern)) {
				customizeResourceHandlerRegistration(registry.addResourceHandler(staticPathPattern)
						.addResourceLocations(getResourceLocations(this.resourceProperties.getStaticLocations()))
						.setCachePeriod(getSeconds(cachePeriod)).setCacheControl(cacheControl));
            //所有请求都去指定的位置this.resourceProperties.getStaticLocations()去找静态资源,staticLocations是一个字符串数组,有四个字符串默认值:被定义成常量的字符串数组{ "classpath:/META-INF/resources/","classpath:/resources/", "classpath:/static/", "classpath:/public/" },即静态资源默认的四个位置,且这里的静态资源也有缓存策略
			}
		}
		...无关代码
	}

	@Configuration(proxyBeanMethods = false)//配置类
	public static class EnableWebMvcConfiguration extends DelegatingWebMvcConfiguration implements ResourceLoaderAware {

        ...无关代码


        //重点四
        @Bean//欢迎页的配置规则
        //HandleMapping:处理器映射,是SpringMVC中的一个核心组件,里面保存了每一个Handler能处理哪些请求,找到了就利用反射机制调用对应的方法,WelcomePageHandlerMapping中就存放了谁来处理欢迎页的请求映射规则
		public WelcomePageHandlerMapping welcomePageHandlerMapping(ApplicationContext applicationContext,
				FormattingConversionService mvcConversionService, ResourceUrlProvider mvcResourceUrlProvider) {
            //通过spring.mvc.static-path-pattern属性(指定静态资源请求前缀,默认是没有前置,即/**)创建welcomePageHandlerMapping,重点是创建welcomePageHandlerMapping对象时配置了静态资源请求前缀无法访问欢迎页面的问题
			WelcomePageHandlerMapping welcomePageHandlerMapping = new WelcomePageHandlerMapping(
					new TemplateAvailabilityProviders(applicationContext), applicationContext, getWelcomePage(),
					this.mvcProperties.getStaticPathPattern());
	welcomePageHandlerMapping.setInterceptors(getInterceptors(mvcConversionService, mvcResourceUrlProvider));
			welcomePageHandlerMapping.setCorsConfigurations(getCorsConfigurations());
			return welcomePageHandlerMapping;
		}
		...无关代码
	}
    //定义接口
	interface ResourceHandlerRegistrationCustomizer {
		void customize(ResourceHandlerRegistration registration);
	}
    //定义类
	static class ResourceChainResourceHandlerRegistrationCustomizer implements ResourceHandlerRegistrationCustomizer {
		...无关代码
	}
    //定义类
	static class OptionalPathExtensionContentNegotiationStrategy implements ContentNegotiationStrategy {
		...无关代码
}
1
2
3
4
5
6
7
8
9
10
11
12
13
14
15
16
17
18
19
20
21
22
23
24
25
26
27
28
29
30
31
32
33
34
35
36
37
38
39
40
41
42
43
44
45
46
47
48
49
50
51
52
53
54
55
56
57
58
59
60
61
62
63
64
65
66
67
68
69
70
71
72
73
74
75
76
77
78
79
80
81
82
83
84
85
86
87
88
89
90
91
92
93
94
95
96
97
98
99
100
101
102
103
104
105
106
107
108
109
110
111
112
113
114
115
116
117
118
119
120
121
122
123
124
125
126
127
128
129
130
131
132
133
134
135
136
137
138
139
140
141
142
143
144
145
146
147
148
149
150
151
152
153
154【WelcomePageHandlerMapping欢迎页处理映射器构造方法的代码逐行解析】
WelcomePageHandlerMapping(TemplateAvailabilityProviders templateAvailabilityProviders,
			ApplicationContext applicationContext, Optional<Resource> welcomePage, String staticPathPattern) {
    //如果欢迎页存在且静态资源请求路径没有前缀,则重定向到静态资源目录的index.html,所以有自定义静态资源请求前缀欢迎页就找不到了,在第一个if中写死了
    if (welcomePage.isPresent() && "/**".equals(staticPathPattern)) {
        //所以要使用欢迎页功能不能添加静态资源请求前缀,staticPathPattern必须是/**
        logger.info("Adding welcome page: " + welcomePage.get());
        setRootViewName("forward:index.html");
    }
    else if (welcomeTemplateExists(templateAvailabilityProviders, applicationContext)) {
        logger.info("Adding welcome page template: index");
        //否则如果欢迎页存在,但是staticPathPattern不为/**,直接设置viewName为index转到Controller看谁能不能处理"/index"请求
        setRootViewName("index");
    }
}
1
2
3
4
5
6
7
8
9
10
11
12
13
14
# 请求参数处理
# Rest风格请求映射原理
@RequestMapping的派生注解
- @GetMapping【相当于**@RequestMapping(value = "/user",method = RequestMethod.GET)**】
- @PostMapping【~@RequestMapping(value = "/user",method = RequestMethod.POST)】
- @PutMapping【~@RequestMapping(value = "/user",method = RequestMethod.PUT)】
- @DeleteMapping【~@RequestMapping(value = "/user",method = RequestMethod.DELETE)】
Rest风格支持【使用同一请求路径不同的HTTP请求方式动词来区分对资源的操作】
- 以前:[***/getUser 获取用户***],[***/deleteUser 删除用户***],[***/editUser 修改用户***],[***/saveUser保存用户***]
- 现在:/user [GET-获取用户],[DELETE-删除用户],[PUT-修改用户],[POST-保存用户]
- Rest风格支持核心的核心Filter组件:HiddenHttpMethodFilter
- SpringBoot默认就配置了HiddenHttpMethodFilter组件,其实是其子类OrderedHiddenHttpMethodFilter
HiddenHttpMethodFilter组件的用法
步骤一:通过前端页面form表单发送post请求,设置隐藏域类型的_method参数为put、delete发送PUT或DELETE请求,GET请求和POST请求正常发,实现前端Rest风格请求的发送准备
<form action="/user" method="get">
    <input value="REST-GET提交" type="submit" />
</form>

<form action="/user" method="post">
    <input value="REST-POST提交" type="submit" />
</form>

<form action="/user" method="post">
    <input name="_method" type="hidden" value="DELETE"/>
    <input value="REST-DELETE 提交" type="submit"/>
</form>

<form action="/user" method="post">
    <input name="_method" type="hidden" value="PUT" />
    <input value="REST-PUT提交"type="submit" />
</form>
1
2
3
4
5
6
7
8
9
10
11
12
13
14
15
16
17步骤二:通过在全局配置文件中配置spring.mvc.hiddenmethod.filter.name=true开启页面表单的隐藏请求方式过滤器组件的功能
spring:
  mvc:
    hiddenmethod:
      filter:
        enabled: true   #开启页面表单的Rest功能
1
2
3
4
5步骤三:编写控制器方法处理Rest风格请求映射
@GetMapping("/user")
//@RequestMapping(value = "/user",method = RequestMethod.GET)
public String getUser(){
    return "GET-张三";
}

@PostMapping("/user")
//@RequestMapping(value = "/user",method = RequestMethod.POST)
public String saveUser(){
    return "POST-张三";
}

@PutMapping("/user")
//@RequestMapping(value = "/user",method = RequestMethod.PUT)
public String putUser(){
    return "PUT-张三";
}

@DeleteMapping("/user")
//@RequestMapping(value = "/user",method = RequestMethod.DELETE)
public String deleteUser(){
    return "DELETE-张三";
}
1
2
3
4
5
6
7
8
9
10
11
12
13
14
15
16
17
18
19
20
21
22
23
form表单提交使用REST风格的原理
- 发送put和delete请求表单以post方式提交并添加请求参数'_method',即开启页面表单的Rest功能
- 请求被服务器捕获并被HiddenHttpMethodFilter拦截
- 请求方式是否为post且请求没有错误和异常
- 获取表单请求参数_method的属性值
- 如果属性值不为空串或者null则全部转换为大写字母
- 判断_method的属性值是否为PUT、DELETE、PATCH三者之一
- 是就创建原生请求对象的包装类,将_method的属性值赋值给包装类自己的method属性中,通过重写getMethod方法将获取请求方式的值指向_method的属性值
- 获取表单请求参数_method的属性值
- 如果请求方式不为post直接放行原生请求,如果是post就放行请求的包装类
- 请求方式是否为post且请求没有错误和异常
- 相关源码
【配置spring.mvc.hiddenmethod.filter.name=true的源码】
public class WebMvcAutoConfiguration {
    ...
	@Bean//OrderedHiddenHttpMethodFilter是HiddenHttpMethodFilter的子类,SpringMVC兼容Rest风格的过滤器组件,接收前端发送的put、delete请求,SpringBoot默认就配置了HiddenHttpMethodFilter组件
	@ConditionalOnMissingBean(HiddenHttpMethodFilter.class)
	@ConditionalOnProperty(prefix = "spring.mvc.hiddenmethod.filter", name = "enabled", matchIfMissing = false)//如果spring.mvc.hiddenmethod.filter.name属性为true就开启HiddenHttpMethodFilter组件的功能,默认值为false,所以在表单发送请求的前提下还要在全局配置文件中配置spring.mvc.hiddenmethod.filter.name=true
	public OrderedHiddenHttpMethodFilter hiddenHttpMethodFilter() {
		return new OrderedHiddenHttpMethodFilter();
	}
    ...
}
1
2
3
4
5
6
7
8
9
10【使用表单post请求并添加_method属性的源码】
public class HiddenHttpMethodFilter extends OncePerRequestFilter {

	private static final List<String> ALLOWED_METHODS =
			Collections.unmodifiableList(Arrays.asList(HttpMethod.PUT.name(),
					HttpMethod.DELETE.name(), HttpMethod.PATCH.name()));

	public static final String DEFAULT_METHOD_PARAM = "_method";

	private String methodParam = DEFAULT_METHOD_PARAM;

	public void setMethodParam(String methodParam) {
		Assert.hasText(methodParam, "'methodParam' must not be empty");
		this.methodParam = methodParam;
	}

	@Override//执行Rest风格的请求拦截代码
	protected void doFilterInternal(HttpServletRequest request, HttpServletResponse response, FilterChain filterChain)
			throws ServletException, IOException {
		HttpServletRequest requestToUse = request;//原生请求的引用赋值给requestToUse
		if ("POST".equals(request.getMethod()) && request.getAttribute(WebUtils.ERROR_EXCEPTION_ATTRIBUTE) == null) {//判断原生请求的请求方式是否为post且请求没有错误
			String paramValue = request.getParameter(this.methodParam);//获取表单请求参数_method的属性值
			if (StringUtils.hasLength(paramValue)) {//判断_method的属性值是否为空串或者null
				String method = paramValue.toUpperCase(Locale.ENGLISH);//_method的属性值全部转成大写
				if (ALLOWED_METHODS.contains(method)) {//判断允许的请求方式是否包含_method的大写属性值,允许的请求方式ALLOWED_METHODS是一个字符串类型的List集合,内容是三个枚举PUT、DELETE、PATCH的名字
					requestToUse = new HttpMethodRequestWrapper(request, method);//如果包含则创建一个Http请求方式的请求装饰器并赋值给requestToUse,HttpMethodRequestWrapper继承于HttpServletRequestWrapper,HttpServletRequestWrapper实现了HttpServletRequest接口,所以HttpMethodRequestWrapper还是一个原生的request请求,HttpMethodRequestWrapper把新的请求方式通过构造器传参保存在自己的method属性中并重写了getMethod方法,返回装饰器自己的method属性值而非继承来的method属性值
				}
			}
		}
        //过滤器放行的是原生request的装饰器对象HttpMethodRequestWrapper
		filterChain.doFilter(requestToUse, response);
	}

	private static class HttpMethodRequestWrapper extends HttpServletRequestWrapper {

		private final String method;

		public HttpMethodRequestWrapper(HttpServletRequest request, String method) {
			super(request);
			this.method = method;
		}

		@Override
		public String getMethod() {
			return this.method;
		}
	}
}
1
2
3
4
5
6
7
8
9
10
11
12
13
14
15
16
17
18
19
20
21
22
23
24
25
26
27
28
29
30
31
32
33
34
35
36
37
38
39
40
41
42
43
44
45
46
47可以使用客户端工具或者Ajax直接发送put或者delete请求
在支持发送真实put、delete请求的场景下就没有必要使用包装类HttpMethodRequestWrapper了,此时请求方式会直接为put或者delete,直接把request赋值给requestToUse,然后立即放行requestToUse
PostMan可直接发送put或者delete请求
安卓直接发put或者delete请求
Ajax直接发put或者delete请求
扩展点:如何把_method这个名字换成用户自定义的
要点
- HiddenHttpMethodFilter组件如果有SpringBoot就不再自动装配,用户可以自己配置
- HiddenHttpMethodFilter中的setMethodParam方法可以设置methodParam用自定义参数名代替_method
public class WebMvcAutoConfiguration {
    ...
    @Bean//hiddenHttpMethodFilter条件装配,如果自己配置了HiddenHttpMethodFilter并设置了相应的属性,SpringBoot就不会配置HiddenHttpMethodFilter组件了,利用这点用户可以配置自定义HiddenHttpMethodFilter组件,通过setMethodParam修改methodParam为自定义参数名实现自定义_method这个参数名
    @ConditionalOnMissingBean(HiddenHttpMethodFilter.class)
    @ConditionalOnProperty(prefix = "spring.mvc.hiddenmethod.filter", name = "enabled", matchIfMissing = false)
    public OrderedHiddenHttpMethodFilter hiddenHttpMethodFilter() {
        return new OrderedHiddenHttpMethodFilter();
    }
    ...
}
//HiddenHttpMethodFilter中的setMethodParam方法可以设置methodParam用自定义参数名代替_method
public class HiddenHttpMethodFilter extends OncePerRequestFilter {
	...
	private String methodParam = DEFAULT_METHOD_PARAM;

	public void setMethodParam(String methodParam) {
		Assert.hasText(methodParam, "'methodParam' must not be empty");
		this.methodParam = methodParam;
	}
	...
}
1
2
3
4
5
6
7
8
9
10
11
12
13
14
15
16
17
18
19
20
21
# 请求映射原理
SpringBoot底层处理请求还是使用SpringMVC,DispatcherServlet是所有请求处理的开始,DispatcherServlet又名前端控制器,分发控制器
DispatcherServlet继承于FrameworkServlet,FrameworkServlet继承于HttpServletBean,HttpServletBean继承于HttpServlet
HttpServlet中没有重写doXxx方法,这一类方法的重写在子类FrameworkServlet中完成,而且统一都去调用自己的processRequest方法,processRequest核心方法是doService方法,执行doService方法前后分别是初始化过程【调用setter/getter方法】和日志处理过程,FrameworkServlet中的doService方法是一个抽象方法,在DispatcherServlet子类中进行了实现
DispatcherServlet中doService方法的核心方法是doDispatch方法【doDispatch意为给请求做派发】,也是请求处理的核心逻辑方法,每一个请求进来都会调用doDispatch方法
# doDispatch()源码解析
doDispatch方法源码解析
protected void doDispatch(HttpServletRequest request, HttpServletResponse response) throws Exception {
    HttpServletRequest processedRequest = request;//[/user GET方式请求]请求重新赋值,此时请求的路径是/user
    HandlerExecutionChain mappedHandler = null;//Handler执行链,执行链中有handler属性,这个应该才是真正的handler
    boolean multipartRequestParsed = false;//文件上传请求解析默认是false

    WebAsyncManager asyncManager = WebAsyncUtils.getAsyncManager(request);//请求是否有异步,如果有异步使用异步管理器

    try {
        ModelAndView mv = null;//视图空初始化
        Exception dispatchException = null;//异常空初始化

        try {
            processedRequest = checkMultipart(request);//检查是否文件上传请求,如果是文件上传请求把原生请求request赋值给processedRequest,即如果是文件上传请求,就把原生请求包装成文件上传请求processedRequest;checkMultipart方法中使用的是MultipartResolver的isMultipart方法对是否文件上传请求进行判断的,判断依据是请求的内容类型是否叫“multipart/”,所有这里决定了form表单需要写enctype="multipart/form-data";如果是文件上传请求使用MultipartResolver文件上传解析器的resolverMultipart(request)方法把文件上传请求进行解析包装成StandardMultipartHttpServletRequest这个类型并返回
            multipartRequestParsed = (processedRequest != request);//如果是文件上传请求根据检查结果重新设定文件上传请求解析

            //重点一:真正获取处理器执行链
            // Determine handler for the current request.
            mappedHandler = getHandler(processedRequest);//决定当前请求的处理器,handler就是用户自己写的处理器方法,mappedHandler最终显示的是HelloController#getUser()方法,即自定义控制器HelloController的getUser()方法
            if (mappedHandler == null) {
                noHandlerFound(processedRequest, response);
                return;
            }

            //重点二:获取处理器适配器,通过这个反射工具调用处理器方法
            // Determine handler adapter for the current request.
            HandlerAdapter ha = getHandlerAdapter(mappedHandler.getHandler());//为确定的Handler找到合适的适配器,mappedHandler.getHandler()的运算结果是对应请求的处理器方法,使用注解@RequestMapping的控制器方法对应的类型是HandlerMethod;控制器方法的调用是通过反射机制实现的,SpringMVC将使用反射机制调用控制器方法的过程封装进了HandlerAdapter中,相当于把HandlerAdapter作为一个大的反射工具,适配器HandlerAdapter通过handle()方法调用目标控制方法; HandlerAdapter是一个接口,该接口中的supports(handler)方法告诉SpringMVC该HandlerAdapter支持处理哪种Handler,handler方法可以处理被支持的handler的目标方法调用,HandlerAdapter也可以自定义,需要指定支持的handler以及具体的handler方法

            // Process last-modified header, if supported by the handler.
            String method = request.getMethod();
            boolean isGet = "GET".equals(method);//获取当前请求的请求方式并判断是否get方法
            if (isGet || "HEAD".equals(method)) {//HEAD请求的响应可被缓存,也就是说,响应中的信息可能用来更新以前缓存的实体,如果有浏览器缓存需要更新可以进行缓存处理
                long lastModified = ha.getLastModified(request, mappedHandler.getHandler());
                if (new ServletWebRequest(request, response).checkNotModified(lastModified) && isGet) {
                    return;
                }
            }

            if (!mappedHandler.applyPreHandle(processedRequest, response)) {
                return;
            }//执行拦截器的preHandle方法

            //重点三:反射调用处理器方法
            // Actually invoke the handler.通过处理器适配器真正执行handler目标方法,传入请求、响应对象,以及匹配的handler;在handle()方法中调用了handleInternal()方法
            mv = ha.handle(processedRequest, response, mappedHandler.getHandler());

            if (asyncManager.isConcurrentHandlingStarted()) {
                return;
            }

            applyDefaultViewName(processedRequest, mv);//如果控制器方法没有返回视图名,applyDefaultViewName方法,如果ModelAndView不为空但是view为空,会添加一个默认的视图地址,该默认视图地址还是会用请求地址作为页面地址,细节没说,暂时不管
            mappedHandler.applyPostHandle(processedRequest, response, mv);//这里面就是单纯执行相关拦截器的postHandle方法,没有其他任何操作
        }
        catch (Exception ex) {
            dispatchException = ex;
        }
        catch (Throwable err) {
            // As of 4.3, we're processing Errors thrown from handler methods as well,
            // making them available for @ExceptionHandler methods and other scenarios.
            dispatchException = new NestedServletException("Handler dispatch failed", err);
        }
        //重点四:处理派发最终的结果,这一步执行前,整个页面还没有跳转过去
        processDispatchResult(processedRequest, response, mappedHandler, mv, dispatchException);
    }
    catch (Exception ex) {
        triggerAfterCompletion(processedRequest, response, mappedHandler, ex);
    }
    catch (Throwable err) {
        triggerAfterCompletion(processedRequest, response, mappedHandler,
                new NestedServletException("Handler processing failed", err));
    }
    finally {
        if (asyncManager.isConcurrentHandlingStarted()) {
            // Instead of postHandle and afterCompletion
            if (mappedHandler != null) {
                mappedHandler.applyAfterConcurrentHandlingStarted(processedRequest, response);
            }
        }
        else {
            // Clean up any resources used by a multipart request.
            if (multipartRequestParsed) {
                cleanupMultipart(processedRequest);
            }
        }
    }
}
2
3
4
5
6
7
8
9
10
11
12
13
14
15
16
17
18
19
20
21
22
23
24
25
26
27
28
29
30
31
32
33
34
35
36
37
38
39
40
41
42
43
44
45
46
47
48
49
50
51
52
53
54
55
56
57
58
59
60
61
62
63
64
65
66
67
68
69
70
71
72
73
74
75
76
77
78
79
80
81
82
83
84
85
注意以下方法都是从doDispatcher方法中进入延伸
# getHandler()
重点1:getHandler(processedRequest)源码解析
- mappedHandler = getHandler(processedRequest)的底层原理
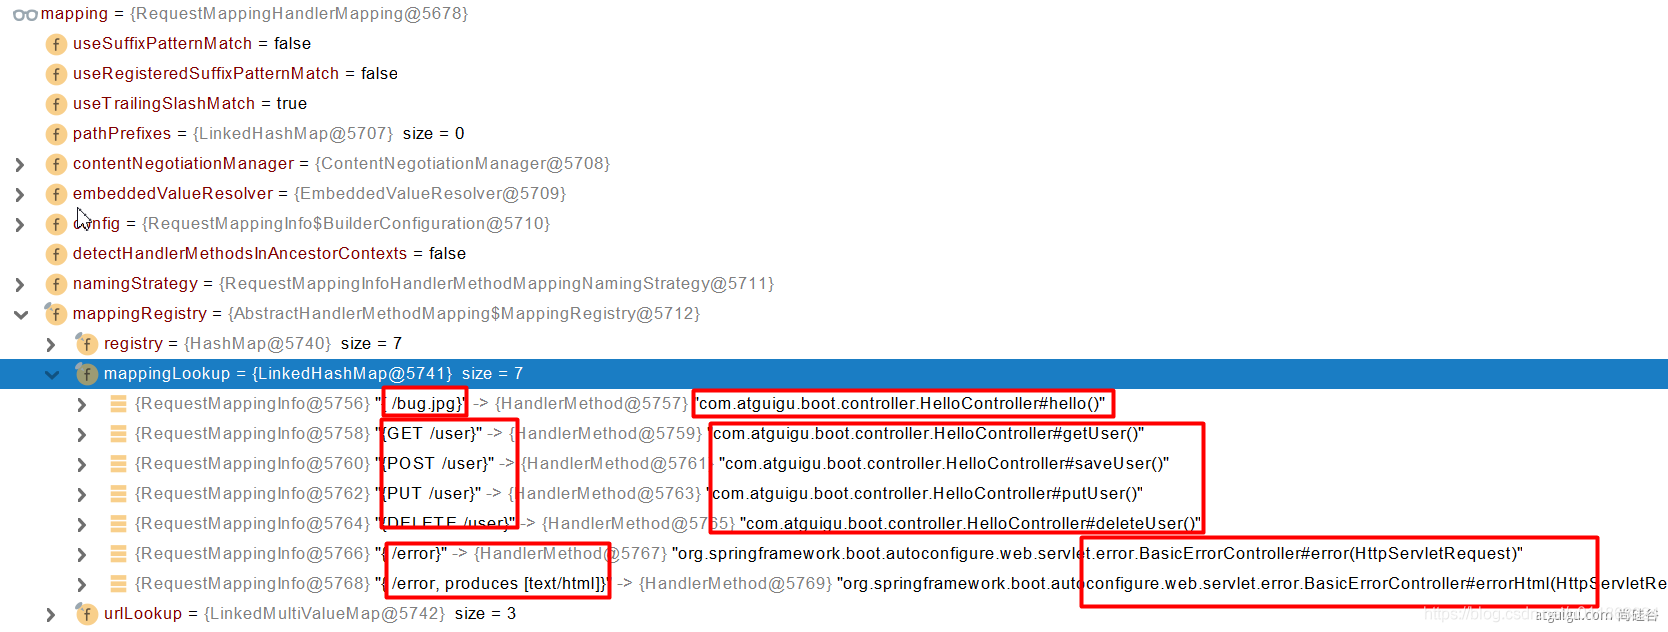
所有的请求映射都在应用启动时被解析放入各个HandlerMapping中
SpringBoot自动配置欢迎页的 WelcomePageHandlerMapping ,配置了"/"对应的映射规则:view= "forward:index.html",能处理访问路径" /"转发到index.html
SpringBoot自动配置了默认的RequestMappingHandlerMapping,在mappingRegistry属性【映射的注册中心】中保存了用户自定义请求路径和控制器方法的映射规则,可以处理控制器方法的对应请求路径
请求处理流程
- 请求进来,for增强循环遍历所有的HandlerMapping匹配请求映射信息,找得到就返回对应控制器方法的Handler【Handler中封装了控制器方法的所有信息】,找不到就返回null继续遍历下一个HandlerMapping
- 自定义处理器映射
- 处理器映射容器中不止一个,用户可以根据需要自行给容器中配置HandlerMapping组件
- 比如访问api文档,根据不同api版本设计不同的请求路径,不仅通过控制器来处理请求,还可以通过处理器映射指定请求映射规则来派发不同api版本的请求的对应资源路径
【mappedHandler = getHandler(processedRequest)寻找处理当前请求的Handler的原理】
//该方法属于DispatcherServlet
@Nullable
protected HandlerExecutionChain getHandler(HttpServletRequest request) throws Exception {
    if (this.handlerMappings != null) {
        for (HandlerMapping mapping : this.handlerMappings) {//增强for循环,从五个HandlerMapping中找出能处理当前请求的处理器映射,第一个就是RequestMappingHandlerMapping,从映射注册中心就能匹配对应的请求处理器
            HandlerExecutionChain handler = mapping.getHandler(request);//核心方法:mapping. getHandler(request)方法[该方法在HandlerMapping接口的实现类AbstractHandlerMapping中]中的getHandlerInternal(request)[该方法是类RequestMappingInfoHandlerMapping中的]方法,在这个方法的层层调用中就能判断对应的HandlerMapping有没有相应的请求映射信息,有就返回对应控制器方法的handler,没有就返回null
            if (handler != null) {
                return handler;
            }
        }
    }
    return null;
}
2
3
4
5
6
7
8
9
10
11
12
13
【mapping.getHandler(request)方法中的getHandlerInternal(request)方法解析】
public abstract class RequestMappingInfoHandlerMapping extends AbstractHandlerMethodMapping<RequestMappingInfo> {
    ...
	@Override
	protected HandlerMethod getHandlerInternal(HttpServletRequest request) throws Exception {
		request.removeAttribute(PRODUCIBLE_MEDIA_TYPES_ATTRIBUTE);//不管,移除一些东西
		try {
			return super.getHandlerInternal(request);//super.getHandlerInternal(request)核心方法
		}
		finally {
			ProducesRequestCondition.clearMediaTypesAttribute(request);
		}
	}
    ...
}
2
3
4
5
6
7
8
9
10
11
12
13
14
【getHandlerInternal(request)方法中的super.getHandlerInternal(request)方法解析】
public abstract class AbstractHandlerMethodMapping<T> extends AbstractHandlerMapping implements InitializingBean {
	...
    @Override
	protected HandlerMethod getHandlerInternal(HttpServletRequest request) throws Exception {
		String lookupPath = getUrlPathHelper().getLookupPathForRequest(request);//拿到原生请求想要访问的路径,此处是"/user"
		request.setAttribute(LOOKUP_PATH, lookupPath);
		this.mappingRegistry.acquireReadLock();//拿到一把锁,害怕并发查询mappingRegistry,在核心对象中可知mappingRegistry是RequestMappingHandlerMapping中的保存映射规则的一个属性
		try {
			HandlerMethod handlerMethod = lookupHandlerMethod(lookupPath, request);//核心方法:lookupHandlerMethod(lookupPath, request)方法对当前路径"/user"和请求进行处理
			return (handlerMethod != null ? handlerMethod.createWithResolvedBean() : null);
		}
		finally {
			this.mappingRegistry.releaseReadLock();
		}
	}
    ...
}
2
3
4
5
6
7
8
9
10
11
12
13
14
15
16
17
【super.getHandlerInternal(request)方法中的lookupHandlerMethod(lookupPath, request)方法解析】
public abstract class AbstractHandlerMethodMapping<T> extends AbstractHandlerMapping implements InitializingBean {
    ...
	@Nullable
	protected HandlerMethod lookupHandlerMethod(String lookupPath, HttpServletRequest request) throws Exception {
		List<Match> matches = new ArrayList<>();
		List<T> directPathMatches = this.mappingRegistry.getMappingsByUrl(lookupPath);//使用请求路径/user去mappingRegistry找哪一个handler能处理该路径,先根据url[即/user]不管请求方式去找,能找到四个请求路径为/user各种请求方式的处理器映射信息
		if (directPathMatches != null) {
			addMatchingMappings(directPathMatches, matches, request);//这一步没进去,功能是从找到的4个请求映射信息中找到最匹配的并添加到匹配映射集合matches中,当前请求此时matches中就只有一个了,如果写了多个能处理/user路径的GET请求的控制器方法,匹配映射集合matches中就会保存不止一个
		}
		if (matches.isEmpty()) {//如果没找到请求映射信息
			// No choice but to go through all mappings...
			addMatchingMappings(this.mappingRegistry.getMappings().keySet(), matches, request);//如果没找到就向集合中添加一些空的东西
		}

		if (!matches.isEmpty()) {//如果找到了请求映射信息且不为null
			Match bestMatch = matches.get(0);//如果matches中只有一个,则从匹配映射集合中取出第一个请求映射信息视为请求映射的最佳匹配
			if (matches.size() > 1) {//如果匹配映射集合matches的请求映射信息不止一个,接下来就会各种排序对比
				Comparator<Match> comparator = new MatchComparator(getMappingComparator(request));
				matches.sort(comparator);
				bestMatch = matches.get(0);
				if (logger.isTraceEnabled()) {
					logger.trace(matches.size() + " matching mappings: " + matches);
				}
				if (CorsUtils.isPreFlightRequest(request)) {
					return PREFLIGHT_AMBIGUOUS_MATCH;
				}
				Match secondBestMatch = matches.get(1);
				if (comparator.compare(bestMatch, secondBestMatch) == 0) {
					Method m1 = bestMatch.handlerMethod.getMethod();
					Method m2 = secondBestMatch.handlerMethod.getMethod();
					String uri = request.getRequestURI();
					throw new IllegalStateException(
							"Ambiguous handler methods mapped for '" + uri + "': {" + m1 + ", " + m2 + "}");//对比完各种请求映射信息,然后抛异常报错该请求有两个控制器方法都能处理,从这儿能看出SpringMVC要求同样的请求路径和请求方式,对应的控制器方法只能有一个
				}
			}
			request.setAttribute(BEST_MATCHING_HANDLER_ATTRIBUTE, bestMatch.handlerMethod);
			handleMatch(bestMatch.mapping, lookupPath, request);
			return bestMatch.handlerMethod;
		}
		else {
			return handleNoMatch(this.mappingRegistry.getMappings().keySet(), lookupPath, request);
		}
	}
    ...
}
2
3
4
5
6
7
8
9
10
11
12
13
14
15
16
17
18
19
20
21
22
23
24
25
26
27
28
29
30
31
32
33
34
35
36
37
38
39
40
41
42
43
44
45
# getHandlerAdapter()
重点2:getHandlerAdapter(mappedHandler.getHandler())源码解析
- 对默认的四个处理器适配器进行for增强遍历,使用四个不同适配器的supports方法对handler的类型进行匹配,@RequestMapping注解标注的方法对应Handler是HandlerMethod类型,函数式编程方法对应的是HandlerFunction类型,类型匹配就返回对应的适配器
【doDispatch方法中的getHandlerAdapter方法解析】
public class DispatcherServlet extends FrameworkServlet {
    ...
    protected HandlerAdapter getHandlerAdapter(Object handler) throws ServletException {
        if (this.handlerAdapters != null) {
            for (HandlerAdapter adapter : this.handlerAdapters) {//for增强循环遍历4种HandlerAdapter处理器适配器,选出合适的处理器适配器
                if (adapter.supports(handler)) {//判断被循环的处理器适配器是否支持当前的handler,判断代码:return (handler instanceof HandlerMethod && supportsInternal((HandlerMethod) handler));意思是如果handler是HandlerMethod类型就返回,supportsInternal((HandlerMethod) handler))总是返回true,这里判断机制没说清楚,到底是根据不同adapter对应的的supports方法对应的handler的类型判断还是其他的,主要这里不知道其他的Adapter中的supports方法的handler应该是什么类型,看起来就是根据Adapter的不同supports方法支持不同的Handler类型进行判断的:@RequestMapping注解标注的handler都是HandlerMethod类型的,函数式编程的方法对应的handler的适配器支持的handler都是HandlerFunction类型的;其他两个先不管,需要的时候去对应适配器的supports方法里面看
                    return adapter;//找到适配器直接返回,找不到就报错
                }
            }
        }
        throw new ServletException("No adapter for handler [" + handler +
                "]: The DispatcherServlet configuration needs to include a HandlerAdapter that supports this handler");
    }
    ...
}
2
3
4
5
6
7
8
9
10
11
12
13
14
15
# ha.handle()
重点3:ha.handle(processedRequest, response, mappedHandler.getHandler())源码解析
执行handler目标方法的适配器handle方法源码解析
handle方法核心流程总结:
- 方法1:DispatcherServlet的doDispatch方法的handle方法
- 调用handleInternal方法获得mav对象【ModelAndView】
- 方法2:AbstractHandlerMethodAdapter的handle方法的handleInternal方法
- 调用invokeHandlerMethod方法获取参数解析器解析参数,执行控制器方法将返回值封装到ModelAndView并返回ModelAndView
- 方法3:RequestMappingHandlerAdapter的handleInternal方法的invokeHandlerMethod方法
- 构建webRequest,放入doDispatch方法传参的request和response
- 获取目标方法对象并封装成可执行方法对象,可执行方法对象可以调用invokeAndHandle方法
- 为可执行方法对象设置所有的参数解析器和返回值处理器
- 调用invokeAndHandle方法获取参数解析器解析参数,执行控制器方法将返回值【即视图信息】封装到mavContainer中并获取到模型和视图容器对象
- 调用getModelAndView方法使用mavContainer获取ModelAndView对象并返回给handleInternal方法
【分支1:invokeAndHandle方法分支】
方法4:RequestMappingHandlerAdapter的invokeHandlerMethod方法的invokeAndHandle方法
无需返回值,直接把操作结果传入参数mavContainer的defalutModel和view属性中
- 调用invokeForRequest方法去找参数解析器解析参数,把请求域共享数据放进mavContainer的属性defaultModel,并调用目标控制器方法,完事后得到控制器目标方法的返回值存入returnValue
- 调用handleReturnValue方法处理控制器方法的返回结果,其实是把返回值的字符串或者其他东西处理赋值给mavContainer的view属性
【小分支1:invokeForRequest方法分支】
- 方法5:ServletInvocableHandlerMethod的invokeAndHandle方法的invokeForRequest方法
- 用一个Object数组接受调用getMethodArgumentValues方法获取的所有的形参对应的实参值,根据形参顺序排列
- 调用doInvoke方法传参Object数组使用反射机制完成目标控制器方法的调用并向invokeAndHandle方法返回控制器方法的返回值
- 方法6:InvocableHandlerMethod的invokeForRequest方法的getMethodArgumentValues方法
- 获取目标方法的所有形式参数的详细信息,包括形式参数的注解、索引位置、参数类型等并创建对应参数长度的object数组准备接收解析出来的参数值,最后返回的就是接收完所有实参的Object数组
- 有参数就对参数进行遍历,遍历过程中
- 调用参数解析器集合的supportsParameter方法匹配对应参数的参数解析器,并将参数解析器以参数对象为key存入参数解析器缓存
- 调用参数解析器集合的resolveArgument方法解析参数的值并将值顺序放入Object数组
- 遍历完事以后返回Object数组
【小小分支1:参数解析器集合的supportsParameter方法分支】
方法7:InvocableHandlerMethod的getMethodArgumentValues方法的supportsParameter方法
调用getArgumentResolver方法遍历所有参数解析器,并调用各个参数解析器的supportsParameter方法判断是否支持解析当前参数,支持就把对应的参数解析器存入argumentResolverCache即参数解析器缓存对象中,并返回参数解析器给supportsParameter方法,该方法判断参数解析器不为空就返回true,为空就返回false
【小小分支2:参数解析器集合的resolveArgument方法分支】
方法8:InvocableHandlerMethod的getMethodArgumentValues方法的resolveArgument方法
参数解析器集合调用的resolveArgument方法
- 尝试从缓存中获取对应的参数解析器,获取不到就去遍历参数解析器集合重新获取参数解析器并存入缓存
- 调用对应的参数解析器的resolveArgument方法解析出参数值并返回被放入Object数组
方法9:HandlerMethodArgumentResolverComposite中的参数解析器集合的resolveArgument方法的参数解析器的resolveArgument方法
通过参数获取参数的名字
调用resolveName传入参数的名字获取参数值,实际是urlPathHelper提前按正则匹配的方式处理URL解析所有的数据封装成map集合uriTemplateVars,参数解析器获取参数都是拿着参数名直接从Map集合里面取,然后返回取得的参数值,最终封装在Object数组中
【小分支2:handleReturnValue方法分支】
方法10:ServletInvocableHandlerMethod的invokeAndHandle方法的handleReturnValue方法
- 调用selectHandler方法根据返回值类型找到合适的返回值处理器并赋值给handler
- 处理器handle对象调用对应的handleReturnValue方法处理控制器方法的返回值
方法11:HandlerMethodReturnValueHandlerComposite的handleReturnValue方法的handleReturnValue方法
- 如果Object类型的返回值是一个字符串,将返回值转为字符串并存入mavContainer对象的view属性,此时mavContainer【模型和视图的容器】对象中既有向请求域中共享的defaultModel中的数据,也有了view数据;
- 如果viewName是重定向视图名就把mavContainer对象的redirectModelScenario属性设置为true
【分支2:getModelAndView方法分支】
方法12:RequestMappingHandlerAdapter的invokeHandlerMethod方法的getModelAndView方法方法
进来就有一个updateModel方法是设置model中共享数据绑定策略的,没听明白,暂时不管
从mavContainer获取defaultModel,把defaultModel、view属性值还有状态码传入ModelAndView对象的有参构造来创建ModelAndView对象mav
如果Model是重定向携带数据,调用putAll方法把所有数据放到请求的上下文中【?应用上下文吗?,没听明白这里】,最后返回mav给invokeHandlerMethod方法
- 方法1:DispatcherServlet的doDispatch方法的handle方法
【doDispatch方法中的ha.handle方法解析】
public abstract class AbstractHandlerMethodAdapter extends WebContentGenerator implements HandlerAdapter, Ordered {
    ...
	@Override
	@Nullable
	public final ModelAndView handle(HttpServletRequest request, HttpServletResponse response, Object handler)
			throws Exception {
		return handleInternal(request, response, (HandlerMethod) handler);//核心方法,返回的是ModelAndView类型的mav对象(封装了请求域共享数据和视图名称)
	}
    ...
}
2
3
4
5
6
7
8
9
10
【handle方法中的handleInternal方法解析】
//RequestMappingHandlerAdapter支持控制器方法上标注@RequestMapping注解的Handler的适配器
public class RequestMappingHandlerAdapter extends AbstractHandlerMethodAdapter
		implements BeanFactoryAware, InitializingBean {
    ...
    //实际上是父类AbstractHandlerMethodAdapter中的handleInternal方法被子类RequestMappingHandlerAdapter重写了,调用也是直接通过这个类继承来的的handler调用重写的handleInternal
	@Override
	protected ModelAndView handleInternal(HttpServletRequest request,
			HttpServletResponse response, HandlerMethod handlerMethod) throws Exception {
		ModelAndView mav;
		checkRequest(request);
		// Execute invokeHandlerMethod in synchronized block if required.
		if (this.synchronizeOnSession) {//自己的用例中这儿进不来,应该和线程安全有关,同一个session会用session锁锁住
			HttpSession session = request.getSession(false);
			if (session != null) {
				Object mutex = WebUtils.getSessionMutex(session);
				synchronized (mutex) {
					mav = invokeHandlerMethod(request, response, handlerMethod);//执行handler的目标方法代码
				}
			}
			else {
				// No HttpSession available -> no mutex necessary
				mav = invokeHandlerMethod(request, response, handlerMethod);//执行handler的目标方法代码
			}
		}
		else {
            //自己的用例会直接到这儿
			// No synchronization on session demanded at all...
			mav = invokeHandlerMethod(request, response, handlerMethod);//执行handler的目标方法代码(核心),返回封装好请求域共享数据和视图名称的ModelAndView对象
		}
		if (!response.containsHeader(HEADER_CACHE_CONTROL)) {
			if (getSessionAttributesHandler(handlerMethod).hasSessionAttributes()) {
				applyCacheSeconds(response, this.cacheSecondsForSessionAttributeHandlers);
			}
			else {
				prepareResponse(response);
			}
		}
		return mav;//获取到mav后直接返回ModelAndView给handle方法,再返回给doDispatch方法,并用mv变量接收
	}
    ...
}
2
3
4
5
6
7
8
9
10
11
12
13
14
15
16
17
18
19
20
21
22
23
24
25
26
27
28
29
30
31
32
33
34
35
36
37
38
39
40
41
【handleInternal方法中的invokeHandlerMethod方法解析】
- 对可执行方法对象设置参数解析器和返回值处理器
- 调用可执行方法对象的invocableMethod.invokeAndHandle(webRequest, mavContainer);方法执行目标方法并返回封装好请求域共享数据和视图名称的ModelAndView对象,注意此时如果不是转发就还没有向请求域共享数据,是转发就已经把共享数据放在上下文对象中了
public class RequestMappingHandlerAdapter extends AbstractHandlerMethodAdapter
		implements BeanFactoryAware, InitializingBean {
    ...
	@Nullable
	protected ModelAndView invokeHandlerMethod(HttpServletRequest request,
			HttpServletResponse response, HandlerMethod handlerMethod) throws Exception {

        //注意,在这里构造的webRequest,构造webRequest的request和response是doDispatch传参传进来的
		ServletWebRequest webRequest = new ServletWebRequest(request, response);
		try {
			WebDataBinderFactory binderFactory = getDataBinderFactory(handlerMethod);
			ModelFactory modelFactory = getModelFactory(handlerMethod, binderFactory);

			ServletInvocableHandlerMethod invocableMethod = createInvocableHandlerMethod(handlerMethod);//在目标方法执行前会为invocableMethod可执行的方法对象中设置参数解析器argumentResolvers,可执行的方法对象就是控制器控制器中的目标方法,invocableMethod只是对handler又封装了一层;随即立即为可执行方法对象设置返回值处理器
			if (this.argumentResolvers != null) {//argumentResolvers参数解析器集合,里面有26个参数解析器,决定了目标方法中能写多少种参数类型
				invocableMethod.setHandlerMethodArgumentResolvers(this.argumentResolvers);//为可执行的方法对象 设置 参数解析器
			}
			if (this.returnValueHandlers != null) {//returnValueHandlers返回值处理器集合,里面有15中返回值处理器
				invocableMethod.setHandlerMethodReturnValueHandlers(this.returnValueHandlers);//为可执行方法对象设置返回值处理器
			}

			...非核心代码【注册线程池什么的】

			invocableMethod.invokeAndHandle(webRequest, mavContainer);//核心代码,这一步真正执行目标方法,到这儿可执行方法对象数据封装处理完毕,具体就是将向请求域共享的数据Model或者Map,以及通过控制器方法的返回值获取viewName都封装进mavContainer模型与视图容器对象中
			if (asyncManager.isConcurrentHandlingStarted()) {
				return null;
			}

			return getModelAndView(mavContainer, modelFactory, webRequest);//通过getModelAndView方法使用mavContainer对象获取ModelAndView对象,并将ModelAndView对象返回给handleInternal方法
		}
		finally {
			webRequest.requestCompleted();
		}
	}
    ...
}
2
3
4
5
6
7
8
9
10
11
12
13
14
15
16
17
18
19
20
21
22
23
24
25
26
27
28
29
30
31
32
33
34
35
36
【invokeHandlerMethod方法中的invokeAndHandle方法解析】
- 进入invokeAndHandle方法后立即通过invokeForRequest方法去执行控制器目标方法
public class ServletInvocableHandlerMethod extends InvocableHandlerMethod {
	public void invokeAndHandle(ServletWebRequest webRequest, ModelAndViewContainer mavContainer,
			Object... providedArgs) throws Exception {

		Object returnValue = invokeForRequest(webRequest, mavContainer, providedArgs);//执行处理当前请求,该方法就是去找参数解析器处理参数并调用控制器方法的目标方法,完事后得到控制器目标方法的返回值,这个returnValue就是我们希望控制器返回的值
        //上述方法重要参数值:
        //1.returnValue:控制器方法的返回值
        //2.mavContainer:里面有defaultModel,里面封装着用户想向请求域共享的数据
        //3.webRequest:传参webRequest向控制器方法提供原生的request和response对象

        setResponseStatus(webRequest);//设置响应状态,暂时不管

		if (returnValue == null) {//如果控制器方法返回null,则invokeAndHandle方法直接返回
			if (isRequestNotModified(webRequest) || getResponseStatus() != null || mavContainer.isRequestHandled()) {
				disableContentCachingIfNecessary(webRequest);
				mavContainer.setRequestHandled(true);
				return;
			}
		}
		else if (StringUtils.hasText(getResponseStatusReason())) {//这个检测返回值中有没有一些失败原因
			mavContainer.setRequestHandled(true);
			return;
		}

		//如果有返回值且返回值不是字符串,就会执行以下代码
		mavContainer.setRequestHandled(false);
		Assert.state(this.returnValueHandlers != null, "No return value handlers");
		try {
			this.returnValueHandlers.handleReturnValue(
					returnValue, getReturnValueType(returnValue), mavContainer, webRequest);//this.returnValueHandlers.handleReturnValue方法是开始处理控制器方法的返回结果,其实是把返回值的字符串或者其他东西处理赋值给mavContainer的view属性,getReturnValueType(returnValue)是获取返回值的类型,实际上获取的是HandlerMethod$ReturnValueMethodParameter类型的对象,其中的returnValue属性保存的是返回值,executable属性指向的对象的name属性为对应控制的方法名,returnType保存的是返回值类型,这一段代码就是处理返回值的核心代码
		}
		catch (Exception ex) {
			if (logger.isTraceEnabled()) {
				logger.trace(formatErrorForReturnValue(returnValue), ex);
			}
			throw ex;
		}
	}
}
2
3
4
5
6
7
8
9
10
11
12
13
14
15
16
17
18
19
20
21
22
23
24
25
26
27
28
29
30
31
32
33
34
35
36
37
38
39
【invokeAndHandle方法中的invokeForRequest方法解析】
核心1:通过getMethodArgumentValues方法去获取参数解析器,使用参数解析器获取形参参数值打包成Object数组
核心2:带着所有形参参数通过doInvoke(args)方法去执行控制器方法,具体用反射调用目标方法的过程不管,重点是执行完以后怎么办,显然这里return的就是控制器方法的返回值返回给invokeAndHandle方法并赋值给returnValue
public class InvocableHandlerMethod extends HandlerMethod {
	...
	@Nullable
	public Object invokeForRequest(NativeWebRequest request, @Nullable ModelAndViewContainer mavContainer,
			Object... providedArgs) throws Exception {

		Object[] args = getMethodArgumentValues(request, mavContainer, providedArgs);//获取目标方法所有参数的值,封装成Object数组,有且只封装形参中有的参数值,每个元素代表一个对应的参数对象
		if (logger.isTraceEnabled()) {
			logger.trace("Arguments: " + Arrays.toString(args));
		}
		return doInvoke(args);//这一步就是利用反射机制调用目标方法,这个方法里面第一步就是调用的反射工具类CoroutinesUtils,具体执行先不管
	}
	...
}
2
3
4
5
6
7
8
9
10
11
12
13
14
【invokeForRequest方法的getMethodArgumentValues方法解析】
以下代码就是如何确定每一个目标参数的值的代码
- 小重点1:判断和寻找每个参数的参数解析器
- 小重点2:解析参数的参数值
核心就是获取目标方法的所有参数信息数组,对参数使用增强for循环;对每个参数都使用参数解析器集合的参数支持判断方法对每一个参数解析器循环遍历调用相应的参数支持判断方法根据注解类型和参数类型匹配参数解析器并将参数解析器放在参数解析器缓存中;然后对每个参数使用参数解析器集合中的解析参数方法直接从缓存中获取参数解析器,如果获取不到再去遍历所有的参数解析器[一层通用行为],再通过参数解析器的解析参数方法一般都从请求域中拿数据(可能从请求域中直接拿,也可能从请求域中封装好的Map里面来,具体要看每种参数解析器的实现)[参数解析器的个体行为]
public class InvocableHandlerMethod extends HandlerMethod {
	protected Object[] getMethodArgumentValues(NativeWebRequest request, @Nullable ModelAndViewContainer mavContainer,
			Object... providedArgs) throws Exception {

		MethodParameter[] parameters = getMethodParameters();//获取目标方法的所有形式参数的详细信息,包括形式参数的注解[combinedAnnotation]、索引位置[parameterIndex]、参数类型[ParameterType]等
		if (ObjectUtils.isEmpty(parameters)) {//判断目标方法参数列表是否为空
			return EMPTY_ARGS;//如果参数列表为空直接返回
		}

        //如果有参数列表
		Object[] args = new Object[parameters.length];//创建一个长度为参数个数的Object数组args
		for (int i = 0; i < parameters.length; i++) {//遍历参数
			MethodParameter parameter = parameters[i];//拿到第i个参数,即形参列表中的第i+1个参数
			parameter.initParameterNameDiscovery(this.parameterNameDiscoverer);//初始化过程不管,找参数名字的发现器来发现对应参数的名字
			args[i] = findProvidedArgument(parameter, providedArgs);//为args[i]赋值,赋值过程不管
			if (args[i] != null) {
				continue;
			}

            //重点1
			if (!this.resolvers.supportsParameter(parameter)) {//解析前先判断当前解析器是否支持当前参数类型,这个resovlers就是argumentResolvers参数解析器集合,内含26个参数参数解析器,这里面找到了参数解析器会把参数解析器存入参数解析器缓存中
				throw new IllegalStateException(formatArgumentError(parameter, "No suitable resolver"));
			}
			try {

                //重点2
				args[i] = this.resolvers.resolveArgument(parameter, mavContainer, request, this.dataBinderFactory);//核心:解析当前参数的参数值
			}
			catch (Exception ex) {
				// Leave stack trace for later, exception may actually be resolved and handled...
				if (logger.isDebugEnabled()) {
					String exMsg = ex.getMessage();
					if (exMsg != null && !exMsg.contains(parameter.getExecutable().toGenericString())) {
						logger.debug(formatArgumentError(parameter, exMsg));
					}
				}
				throw ex;
			}
		}
		return args;//返回args
	}
}
2
3
4
5
6
7
8
9
10
11
12
13
14
15
16
17
18
19
20
21
22
23
24
25
26
27
28
29
30
31
32
33
34
35
36
37
38
39
40
41
42
【小重点1:以下是判断和寻找每个参数的参数解析器的过程解析】
【getMethodArgumentValues方法中的resolvers.supportsParameter方法解析】
- 重点:形参对应的参数解析器缓存机制,第一次请求去挨个遍历26个参数解析器,速度慢;找到以后就以参数作为key,参数解析器作为value存入参数解析器缓存argumentResolverCache,以后请求找参数解析器都走缓存
public class HandlerMethodArgumentResolverComposite implements HandlerMethodArgumentResolver {
    private final List<HandlerMethodArgumentResolver> argumentResolvers = new ArrayList();
    private final Map<MethodParameter, HandlerMethodArgumentResolver> argumentResolverCache = new ConcurrentHashMap(256);

    ...

    public boolean supportsParameter(MethodParameter parameter) {
        return this.getArgumentResolver(parameter) != null;//核心方法,在supportsParameter方法中调用同一个类的getArgumentResolver方法来获取支持Parameter这个参数解析的参数解析器,如果有就返回true
    }

    @Nullable
    public Object resolveArgument(MethodParameter parameter, @Nullable ModelAndViewContainer mavContainer, NativeWebRequest webRequest, @Nullable WebDataBinderFactory binderFactory) throws Exception {
        ...
    }

    //【supportsParameter方法中的this.getArgumentResolver方法】
    @Nullable
	private HandlerMethodArgumentResolver getArgumentResolver(MethodParameter parameter) {
        //先从argumentResolverCache参数解析器缓存[map集合]中获取参数,但第一次请求访问缓存中是空的,会直接进入if中执行代码【woc我的argumentResolverCache不为null,没有进入for增强,直接返回result对应的参数解析器,是因为新版本改了吗?卧槽懂了,通透:因为每个参数都要遍历,很耗时间,所以只要访问了一次,就会把结果存入缓存,以后对应参数都直接拿着参数从缓存argumentResolverCache拿】
		HandlerMethodArgumentResolver result = this.argumentResolverCache.get(parameter);//通过key即参数获取对应的参数解析器result
        //那缓存不为空没有判断参数解析器是否支持是个什么情况?第一次对应请求执行以后缓存就有了,以后不判断直接走缓存
		if (result == null) {
			for (HandlerMethodArgumentResolver resolver : this.argumentResolvers) {//增强for循环遍历所有参数解析器,挨个调用参数解析器的supportsParameter方法确定26个参数解析器谁能解析传入的第i个参数,判断原理更参数解析器各不相同,一般都是判断注解类型,有些会判断参数类型并做一些额外动作
				if (resolver.supportsParameter(parameter)) {//核心resolver.supportsParameter(parameter)方法判断参数是否支持,不支持继续判断下一个参数解析器
					result = resolver;//支持就把对应的参数解析器放入result中存入参数解析器缓存中并跳出第一个参数的寻找参数解析器循环
					this.argumentResolverCache.put(parameter, result);
					break;
				}
			}
		}
		return result;//然后返回支持第一个参数解析的参数解析器给supportsParameter方法
	}
}
2
3
4
5
6
7
8
9
10
11
12
13
14
15
16
17
18
19
20
21
22
23
24
25
26
27
28
29
30
31
32
33
【getArgumentResolver方法中的resolver.supportsParameter(parameter)方法解析】
public class RequestParamMethodArgumentResolver extends AbstractNamedValueMethodArgumentResolver
		implements UriComponentsContributor {
	...
	@Override
	public boolean supportsParameter(MethodParameter parameter) {
		if (parameter.hasParameterAnnotation(RequestParam.class)) {//判断传入的参数有没有包含@RequestParam注解,没有标注该注解会直接return false,然后回到上一个方法的for增强选择下一个参数解析器RequestParamMapMethodArgumentResolver的supportsParameter方法继续判断,不同参数解析器的判断方法不同,有些都直接在supportsParameter方法就把判断的事情搞定了,一般都是判断参数上是否标注了对应的请求参数基本注解,有些还要判断特定的参数类型并做一些额外动作,其他参数解析器的对应supportsParameter方法就不看了
			if (Map.class.isAssignableFrom(parameter.nestedIfOptional().getNestedParameterType())) {
				RequestParam requestParam = parameter.getParameterAnnotation(RequestParam.class);
				return (requestParam != null && StringUtils.hasText(requestParam.name()));
			}
			else {
				return true;
			}
		}
		else {
			if (parameter.hasParameterAnnotation(RequestPart.class)) {//判断传入的参数有没有包含@RequestPart注解,有就直接返回false
				return false;
			}
			parameter = parameter.nestedIfOptional();
			if (MultipartResolutionDelegate.isMultipartArgument(parameter)) {
				return true;
			}
			else if (this.useDefaultResolution) {
				return BeanUtils.isSimpleProperty(parameter.getNestedParameterType());
			}
			else {
				return false;
			}
		}
	}
	...
}
2
3
4
5
6
7
8
9
10
11
12
13
14
15
16
17
18
19
20
21
22
23
24
25
26
27
28
29
30
31
32
【小重点2:以下是解析当前参数的参数值的解析过程】
【getMethodArgumentValues方法中的resolvers.resolveArgument方法解析】
public class HandlerMethodArgumentResolverComposite implements HandlerMethodArgumentResolver {
	@Override
	@Nullable
	public Object resolveArgument(MethodParameter parameter, @Nullable ModelAndViewContainer mavContainer,
			NativeWebRequest webRequest, @Nullable WebDataBinderFactory binderFactory) throws Exception {//注意,该方法中的webRequest中封装了原生的request和response对象
		HandlerMethodArgumentResolver resolver = getArgumentResolver(parameter);//拿到当前参数的参数解析器,先尝试从缓存拿,拿不到就去遍历参数解析器集合再次放缓存并返回参数解析器,正常情况下在判断解析器的步骤中已经遍历了,这里可以直接从缓存拿
		if (resolver == null) {
			throw new IllegalArgumentException("Unsupported parameter type [" +
					parameter.getParameterType().getName() + "]. supportsParameter should be called first.");
		}

        //核心
		return resolver.resolveArgument(parameter, mavContainer, webRequest, binderFactory);//调用参数解析器的resolveArgument方法进行解析
	}
}
2
3
4
5
6
7
8
9
10
11
12
13
14
15
【resolveArgument方法中的resolver.resolveArgument方法解析】
public abstract class AbstractNamedValueMethodArgumentResolver implements HandlerMethodArgumentResolver {
	@Override
	@Nullable
	public final Object resolveArgument(MethodParameter parameter, @Nullable ModelAndViewContainer mavContainer,
			NativeWebRequest webRequest, @Nullable WebDataBinderFactory binderFactory) throws Exception {

		NamedValueInfo namedValueInfo = getNamedValueInfo(parameter);//获取参数信息,包含参数的名字,此时参数还没有值
		MethodParameter nestedParameter = parameter.nestedIfOptional();

		Object resolvedName = resolveEmbeddedValuesAndExpressions(namedValueInfo.name);//这个方法能解析出括号中参数的名字,该名字为获取参数值做准备
		if (resolvedName == null) {
			throw new IllegalArgumentException(
					"Specified name must not resolve to null: [" + namedValueInfo.name + "]");
		}

        //核心
		Object arg = resolveName(resolvedName.toString(), nestedParameter, webRequest);//通过这个方法解析括号中 参数的值,参数解析器从请求路径按照正则匹配的方式拿到参数的值,实际是urlPathHelper提前解析所有的数据封装成map集合uriTemplateVars后续都是拿着参数名直接从Map集合里面取;路径变量是走uriTemplateVars;某个请求头数据如User-Agent是以数组的形式直接放在请求域中,没有经过Map封装,直接在请求头方法参数解析器中通过请求对象获取相应变量值数组,如果数组长度为1则返回第一个元素,如果数组长度大于1就返回整个数组,如果数组长度为0则返回null
		...额外操作代码暂时不管
		return arg;
	}
}
2
3
4
5
6
7
8
9
10
11
12
13
14
15
16
17
18
19
20
21
【resolveArgument方法中的resolveName方法解析】
public class PathVariableMethodArgumentResolver extends AbstractNamedValueMethodArgumentResolver
		implements UriComponentsContributor {
	@Override
	@SuppressWarnings("unchecked")
	@Nullable
	protected Object resolveName(String name, MethodParameter parameter, NativeWebRequest request) throws Exception {
		Map<String, String> uriTemplateVars = (Map<String, String>) request.getAttribute(
				HandlerMapping.URI_TEMPLATE_VARIABLES_ATTRIBUTE, RequestAttributes.SCOPE_REQUEST);//uriTemplateVars中的数据id=2,username=zhangsan,这里面的数据是由请求一进来就被UrlPathHelper提前解析出来并将数据封装在uriTemplateVars并提前保存在请求域中
		return (uriTemplateVars != null ? uriTemplateVars.get(name) : null);//直接在uriTemplateVars这个Map集合中通过参数的名字获取对应的值
	}
}
2
3
4
5
6
7
8
9
10
11
【invokeAndHandle方法中的this.returnValueHandlers.handleReturnValue方法解析】
public class HandlerMethodReturnValueHandlerComposite implements HandlerMethodReturnValueHandler {
	@Override
	public void handleReturnValue(@Nullable Object returnValue, MethodParameter returnType,ModelAndViewContainer mavContainer, NativeWebRequest webRequest) throws Exception {
		HandlerMethodReturnValueHandler handler = selectHandler(returnValue, returnType);//调用selectHandler方法根据返回值类型找到合适的返回值处理器并赋值给handler
		if (handler == null) {
			throw new IllegalArgumentException("Unknown return value type: " + returnType.getParameterType().getName());
		}
		handler.handleReturnValue(returnValue, returnType, mavContainer, webRequest);//核心:处理器对象调用对应的handleReturnValue方法处理控制器方法的返回值
	}
}
2
3
4
5
6
7
8
9
10
【handleReturnValue方法中的handler.handleReturnValue方法】
public class ViewNameMethodReturnValueHandler implements HandlerMethodReturnValueHandler {
	@Override
	public void handleReturnValue(@Nullable Object returnValue, MethodParameter returnType,
			ModelAndViewContainer mavContainer, NativeWebRequest webRequest) throws Exception {

		if (returnValue instanceof CharSequence) {//如果返回值是一个字符串,注意此时是一个Object
			String viewName = returnValue.toString();//拿到返回值的字符串并存入viewName
			mavContainer.setViewName(viewName);//将字符串返回值存入mavContainer对象的viewName属性中,mavContainer翻译过来就是模型和视图的容器,此时mavContainer对象中既有向请求域中共享的数据,也有了viewName
			if (isRedirectViewName(viewName)) {//判断view是否是重定向的视图,使用startWith方法判断视图名是否以redirect:开始的;或者调用simpleMatch方法判断视图名是否匹配重定向路径
				mavContainer.setRedirectModelScenario(true);//如果viewName是重定向视图名就把mavContainer对象的redirectModelScenario属性设置为true,这个后面再说
			}
		}
		else if (returnValue != null) {
			// should not happen
			throw new UnsupportedOperationException("Unexpected return type: " +
					returnType.getParameterType().getName() + " in method: " + returnType.getMethod());
		}
	}
}
2
3
4
5
6
7
8
9
10
11
12
13
14
15
16
17
18
19
【invokeHandlerMethod方法中的getModelAndView方法解析】
- 共享数据和视图名称都放在了ModelAndViewContainer类型的mavContainer对象中,包含要去的页面地址View和请求域共享的Model数据,以下的代码就是对mavContainer对象中的相关数据进行处理
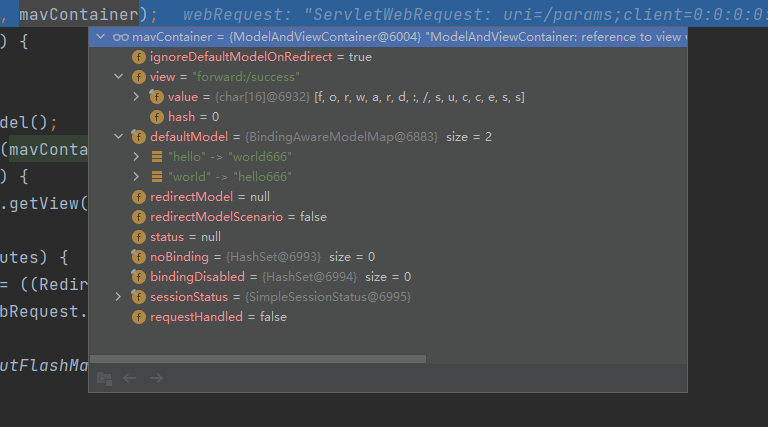
public class RequestMappingHandlerAdapter extends AbstractHandlerMethodAdapter
		implements BeanFactoryAware, InitializingBean {
	@Nullable
	private ModelAndView getModelAndView(ModelAndViewContainer mavContainer,
			ModelFactory modelFactory, NativeWebRequest webRequest) throws Exception {

		modelFactory.updateModel(webRequest, mavContainer);//modelFactory模型工厂,updateModel方法的作用是更新Model
		if (mavContainer.isRequestHandled()) {
			return null;
		}
		ModelMap model = mavContainer.getModel();//还是获取defaultModel,注意getModel这个方法内部是有个判断的,如果是重定向视图的话,就重新new了一个model返回给你,如果是转发的话,返回的model就是mavContainer里的那个defaultModel,也就是含user的;是否使用默认的defaultModel是根据!this.redirectModelScenario || (this.redirectModel == null && !this.ignoreDefaultModelOnRedirect这三个属性值综合判断的
		ModelAndView mav = new ModelAndView(mavContainer.getViewName(), model, mavContainer.getStatus());//将defaultModel(如果是重定向视图是上一步新建的model)、viewName还有状态码传入ModelAndView对象的有参构造创建ModelAndView对象
		if (!mavContainer.isViewReference()) {
			mav.setView((View) mavContainer.getView());
		}
		if (model instanceof RedirectAttributes) {//如果Model是重定向携带数据,使用putAll方法把所有数据放到请求的上下文中,形参不仅能写Model类型;还可以写RedirectAttributes类型,RedirectAttributes类型用于重定向携带数据,这个具体操作后面再说,简言之就是把重定向携带数据想办法搞到重定向请求中
			Map<String, ?> flashAttributes = ((RedirectAttributes) model).getFlashAttributes();
			HttpServletRequest request = webRequest.getNativeRequest(HttpServletRequest.class);
			if (request != null) {
				RequestContextUtils.getOutputFlashMap(request).putAll(flashAttributes);
			}
		}
		return mav;
	}
}
2
3
4
5
6
7
8
9
10
11
12
13
14
15
16
17
18
19
20
21
22
23
24
25
【getModelAndView方法中的updateModel方法解析】
public final class ModelFactory {
    ...
	public void updateModel(NativeWebRequest request, ModelAndViewContainer container) throws Exception {
		ModelMap defaultModel = container.getDefaultModel();//从mavContainer中拿到defaultModel
		if (container.getSessionStatus().isComplete()){
			this.sessionAttributesHandler.cleanupAttributes(request);
		}
		else {
			this.sessionAttributesHandler.storeAttributes(request, defaultModel);
		}
		if (!container.isRequestHandled() && container.getModel() == defaultModel) {
			updateBindingResult(request, defaultModel);//调用updateBindingResult更新最终的绑定结果
		}
	}
    //被上述updateModel方法调用
    private void updateBindingResult(NativeWebRequest request, ModelMap model) throws Exception {
		List<String> keyNames = new ArrayList<>(model.keySet());//从defaultModel中拿到所有的键值对的key,封装成List集合
		for (String name : keyNames) {//对所有共享数据的key遍历
			Object value = model.get(name);//通过key拿到defaultModel中对应的value
			if (value != null && isBindingCandidate(name, value)) {//下面好像是设置绑定策略的,暂时不管
				String bindingResultKey = BindingResult.MODEL_KEY_PREFIX + name;
				if (!model.containsAttribute(bindingResultKey)) {
					WebDataBinder dataBinder = this.dataBinderFactory.createBinder(request, value, name);
					model.put(bindingResultKey, dataBinder.getBindingResult());
				}
			}
		}
	}
    ...
}
2
3
4
5
6
7
8
9
10
11
12
13
14
15
16
17
18
19
20
21
22
23
24
25
26
27
28
29
30
# processDispatchResult()
重点4:processDispatchResult(processedRequest, response, mappedHandler, mv, dispatchException)源码解析
在该方法中把Model中的数据放到请求域中,核心是在最后渲染那一步才把model中的数据封装到LinkedHashMap类型的mergedMap对象中,在究极嵌套的render方法的view.render方法中的最后一个方法renderMergedOutputModel方法中的exposeModelAsRequestAttributes方法中放入请求域的
【doDispatch方法中的processDispatchResult方法解析】
public class DispatcherServlet extends FrameworkServlet {
    ...
	private void processDispatchResult(HttpServletRequest request, HttpServletResponse response,
			@Nullable HandlerExecutionChain mappedHandler, @Nullable ModelAndView mv,
			@Nullable Exception exception) throws Exception {

		boolean errorView = false;//判断整个处理期间有没有失败,为什么能够判断后面再说

        //这里都是异常相关的不管
		if (exception != null) {
			if (exception instanceof ModelAndViewDefiningException) {
				logger.debug("ModelAndViewDefiningException encountered", exception);
				mv = ((ModelAndViewDefiningException) exception).getModelAndView();
			}
			else {
				Object handler = (mappedHandler != null ? mappedHandler.getHandler() : null);
				mv = processHandlerException(request, response, handler, exception);
				errorView = (mv != null);
			}
		}

		// Did the handler return a view to render?
		if (mv != null && !mv.wasCleared()) {//mv就是ModelAndView,里面的model被处理成mav时重新封装成ModelMap,保存的值还是共享数据键值对;ModelAndView不为空且ModelAndView没有被清理过

            //小重点1:使用render方法开始渲染要去哪个页面
            //ModelAndView不为空且没有被清理过就调用render方法进行视图渲染
			render(mv, request, response);

            if (errorView) {
				WebUtils.clearErrorRequestAttributes(request);
			}
		}
		else {
			if (logger.isTraceEnabled()) {
				logger.trace("No view rendering, null ModelAndView returned.");
			}
		}
		if (WebAsyncUtils.getAsyncManager(request).isConcurrentHandlingStarted()) {
			// Concurrent handling started during a forward
			return;
		}
		if (mappedHandler != null) {
			// Exception (if any) is already handled..
			mappedHandler.triggerAfterCompletion(request, response, null);
		}
	}
    ...
}
2
3
4
5
6
7
8
9
10
11
12
13
14
15
16
17
18
19
20
21
22
23
24
25
26
27
28
29
30
31
32
33
34
35
36
37
38
39
40
41
42
43
44
45
46
47
48
【小重点1:processDispatchResult方法中的render方法】
public class DispatcherServlet extends FrameworkServlet {
	protected void render(ModelAndView mv, HttpServletRequest request, HttpServletResponse response) throws Exception {
		// Determine locale for request and apply it to the response.进行国际化的暂时不管
		Locale locale =
				(this.localeResolver != null ? this.localeResolver.resolveLocale(request) : request.getLocale());
		response.setLocale(locale);

		View view;
		String viewName = mv.getViewName();//从ModelAndView中获取视图名,就是控制器方法返回的字符串,一字不差
		if (viewName != null) {
			// We need to resolve the view name.
			view = resolveViewName(viewName, mv.getModelInternal(), locale, request);//这一步解析视图,mv.getModelInternal()会把Model中的数据全部拿出来放到一个Map中,但是这个Map在该方法中没用上啊,这一步的目的是获取最佳的视图对象,得到视图对象是为了调用其render方法
			if (view == null) {
				throw new ServletException("Could not resolve view with name '" + mv.getViewName() +
						"' in servlet with name '" + getServletName() + "'");
			}
		}
		else {
			// No need to lookup: the ModelAndView object contains the actual View object.
			view = mv.getView();
			if (view == null) {
				throw new ServletException("ModelAndView [" + mv + "] neither contains a view name nor a " +
						"View object in servlet with name '" + getServletName() + "'");
			}
		}

		// Delegate to the View object for rendering.
		if (logger.isTraceEnabled()) {
			logger.trace("Rendering view [" + view + "] ");
		}
		try {
			if (mv.getStatus() != null) {
				request.setAttribute(View.RESPONSE_STATUS_ATTRIBUTE, mv.getStatus());
				response.setStatus(mv.getStatus().value());
			}
            //核心代码:render方法中的view.render方法:作用是渲染目标页面,拿到页面数据
			view.render(mv.getModelInternal(), request, response);
		}
		catch (Exception ex) {
			if (logger.isDebugEnabled()) {
				logger.debug("Error rendering view [" + view + "]", ex);
			}
			throw ex;
		}
	}
}
2
3
4
5
6
7
8
9
10
11
12
13
14
15
16
17
18
19
20
21
22
23
24
25
26
27
28
29
30
31
32
33
34
35
36
37
38
39
40
41
42
43
44
45
46
【render方法中的resolveViewName方法解析】
【所有的视图解析器】

public class DispatcherServlet extends FrameworkServlet {
	@Nullable
	protected View resolveViewName(String viewName, @Nullable Map<String, Object> model,
			Locale locale, HttpServletRequest request) throws Exception {

		if (this.viewResolvers != null) {//视图解析器,获取所有的视图解析器
			for (ViewResolver viewResolver : this.viewResolvers) {//遍历视图解析器
				View view = viewResolver.resolveViewName(viewName, locale);//核心方法,获取到最佳匹配的视图并返回给render方法
				if (view != null) {
					return view;
				}
			}
		}
		return null;
	}
}
2
3
4
5
6
7
8
9
10
11
12
13
14
15
16
【resolveViewName方法中的viewResolver.resolveViewName(viewName, locale)方法解析】
public class ContentNegotiatingViewResolver extends WebApplicationObjectSupport
		implements ViewResolver, Ordered, InitializingBean {
	@Override
	@Nullable
	public View resolveViewName(String viewName, Locale locale) throws Exception {
		RequestAttributes attrs = RequestContextHolder.getRequestAttributes();//RequestContextHolder.getRequestAttributes()拿到所有请求域中的属性,这个东西暂时和Model没啥关系
		Assert.state(attrs instanceof ServletRequestAttributes, "No current ServletRequestAttributes");
		List<MediaType> requestedMediaTypes = getMediaTypes(((ServletRequestAttributes) attrs).getRequest());//这一步获取客户端能够接收的所有媒体内容类型
		if (requestedMediaTypes != null) {
			List<View> candidateViews = getCandidateViews(viewName, locale, requestedMediaTypes);//获取候选的视图,不知道是啥意思,反正得到了两个RedirectView,感觉都指向main.html,注意:这个getCandidateViews是视图解析器ContentNegotiatingViewResolver中的方法,这个方法中又对其他四种视图解析器进行了遍历
			View bestView = getBestView(candidateViews, requestedMediaTypes, attrs);//获取到最好的视图?按内容协商筛选最佳匹配?这儿讲的好水
			if (bestView != null) {
				return bestView;//返回这个视图
			}
		}
		...无关代码
	}
}
2
3
4
5
6
7
8
9
10
11
12
13
14
15
16
17
18
【resolveViewName方法中的getCandidateViews方法】
public class ContentNegotiatingViewResolver extends WebApplicationObjectSupport
		implements ViewResolver, Ordered, InitializingBean {
	private List<View> getCandidateViews(String viewName, Locale locale, List<MediaType> requestedMediaTypes)
			throws Exception {

		List<View> candidateViews = new ArrayList<>();
		if (this.viewResolvers != null) {//内容协商视图解析器中有一个视图解析器集合,视图解析器本来有5个 第一个是内容协商视图解析器,这里面没有内容协商视图解析器,所以只有四个
			Assert.state(this.contentNegotiationManager != null, "No ContentNegotiationManager set");
			for (ViewResolver viewResolver : this.viewResolvers) {//第一个是BeanNameViewResolver,对应的resolveViewName的逻辑是拿到IoC容器,判断容器中有没有对应viewName的组件组件名与返回值字符串完全相同,如果有就会用BeanNameViewResolver解析;
                //第二个是ThymeleafViewResolver,这个是Thymeleaf模板引擎的视图解析器,这个视图解析器判断ViewName是不是以redirect:开始的, 如果是就截取redirect:后面的内容,这里是/main.html,通过这个/main.html直接创建RedirectView对象【很诡异,在视图解析器中调用视图解析器创建视图View对象】;否则如果是forward:开始的,会通过控制器方法的返回值除去forward:创建InternalResourceView【相当于thymeleaft拦截了渲染的过程,将返回结果用thymeleaft的语法进行了渲染。】;如果既不是redirect:也不是forward:,就会调用loadView方法来进行页面加载,先拿到IoC工厂,根据ViewName判断有没有对应的组件存在,如果不存在会利用模板引擎自己创建一个ThymeleafView并设置一些属性
                //第三个是
				View view = viewResolver.resolveViewName(viewName, locale);//得到这个view对象是进行内容匹配用的,暂时不管
				if (view != null) {
					candidateViews.add(view);
				}
				for (MediaType requestedMediaType : requestedMediaTypes) {//进行内容类型匹配
					List<String> extensions = this.contentNegotiationManager.resolveFileExtensions(requestedMediaType);
					for (String extension : extensions) {
						String viewNameWithExtension = viewName + '.' + extension;
						view = viewResolver.resolveViewName(viewNameWithExtension, locale);
						if (view != null) {
							candidateViews.add(view);
						}
					}
				}
			}
		}
		if (!CollectionUtils.isEmpty(this.defaultViews)) {
			candidateViews.addAll(this.defaultViews);
		}
		return candidateViews;//直接返回匹配的视图List集合
	}
}
2
3
4
5
6
7
8
9
10
11
12
13
14
15
16
17
18
19
20
21
22
23
24
25
26
27
28
29
30
31
32
33
【render方法中的view.render方法解析】
public abstract class AbstractView extends WebApplicationObjectSupport implements View, BeanNameAware {
	@Override
	public void render(@Nullable Map<String, ?> model, HttpServletRequest request,
			HttpServletResponse response) throws Exception {

		if (logger.isDebugEnabled()) {
			logger.debug("View " + formatViewName() +
					", model " + (model != null ? model : Collections.emptyMap()) +
					(this.staticAttributes.isEmpty() ? "" : ", static attributes " + this.staticAttributes));
		}

		Map<String, Object> mergedModel = createMergedOutputModel(model, request, response);//创建一个要合并输出的Model,传参的model还是存的老数据,还是ModelMap ,此外还传参了request和response,这一步的目的就是用把model中的数据再封装一层转移到mergedModel中,不知道这么做的意图是什么

		prepareResponse(request, response);//准备响应
		renderMergedOutputModel(mergedModel, getRequestToExpose(request), response);//核心方法:渲染合并输出的模型数据,传参再次封装的mergedModel,这一步就是把Model中的数据放在请求域中,参数中getRequestToExpose(request)获取的是原生的request
	}

    //【render方法中的createMergedOutputModel方法】
    protected Map<String, Object> createMergedOutputModel(@Nullable Map<String, ?> model,
			HttpServletRequest request, HttpServletResponse response) {

		@SuppressWarnings("unchecked")
		Map<String, Object> pathVars = (this.exposePathVariables ?
				(Map<String, Object>) request.getAttribute(View.PATH_VARIABLES) : null);

		// Consolidate static and dynamic model attributes.
		int size = this.staticAttributes.size();
		size += (model != null ? model.size() : 0);
		size += (pathVars != null ? pathVars.size() : 0);

		Map<String, Object> mergedModel = CollectionUtils.newLinkedHashMap(size);//新建一个LinkedHashMap类型的mergeModel对象
		mergedModel.putAll(this.staticAttributes);
		if (pathVars != null) {
			mergedModel.putAll(pathVars);
		}
		if (model != null) {
			mergedModel.putAll(model);//如果model不为空,即用户向model或者Map中放了共享数据,就把所有的数据转移放到mergeModel中
		}

		// Expose RequestContext?
		if (this.requestContextAttribute != null) {
			mergedModel.put(this.requestContextAttribute, createRequestContext(request, response, mergedModel));
		}

		return mergedModel;//将封装了共享数据的mergeModel返回给render方法
	}
}
2
3
4
5
6
7
8
9
10
11
12
13
14
15
16
17
18
19
20
21
22
23
24
25
26
27
28
29
30
31
32
33
34
35
36
37
38
39
40
41
42
43
44
45
46
47
【view.render方法中的renderMergedOutputModel方法解析】
public class InternalResourceView extends AbstractUrlBasedView {//InternalResourceView属于视图解析流程

    //renderMergedOutputModel这个方法就是视图解析InternalResourceView类中的核心方法
	@Override
	protected void renderMergedOutputModel(
			Map<String, Object> model, HttpServletRequest request, HttpServletResponse response) throws Exception {

		// Expose the model object as request attributes.
		exposeModelAsRequestAttributes(model, request);//暴露model作为请求域的属性,这个就是把Model中的数据放入请求域的核心方法

		// Expose helpers as request attributes, if any.
		exposeHelpers(request);

		// Determine the path for the request dispatcher.
		String dispatcherPath = prepareForRendering(request, response);

		// Obtain a RequestDispatcher for the target resource (typically a JSP).
		RequestDispatcher rd = getRequestDispatcher(request, dispatcherPath);
		if (rd == null) {
			throw new ServletException("Could not get RequestDispatcher for [" + getUrl() +
					"]: Check that the corresponding file exists within your web application archive!");
		}

		// If already included or response already committed, perform include, else forward.
		if (useInclude(request, response)) {
			response.setContentType(getContentType());
			if (logger.isDebugEnabled()) {
				logger.debug("Including [" + getUrl() + "]");
			}
			rd.include(request, response);
		}

		else {
			// Note: The forwarded resource is supposed to determine the content type itself.
			if (logger.isDebugEnabled()) {
				logger.debug("Forwarding to [" + getUrl() + "]");
			}
			rd.forward(request, response);
		}
	}
}
2
3
4
5
6
7
8
9
10
11
12
13
14
15
16
17
18
19
20
21
22
23
24
25
26
27
28
29
30
31
32
33
34
35
36
37
38
39
40
41
【renderMergedOutputModel方法中的exposeModelAsRequestAttributes方法】
public abstract class AbstractView extends WebApplicationObjectSupport implements View, BeanNameAware {
	protected void exposeModelAsRequestAttributes(Map<String, Object> model,
			HttpServletRequest request) throws Exception {

        //逻辑很简单,就是直接取所有的key和value,然后使用原生request的setAttribute挨个遍历放到请求域中,注意这个model对象是最后封装的LinkedHashMap类型的mergedMap对象
		model.forEach((name, value) -> {//学到了对Map集合的流式编程,直接用key和value
			if (value != null) {
				request.setAttribute(name, value);
			}
			else {
				request.removeAttribute(name);
			}
		});
	}
}
2
3
4
5
6
7
8
9
10
11
12
13
14
15
# Web开发核心对象
# HandlerMapping
HandlerMapping【处理器映射】
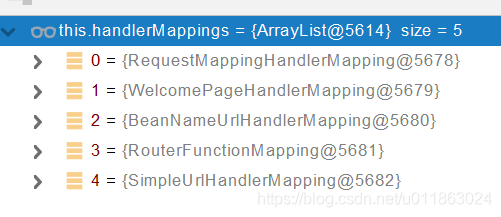
【/user—GET请求】下的HandlerMapping,请求处理规则【即/xxx请求对应处理器】都被保存在HandlerMapping中,默认有五个HandlerMapping
WelcomePageHandlerMapping欢迎页的处理器映射,老熟人了
WebMvcAutoConfiguration中的welcomePageHandlerMapping通过spring.mvc.static-path-pattern属性创建welcomePageHandlerMapping组件并配置到容器中
WelcomePageHandlerMapping中的pathMatcher路径匹配保存的是"/",意思是请求直接访问"/"会被对应到rootHandler中的view="forward:index.html",这就是HandleMapping中保存的映射规则
RequestMappingHandlerMapping【@RequestMapping注解的所有处理器映射】
RequestMappingHandlerMapping保存了所有@RequestMapping注解和handler的映射规则,也由配置类WebMvcAutoConfiguration对该组件进行配置
应用一启动,SpringMVC自动扫描所有的控制器组件并解析@RequestMapping注解,把所有注解信息保存在RequestMappingHandlerMapping中
RequestMappingHandlerMapping中有一个mappingRegistry属性【映射的注册中心】,其下的mappingLookup属性中用HashMap保存了用户所有自定义路径以及对应的处理器以及系统自带的两个错误处理映射
![mappingRegistry属性【映射的注册中心】]()
# HandlerAdapter
HandlerAdapter【处理器适配器】
处理器就是一个大的反射工具,可以使用反射机制执行用户的控制器方法并且调用参数解析器为控制器方法的参数赋值
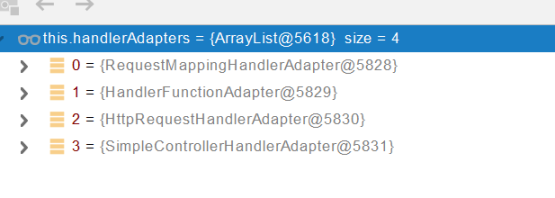
RequestMappingHandlerAdapter:支持控制器方法上标注@RequestMapping注解的Handler的适配器
HandlerFunctionAdapter:支持控制器函数式编程的方法【后面了解】
# ArgumentResolver
ArgumentResolver【参数解析器】
在处理器适配器RequestMappingHandlerAdapter中有argumentResolvers属性,里面存储了26个参数解析器ArgumentResolver(数量不一定,我这里测试有27个,版本也不同),每个参数解析器都实现了HandlerMethodArgumentResolver接口
![]()
这些参数解析器的作用是自动设置将要执行的目标方法中形参的具体参数值
具体的参数解析器
- RequestParamMethodArgumentResolver:解析标注@Requestparam注解请求参数的方法参数解析器
- PathVariableMethodArgumentResolver:解析标注@PathVariable注解的请求参数
- ...
SpringMVC目标方法中能写多少中参数类型取决于参数解析器
参数解析器的源码
- 由源码可知参数解析器的工作流程
- 步骤1:判断当前解析器是否支持传入的当前参数
- 步骤2:如果支持当前参数的解析就调用resolveArgument方法来进行解析
【参数解析器作为处理器适配器的属性】
public class RequestMappingHandlerAdapter extends AbstractHandlerMethodAdapter
		implements BeanFactoryAware, InitializingBean {
	...
	@Nullable
	private HandlerMethodArgumentResolverComposite argumentResolvers;
	...
}
1
2
3
4
5
6
7【参数解析器的设计源码】
有二十几个参数解析器,针对不同的参数注解和类型都有不同的实现,执行流程和代码原理在【重点3:ha.handle方法源码解析】中已经讲的很清楚了,去看就完事了
public class HandlerMethodArgumentResolverComposite implements HandlerMethodArgumentResolver {
    ...
}
1
2
3【参数解析器实现的接口HandlerMethodArgumentResolver】
public interface HandlerMethodArgumentResolver {

	boolean supportsParameter(MethodParameter parameter);//判断当前参数解析器是否支持这种参数

	@Nullable
	Object resolveArgument(MethodParameter parameter, @Nullable ModelAndViewContainer mavContainer,
			NativeWebRequest webRequest, @Nullable WebDataBinderFactory binderFactory) throws Exception;//如果当前参数解析器支持这种参数就调用resolveArgument方法对该参数进行解析

}
1
2
3
4
5
6
7
8
9- 由源码可知参数解析器的工作流程
# ReturnValueHandler
ReturnValueHandler【返回值处理器】
在处理器适配器RequestMappingHandlerAdapter中有returnValueHandlers属性,里面存储了15个返回值处理器ReturnValueHandler(我这里测试有15个,版本不同)【在可执行方法中也有returnValueHandlers属性】
![]()
这些返回值处理器决定了控制器方法的返回值类型种类(注意非形参)
- 如返回ModelAndView、Model、View、返回值可以使用@ResponseBody注解、HttpEntity等等
- SpringMVC支持的返回值类型【根据返回值处理器的顺序依次向下】
- ModelAndView
- Model
- View
- ResponseEntity
- ResponseBodyEmitter
- SreamingResponseBody【返回值类型是不是流式数据的,这是一个函数式接口】
- HttpEntity【且返回值类型不能是RequestEntity】
- HttpHeaders
- Callable【判断是否异步的,将JUC的时候会讲】
- DeferredResult【支持异步的】、ListenableFuture、CompletionStage【这三个都是被SpringMVC包装了的一些异步返回方式】
- WebAsnyTask
- 控制器方法上有@ModelAttribute注解标注的对应返回值【注意使用了这种注解还会判断返回值不是简单类型如字符串,必须是对象】
- 控制器方法上有@ResponseBody注解标注的对应返回值
- 【相应返回值处理器:RequestResponseBodyMethodProcessor】,这个返回值处理器就能处理响应json格式的数据
返回值处理器都继承了接口HandlerMethodReturnValueHandler
public interface HandlerMethodReturnValueHandler {

    //1.返回值处理器调用supportsReturnType方法判断是否支持当前类型返回值returnType
	boolean supportsReturnType(MethodParameter returnType);

    //2.返回值处理器调用handleReturnValue方法对该返回值进行处理
	void handleReturnValue(@Nullable Object returnValue, MethodParameter returnType,
			ModelAndViewContainer mavContainer, NativeWebRequest webRequest) throws Exception;
}
1
2
3
4
5
6
7
8
9一些返回值处理器既可以作为返回值处理流程中的返回值处理器,也可以作为参数解析器
以返回值处理器RequestResponseBodyMethodProcessor为例
/**
 * Resolves method arguments annotated with {@code @RequestBody}(解析标注特定注解的方法参数) and handles return
 * values from methods annotated with {@code @ResponseBody}(处理标注特定注解的方法的返回值) by reading and writing
 * to the body of the request(通过读请求体) or response with an {@link HttpMessageConverter}(或者通过HttpMessageConverter来响应).
 *
 * <p>An {@code @RequestBody} method argument is also validated if it is annotated
 * with any
 * {@linkplain org.springframework.validation.annotation.ValidationAnnotationUtils#determineValidationHints
 * annotations that trigger validation}. In case of validation failure,
 * {@link MethodArgumentNotValidException} is raised and results in an HTTP 400
 * response status code if {@link DefaultHandlerExceptionResolver} is configured.
 */
public class RequestResponseBodyMethodProcessor extends AbstractMessageConverterMethodProcessor {
    ...
}
1
2
3
4
5
6
7
8
9
10
11
12
13
14
15【继承结构图】
![]()
# WebDataBinder
WebDataBinder【Web数据绑定器】
- 使用绑定工厂创建一个Web数据绑定器WebDataBinder类型的binder对象,控制器方法中的自定义对象参数创建的空pojo对象会被直接封装到binder对象中作为binder的target属性
- binder中还有一个conversionService属性称为转换服务,conversionService对应的WebConversionService对象中的converters属性里面封装者124个converter
- Http协议规定传过来的都是字符串,SpringMVC就依靠这些转换器把String类型的数据转成各种类型的数据
- 转换器不只是String类型转成其他类型的数据,各种数据类型的转换都有
# MessageConverter
MessageConverter【消息转换器】
所有的MessageConverter都实现了HttpMessageConverter接口
![]()
canRead是判断能不能把Class类型的返回值对象以MediaType的格式读入消息转换器
canWrite是判断能否把Class类型的返回值对象以MediaType的格式写出到浏览器
例子:Person对象转为JSON,还可以实现请求中的JSON转换成Person对象,是可逆的,把服务器对象转成媒体类型,把请求的媒体类型转成服务器对象,原因是某些返回值处理器如RequestResponseBodyMethodProcessor既可以作为返回值处理流程中的返回值处理器,也可以作为参数解析器,里面都有消息转换器
系统中默认的所有MessageConverter
![]()
ByteArrayHttpMessageConverter-只支持返回值Byte类型
StringHttpMessageConverter-只支持返回值String类型
StringHttpMessageConverter-只支持返回值String类型
ResourceHttpMessageConverter-只支持返回值Resource类型【Resource类型是springFramework的io下的InputStream,返回这个类型的也可以写出去,这个是一个接口,继承接口有HttpResource,HttpResource的实现类GzippedResource...是以压缩包的内容类型响应;FileNameVersionedResource是以文件的内容类型响应;AbstractResource是Resource的实现类,里面有N多个继承类,有路径的方式、压缩包的方式、系统文件的方式】【指定返回值类型就会自动调用相关的消息转换器】
ResourceRegionHttpMessageConverter-只支持返回值ResourceRegion类型
SourceHttpMessageConverter-支持的是一个返回值类型HashSet集合,里面的元素有【添加到set集合中是静态代码块中添加的】
- DOMSource、SAXSource、StAXSource、StreamSource、Source
AllEncompassingFormHttpMessageConverter-只支持返回值MultiValueMap类型
MappingJackson2HttpMessageConverter-这个的support方法直接返回true,没有像其他转换器一样进行类型匹配,但是仍然有canWrite方法内部的重载方法canWrite方法的调用判断,两个都同时满足才满足对应返回值类型,一般来说这个消息转换器能处理任何对象将其转成json写出去
MappingJackson2HttpMessageConverter-这个和上一个是一样的,区别暂时没讲
Jaxb2RootElementHttpMessageConverter-只支持方法标注了@XmlRoctElement注解的返回值
# HandlerInterceptor
HandlerInterceptor【拦截器】
所有的拦截器都继承了接口HandlerInterceptor
包括自定义的拦截器,根据执行时机的需要选择合适的方法
- 接口HandlerInterceptor中有三个需要被实现的方法
- preHandle方法:在控制器方法执行前被调用执行
- postHandle方法:控制器方法执行完但还没到达页面以前执行postHandle方法【即执行完handle方法获取ModelAndView后派发最终结果前】
- afterCompletion方法:页面渲染完成后还想执行一些操作
![]()
- 接口HandlerInterceptor中有三个需要被实现的方法
自定义拦截器需要通过配置类实现WebMvcConfigurer接口的addInterceptors方法添加到IoC容器中
- 通过registry.addInterceptor方法添加自定义的拦截器组件到IoC容器中
- 在registry.addInterceptor方法后使用addPathPatterns方法添加拦截器生效的路径
- /**表示所有请求,拦截所有也会拦截掉静态资源的访问
- 在addPathPatterns方法后使用excludePathPatterns方法添加排除拦截器生效的路径
- 正常写,如登录页面"/","/login'',以及静态资源如"/css/**",...
- 静态资源的放行还可以通过设置静态资源前缀如/static,放行"/static/**"来实现对所有静态资源的放行
拦截器源码分析
【拦截器原理总览】
![]()
第一步:根据当前请求,找到HandlerExcutionChain【即doDispatch方法中的mappedHandler】
其中包含处理请求的Handler以及对应请求的所有拦截器
找到适配的Handler,即mappedHandler,其中的两个属性handler指向控制器的main.html映射匹配的控制器方法,mappedHandler实际上是一个HandlerExcutionChain,即处理器执行链
处理器中只有两个属性,处理器和拦截器列表
interceptorList为拦截器列表,其中的LoginInterceptor就是自定义的登录验证拦截器
- 下面两个拦截器任何方法都会执行
- ConversionServiceExposinginterceptor
- ResourceUrlProviderExposingInterceptor
- ConversionServiceExposinginterceptor
- 下面两个拦截器任何方法都会执行
![]()
第二步:先顺序执行所有拦截器的preHandle方法
- 如果当前拦截器preHandle方法返回true,则执行下一个拦截器的preHandle方法
- 如果当前拦截器返回false,则直接触发triggerAfterCompletion方法倒序执行所有已经执行了preHandle方法的拦截器的AfterCompletion方法并返回false触发结束doDispatch方法的执行,不再继续执行目标控制器方法
第三步:执行完handle方法并处理默认视图名字【没有视图名就应用默认视图名】后立即去倒序执行所有拦截器的postHandle方法
第四步:执行完postHandle方法后立即去执行派发最终结果方法,在processDispatchResult方法的最后一行即页面成功渲染完成以后也会倒序触发执行已执行拦截器的afterCompletion方法
以上所有过程发生任何异常都会捕捉异常直接去倒序执行所有执行过preHandle方法的拦截器的afterCompletion方法,包括自己写的拦截器方法发生异常
protected void doDispatch(HttpServletRequest request, HttpServletResponse response) throws Exception {
    ...
            mappedHandler = getHandler(processedRequest);//mappedHandler是处理器执行来年,mappedHandler的handler属性是HelloController#main()方法,interceptorList是拦截器列表
            ...

            HandlerAdapter ha = getHandlerAdapter(mappedHandler.getHandler());//调用控制器方法大的反射工具类
            ...

            //分支1
            if (!mappedHandler.applyPreHandle(processedRequest, response)) {
                return;
            }//执行拦截器的preHandle方法,就在执行控制器方法的前一步

            //执行控制器方法
            mv = ha.handle(processedRequest, response, mappedHandler.getHandler());

            if (asyncManager.isConcurrentHandlingStarted()) {
                return;
            }

            applyDefaultViewName(processedRequest, mv);
    		//分支2
            mappedHandler.applyPostHandle(processedRequest, response, mv);//执行相关拦截器的postHandle方法
        }
        catch (Exception ex) {
            dispatchException = ex;
        }
        ...
        //重点四:处理派发最终的结果,这一步执行前,整个页面还没有跳转过去
        processDispatchResult(processedRequest, response, mappedHandler, mv, dispatchException);
    }
    catch (Exception ex) {
        triggerAfterCompletion(processedRequest, response, mappedHandler, ex);
    }
    ...
}
1
2
3
4
5
6
7
8
9
10
11
12
13
14
15
16
17
18
19
20
21
22
23
24
25
26
27
28
29
30
31
32
33
34
35
36【分支1:applypreHandle方法分支】
【doDispatch方法中的applypreHandle方法】
public class HandlerExecutionChain {
	boolean applyPreHandle(HttpServletRequest request, HttpServletResponse response) throws Exception {
		for (int i = 0; i < this.interceptorList.size(); i++) {
			HandlerInterceptor interceptor = this.interceptorList.get(i);//正向一次遍历所有拦截器
			if (!interceptor.preHandle(request, response, this.handler)) {//执行拦截器的preHandle方法,如果但凡一个拦截器返回false,这里就会先执行拦截器的AfterCompletion然后返回false导致直接跳出doDispatch方法的执行
				triggerAfterCompletion(request, response, null);
				return false;
			}
			this.interceptorIndex = i;//如果拦截器返回true,就会遍历一个拦截器,执行完对应的preHandle方法就会给interceptorIndex属性赋值i,这个为当前已执行preHandle方法的拦截器在interceptorList中的下标
		}
		return true;
	}
}
1
2
3
4
5
6
7
8
9
10
11
12
13【applyPreHandle方法中的triggerAfterCompletion方法】
public class HandlerExecutionChain {
	void triggerAfterCompletion(HttpServletRequest request, HttpServletResponse response, @Nullable Exception ex) {//但凡有一个拦截器的返回值为false,就会直接进来执行已经执行了preHandle方法的所有拦截器的afterCompletion方法
		for (int i = this.interceptorIndex; i >= 0; i--) {
			HandlerInterceptor interceptor = this.interceptorList.get(i);
			try {
				interceptor.afterCompletion(request, response, this.handler, ex);//执行afterCompletion方法,正常不正常的afterCompletion方法都是来这里面执行
			}
			catch (Throwable ex2) {
				logger.error("HandlerInterceptor.afterCompletion threw exception", ex2);
			}
		}
	}
}
1
2
3
4
5
6
7
8
9
10
11
12
13【分支2:applyPostHandle方法分支】
【doDispatch方法中的applyPostHandle方法】
public class HandlerExecutionChain {
	void applyPostHandle(HttpServletRequest request, HttpServletResponse response, @Nullable ModelAndView mv)
			throws Exception {
		for (int i = this.interceptorList.size() - 1; i >= 0; i--) {//倒序执行所有拦截器的postHandle方法,注意这里的初始i取得是拦截器列表的最后一位的下标
			HandlerInterceptor interceptor = this.interceptorList.get(i);
			interceptor.postHandle(request, response, this.handler, mv);//挨个执行postHandle方法
		}
	}
}
1
2
3
4
5
6
7
8
9
# Handler请求参数处理
# 请求参数基本注解
在SpringMVC中的控制器方法形式参数面前加上适当的注解,SpringMVC就可以自动为赋值目标请求参数
# @PathVariable
路径变量注解@PathVariable可以从Rest风格请求路径获取请求参数并将特定请求参数与形参对应
在形参前面使用@PathVariable("id")能指定形参对应请求参数的位置并将请求参数赋值给形参
使用key和value都为String类型的Map集合作为形参结合@PathVariable注解能获取请求映射注解匹配路径中所有用大括号进行标识的请求参数
[使用@PathVariable注解的前提是请求映射@GetMapping("/car/{id}/owner/{username}")的匹配路径对相关请求参数用大括号进行标识,注意请求映射上大括号标注的路径变量可以动态的被替换]
@GetMapping("/car/{id}/owner/{username}")
public Map<String,Object> getCar(@PathVariable("id") Integer id,
                                 @PathVariable("username") String username,
                                 @PathVariable Map<String,String> pv){
    Map<String,Object> map=new HashMap<>();
    map.put("id",id);
    map.put("username",username);
    map.put("pv",pv);
    return map;//{"pv":{"id":"2","username":"zhangsan"},"id":2,"username":"zhangsan"}
}
2
3
4
5
6
7
8
9
10
# @RequestHeader
获取请求头对象,可以通过请求头的Host获取请求发送的ip地址、通过User-Agent获取发送请求的浏览器信息
在形参前面使用@RequestHeader("User-Agent")可以获取请求头中key为User-Agent的单个属性值并赋值给对应字符串形参,这种方式只支持获取请求头中的单个键值对的属性值
使用key和value都为String类型的Map集合或者MultiValueMap类型以及HttpHeaders类型的形参结合@RequestHeader注解可以获取全部的请求头信息
@GetMapping("/car/header")
public Map<String,Object> getCar(@RequestHeader("User-Agent") String userAgent,
                                 @RequestHeader Map<String,String> header){
    Map<String,Object> map=new HashMap<>();
    map.put("userAgent",userAgent);
    map.put("header",header);
    return map;//"userAgent":"Mozilla/5.0 (Linux; Android 6.0; Nexus 5 Build/MRA58N) AppleWebKit/537.36 (KHTML, like Gecko) Chrome/113.0.0.0 Mobile Safari/537.36"},header太长了不展示
}
2
3
4
5
6
7
8
# @RequestParam
非Rest风格传递请求参数使用@RequestParam指定形参与请求参数名的对应关系
- 在形参前面使用@RequestParam("age")注解指定请求参数age与形式参数age的对应关系并自动赋值给对应的形式参数,如果请求参数中含有多个同名参数值,需要使用List集合进行接收
- 使用key和value都为String类型的Map集合结合@RequestParam注解可以获取所有的请求参数,注意这种使用map集合接收多个同名参数的方法存在参数值丢失的现象
@GetMapping("/car/param")
public Map<String,Object> getCar(@RequestParam("age") Integer age,
                                 @RequestParam("inters") List<String> inters,
                                 //@RequestParam Map<String,String> params){
                                 @RequestParam Map<String,Object> params){//Map接收所有数据请求参数存在多个同名参数值的会丢值
    Map<String,Object> map=new HashMap<>();
    map.put("age",age);
    map.put("inters",inters);
    map.put("params",params);
    return map;//{"inters":["basketball","game"],"params":{"age":"18","inters":" basketball"},"age":18}
}
2
3
4
5
6
7
8
9
10
11
# @CookieValue
使用@CookieValue注解可以获取请求的Cookie值
- 在字符串形参前面使用@CookieValue("JSESSIONID")注解指定请求头中Cookie项下的key为JSESSIONID的参数的参数值并为形参赋值,这种方式只是拿到了JSESSIONID的cookie值
- 在Cookie类型的形参前面使用@CookieValue("JSESSIONID")注解可以获取整个"JSESSIONID"的Cookie对象并赋值给形参,可以获取Cookie对象的名字,值等信息
@GetMapping("/car/cookie")
public Map<String,Object> getCar(@CookieValue("JSESSIONID") String jSessionId,
                                 @CookieValue("JSESSIONID") Cookie cookie){
    System.out.println(cookie+" | "+cookie.getName()+":"+cookie.getValue());
    //javax.servlet.http.Cookie@4bbe7695 | JSESSIONID:44613C5A612B109B5DB9E9A6D71C6C3D
    Map<String,Object> map=new HashMap<>();
    map.put("JSESSIONID",jSessionId);
    return map;//{"JSESSIONID":"44613C5A612B109B5DB9E9A6D71C6C3D"}
}
2
3
4
5
6
7
8
9
【注意Chrome需要先获取一次session对象才会生成JSESSIONID,否则在请求头是不会显示Cookie的】
# @RequestBody
使用@RequestBody注解可以获取POST请求的请求体,即表单中的数据
- 在字符串形参前面使用@RequestBody注解指定form表单中的数据并为形参赋值,浏览器请求体中表单的内容原本就是类似于Get请求URL中问号的部分如:username=zhangsan&email=2625074321%40qq.com,所以这种方式获取的字符串也是同样的组织形式
@PostMapping("/save")
public Map<String,Object> getCar(@RequestBody String requestBodyContent){
    System.out.println(requestBodyContent);//username=zhangsan&email=2625074321%40qq.com
    Map<String,Object> map=new HashMap<>();
    map.put("requestBodyContent",requestBodyContent);
    return map;//{"requestBodyContent":"username=zhangsan&email=2625074321%40qq.com"}
}
2
3
4
5
6
7
# @RequestAttribute
使用@RequestAttribute注解可以在转发页面获取请求域中的共享数据
- 在转发控制器方法中与请求域参数类型对应的形参前面使用@RequestAttribute("msg")注解指定域中的key为msg的值并自动为对应的形参赋值,要求对应的值转发必须已经存入请求域
- 从请求域中获取共享数据除了使用@RequestAttribute注解的方式外还可以使用原生的被转发的request请求调用getAttribute获取,你懂的
- 可以在@RequestAttribute注解中使用required=false指定参数不是必须的,没传参引用数据类型全部默认null
@Controller
public class RequestController {
    @GetMapping("/goto")
    public String goToPage(HttpServletRequest request){
        request.setAttribute("msg","成功了...");
        request.setAttribute("code",200);
        return "forward:/success";//转发到'/success'请求
    }
    @ResponseBody
    @GetMapping("/success")
    public Map<String,Object> success(@RequestAttribute("msg") String msg,
                                      @RequestAttribute("code") Integer code,
                                      HttpServletRequest request){
        Map<String,Object> map=new HashMap<>();
        Object msg1 = request.getAttribute("msg");
        map.put("reqMethod_msg",msg1);
        map.put("annotationMethod_code",code);
        return map;//{"reqMethod_msg":"成功了...","annotationMethod_code":200}
    }
}
2
3
4
5
6
7
8
9
10
11
12
13
14
15
16
17
18
19
20
# @MatrixVariable
使用@MatrixVariable注解可以获取矩阵变量路径中的矩阵变量
矩阵变量
矩阵变量是一种请求数据的组织形式,原来一直使用的是查询字符串
查询字符串【queryString】:/cars/{path}?xxx=xxx&xxxx=xxx
- 查询字符串的方式使用@RequestParam注解获取请求数据
矩阵变量:/cars/sell;low=34;brand=byd,audi,yd
应用场景:Cookie禁用,浏览器请求头不携带JSESSIONID,解决办法是重写url,把cookie的值使用矩阵变量的方式进行传递:/abc;jsessionid=xxxx
含多个同名参数的矩阵变量写法:
<a href="/cars/sell;low=34;brand=byd,audi,yd,haha"></a>
<a href="/cars/sell;low=34;brand=byd,audi,yd;brand=haha"></a>
<!--以上两种写法的效果都是一样的,最终brand都会封装成四个属性值
	{"path":"sell","low":34,"brand":["byd","audi","yd","niuniu"]}
-->
<a href="/boss/1;age=20/2;age=10"></a>
<!--以上这种写法的同名参数属于不同的路径变量,当指定了pathVar后会分别依据pathVar获取不同路径变量的age-->
1
2
3
4
5
6
7矩阵变量中/xxx;xxx=xxx/的xxx;xxx=xxx是一个基本整体,一个请求路径中可以有多个这样的基础单元;基本单元中分号前面没有等号的部分是访问路径,分号后面的等式是矩阵变量,多个矩阵变量间使用分号进行区分
使用@MatrixVariable注解可以获取矩阵变量路径中的矩阵变量,注意这种获取矩阵变量的方式矩阵变量必须绑定在路径变量中,即请求映射注解中的矩阵变量部分基本单元需要使用{xxx}如{path}代替,多个基本单元中含有同名变量,需要在@MatrixVariable注解中使用pathvar("xxx")如pathVar("path")指定基本单元
手动开启矩阵变量功能
禁用矩阵变量的原理
SpringBoot默认是禁用矩阵变量的,需要定制化SpringMVC中的组件手动开启矩阵变量功能,相应的核心属性是WebMvcAutoConfiguration中的configurePathMatch配置路径映射组件的UrlPathHelper对象中的removeSemicolonContent属性;SpringBoot对路径的处理依靠UrlPathHelper对路径进行解析,当removeSemicolonContent属性为true时表示移除路径中分号后面的所有内容,矩阵变量会被自动忽略,因此使用矩阵变量需要自定义removeSemicolonContent属性为false的组件configurePathMatch
public class WebMvcAutoConfiguration {
    ...
    @Configuration(proxyBeanMethods = false)
    @Import(EnableWebMvcConfiguration.class)
    @EnableConfigurationProperties({ WebMvcProperties.class, ResourceProperties.class })
    @Order(0)
    public static class WebMvcAutoConfigurationAdapter implements WebMvcConfigurer {
    	...
        @Override
        @SuppressWarnings("deprecation")
        public void configurePathMatch(PathMatchConfigurer configurer) {
            configurer.setUseSuffixPatternMatch(this.mvcProperties.getPathmatch().isUseSuffixPattern());
            configurer.setUseRegisteredSuffixPatternMatch(
                    this.mvcProperties.getPathmatch().isUseRegisteredSuffixPattern());
            this.dispatcherServletPath.ifAvailable((dispatcherPath) -> {
                String servletUrlMapping = dispatcherPath.getServletUrlMapping();
                if (servletUrlMapping.equals("/") && singleDispatcherServlet()) {
                    UrlPathHelper urlPathHelper = new UrlPathHelper();//UrlPathHelper意为路径帮助器,UrlPathHelper中的removeSemicolonContent属性为true,表示会默认移除请求路径URI中分号后面的所有内容,就相当于直接忽略掉所有的矩阵变量
                    urlPathHelper.setAlwaysUseFullPath(true);
                    configurer.setUrlPathHelper(urlPathHelper);
                }
            });
        }
    }
}
1
2
3
4
5
6
7
8
9
10
11
12
13
14
15
16
17
18
19
20
21
22
23
24
25自定义configurePathMatch组件
SpringBoot为组件自定义提供了三种方案,详情见 [4.1.1、 SpringMVC自动配置概览],这里自定义configurePathMatch组件有两种方式
方式一:在自定义配置类WebConfig中用@Bean注解给容器配置一个WebMvcConfigurer组件
@Configuration(proxyBeanMethods = false)
public class WebConfig{
	//方式一:使用@Bean配置一个WebMvcConfigurer组价
    @Bean
    public WebMvcConfigurer webMvcConfigurer(){
        return new WebMvcConfigurer() {
            @Override
            public void configurePathMatch(PathMatchConfigurer configurer) {
                UrlPathHelper urlPathHelper=new UrlPathHelper();
                //设置removeSemicolonContent属性为false就可以保留矩阵变量功能分号后面的内容
                urlPathHelper.setRemoveSemicolonContent(false);
                //感觉像把容器中的默认urlPathHelper换成自己创建的
                configurer.setUrlPathHelper(urlPathHelper);
            }
        };
    }
}
1
2
3
4
5
6
7
8
9
10
11
12
13
14
15
16
17方式二:让自定义配置类WebConfig实现WebMvcConfigurer接口,由于Jdk8有该接口的默认实现,可以只实现该接口的configurePathMatch方法,将自定义的urlPathHelper通过该方法传参configurer的setUrlpathHelper(urlPathHelper)方法配置到容器中即可
@Configuration(proxyBeanMethods = false)
public class WebConfig implements WebMvcConfigurer {
    //方式二:自定义配置类实现WebMvcConfigurer接口并重写configurePathMatch方法
    @Override
    public void configurePathMatch(PathMatchConfigurer configurer) {
        UrlPathHelper urlPathHelper=new UrlPathHelper();
        //设置removeSemicolonContent属性为false就可以保留矩阵变量功能分号后面的内容
        urlPathHelper.setRemoveSemicolonContent(false);
        //感觉像把容器中的默认urlPathHelper换成自己创建的
        configurer.setUrlPathHelper(urlPathHelper);
    }
}
1
2
3
4
5
6
7
8
9
10
11
12
@MatrixVariable注解的用法
在形参前面使用@MatrixVariable("low")注解可以获取矩阵变量路径中变量名为low的字面值并自动赋值给形参,形参类型不限,含多个同名参数需要使用List集合类型的形参进行接收
//请求路径: /cars/sell;low=34;brand=byd,audi,yd
//@GetMapping("/cars/sell")
@GetMapping("/cars/{path}")
public Map<String,Object> carsSell(@MatrixVariable("low") Integer low,
                                   @MatrixVariable("brand") List<String> brand,
                                   @PathVariable("path") String path){
    System.out.println(path);
    Map<String,Object> map=new HashMap<>();
    map.put("low",low);
    map.put("brand",brand);
    map.put("path",path);//sell
    return map;//{"path":"sell","low":34,"brand":["byd","audi","yd"]}
}
1
2
3
4
5
6
7
8
9
10
11
12
13配置@MatrixVariable注解的pathVar属性可以获取不同路径变量的同名参数
//请求路径:   /boss/1;age=20/2;age=10
@GetMapping("/boss/{bossId}/{empId}")
public Map<String,Object> boss(@MatrixVariable(value = "age",pathVar = "bossId") Integer bossAge,
                               @MatrixVariable(value = "age",pathVar = "empId") Integer empAge){
    Map<String,Object> map=new HashMap<>();
    map.put("bossAge",bossAge);
    map.put("empAge",empAge);
    return map;//{"bossAge":20,"empAge":10}
}
1
2
3
4
5
6
7
8
9
# @ModelAttribute
参数解析器ServletModelAttributeMethodArgumentResolver是专门检查是否有@ModelAttribute注解的,不能处理复杂参数Model类型
# 常用Servlet API
在控制方法形参列表指定特定参数类型可以自动获取常用的原生Servlet相关对象作为参数,可使用原生Servlet的功能
可以使用的Servlet API:
- WebRequest、ServletRequest、MultipartRequest、 HttpSession、javax.servlet.http.PushBuilder、Principal、InputStream、Reader、HttpMethod、Locale、TimeZone、ZoneId
- 上述部分API的参数解析器为ServletRequestMethodArgumentResolver,在supportsParameter方法中规定了具体的相关参数类型,原生request和response都可以通过传递过来封装了原生请求和响应对象的参数webRequest获取,具体原理见源码
以ServletRequest为例分析Servlet API的底层原理
- 只讲getMethodArgumentValues方法的两个重点判断参数解析器和解析参数值,其他的执行流程见重点3
【控制器方法准备】
@GetMapping("/goto")
public String goToPage(HttpServletRequest request){
    request.setAttribute("msg","成功了...");
    request.setAttribute("code",200);
    return "forward:/success";//转发到'/success'请求
}
1
2
3
4
5
6【步骤1:判断和寻找适合HttpServletRequest类型参数的参数解析器】
public class HandlerMethodArgumentResolverComposite implements HandlerMethodArgumentResolver {
    ...
    public boolean supportsParameter(MethodParameter parameter) {
        return this.getArgumentResolver(parameter) != null;//第1步
    }

    //第2步
    @Nullable
	private HandlerMethodArgumentResolver getArgumentResolver(MethodParameter parameter) {
		HandlerMethodArgumentResolver result = this.argumentResolverCache.get(parameter);
		if (result == null) {
			for (HandlerMethodArgumentResolver resolver : this.argumentResolvers) {
				if (resolver.supportsParameter(parameter)) {//第3步
					result = resolver;
					this.argumentResolverCache.put(parameter, result);//第4步
					break;
				}
			}
		}
		return result;
	}
}
1
2
3
4
5
6
7
8
9
10
11
12
13
14
15
16
17
18
19
20
21
22【当循环到resolver为ServletRequestMethodArgumentResolver时的supportsParameter方法解析】
public class ServletRequestMethodArgumentResolver implements HandlerMethodArgumentResolver {
    ...
	@Override
	public boolean supportsParameter(MethodParameter parameter) {
		Class<?> paramType = parameter.getParameterType();//拿到参数类型HttpServletRequest,接下来对参数类型进行一堆判断,HttpServletRequest正好就是ServletRequest,返回true,不止HttpServletRequest,凡是下面出现的Servlet API都可以使用这个解析器进行解析
		return (/*是否WebRequest*/WebRequest.class.isAssignableFrom(paramType) ||
				/*是否ServletRequest*/ServletRequest.class.isAssignableFrom(paramType) ||
				/*是否...*/MultipartRequest.class.isAssignableFrom(paramType) ||
				/*...*/HttpSession.class.isAssignableFrom(paramType) ||
				(pushBuilder != null && pushBuilder.isAssignableFrom(paramType)) ||
				(Principal.class.isAssignableFrom(paramType) && !parameter.hasParameterAnnotations()) ||
				InputStream.class.isAssignableFrom(paramType) ||
				Reader.class.isAssignableFrom(paramType) ||
				HttpMethod.class == paramType ||
				Locale.class == paramType ||
				TimeZone.class == paramType ||
				ZoneId.class == paramType);
	}
    ...
}
1
2
3
4
5
6
7
8
9
10
11
12
13
14
15
16
17
18
19
20【步骤2:使用解析器将原生的HttpServletRequest传递给形参】
public class ServletRequestMethodArgumentResolver implements HandlerMethodArgumentResolver {
	@Override
	public Object resolveArgument(MethodParameter parameter, @Nullable ModelAndViewContainer mavContainer,
			NativeWebRequest webRequest, @Nullable WebDataBinderFactory binderFactory) throws Exception {//注意了webRequest中封装了原生的request和response对象,是由HandlerMethodArgumentResolverComposite类中的resolveArgument方法传进来的

		Class<?> paramType = parameter.getParameterType();

		// WebRequest / NativeWebRequest / ServletWebRequest
		if (WebRequest.class.isAssignableFrom(paramType)) {//判断对象类型是不是WebRequest ,这里是HttpServletRequest,所以不是【还有其他两个是也行】
			if (!paramType.isInstance(webRequest)) {
				throw new IllegalStateException(
						"Current request is not of type [" + paramType.getName() + "]: " + webRequest);
			}
			return webRequest;
		}

		// ServletRequest / HttpServletRequest / MultipartRequest / MultipartHttpServletRequest
		if (ServletRequest.class.isAssignableFrom(paramType) || MultipartRequest.class.isAssignableFrom(paramType)) {//判断对象类型是不是ServletRequest ,这里是HttpServletRequest,所以是【还有其他三个是也行】
			return resolveNativeRequest(webRequest, paramType);//核心,把webRequest形参传给了resolveNativeRequest方法进行解析
		}

		// HttpServletRequest required for all further argument types
		return resolveArgument(paramType, resolveNativeRequest(webRequest, HttpServletRequest.class));
	}

    //【resolveArgument方法中的resolveNativeRequest方法解析】
    private <T> T resolveNativeRequest(NativeWebRequest webRequest, Class<T> requiredType) {
		T nativeRequest = webRequest.getNativeRequest(requiredType);//通过webRequest拿到原生的request请求
		if (nativeRequest == null) {
			throw new IllegalStateException(
					"Current request is not of type [" + requiredType.getName() + "]: " + webRequest);
		}
		return nativeRequest;//拿到原生的request请求直接返回给resolveNativeRequest方法,最后返回给存储所有参数的数组
	}
}
1
2
3
4
5
6
7
8
9
10
11
12
13
14
15
16
17
18
19
20
21
22
23
24
25
26
27
28
29
30
31
32
33
34
35
# 常用复杂参数
在形参列表指定特定参数类型可以自动获取一些复杂参数,如Model可用于向请求域共享数据,doDispatch方法源码解析的重点4中介绍了Map和Model数据从封装到ModelAndView到最后放入请求域中的整个流程
常用复杂参数清单
Map
Model
^要点1: 存放在map、model的数据会被放在request的请求域中, 相当于给数据调用request.setAttribute方法 ^注意: 向请求域中放数据实际上有五种方式,雷神这里讲了三种:原生request、map、model
Errors/BindingResult
RedirectAttributes
ServletResponse
[^要点3]: 原生的response,这个不是在原生Servlet API中讲过了吗
SessionStatus
UriComponentsBuilder
ServletUriComponentsBuilder
测试map和model对应的参数解析器
原理:还是原来的,在supportsParameter方法的调用方法getArgumentResolver中对26种参数解析器进行遍历,测试请求参数类型按顺序依次为Map、Model、HttpServletRequest、HttpServletResponse ,生效的参数解析器依次为MapMethodProcessor、ModelMethodProcessor、
特别注意:经过测试和源码分析,形参同时有参数类型为Map以及参数类型为Model的情况下,实参Object临时数组中存放的Map和Model的引用地址都指向同一个BindingAwareModelMap对象
![]()
【BindingAwareModelMap的继承结构图】
![]()
当参数类型为Map且参数没有任何注解时的底层原理
- 核心1:参数解析器MapMethodProcessor的supportsParameter方法检查参数类型是否Map且参数上没有注解
- 核心2:参数解析器MapMethodProcessor的resolveArgument方法直接调用mavContainer. getModel()方法从mavContainer对象【ModelAndViewContainer】中获取空的defaultModel属性【BindingAwareModelMap】并将其作为实参传入类型为Map的形参,defaultModel是一个空Map ,同时也是一个Model,这个defaultModel可以直接从mavContainer对象中随时拿
【MapMethodProcessor的相关方法】
public class MapMethodProcessor implements HandlerMethodArgumentResolver, HandlerMethodReturnValueHandler {
	//匹配参数解析器方法
    @Override
	public boolean supportsParameter(MethodParameter parameter) {
		return (Map.class.isAssignableFrom(parameter.getParameterType()) &&
				parameter.getParameterAnnotations().length == 0);//判断方法参数类型是Map并且该没有注解
	}

    //解析参数方法
    @Override
	@Nullable
	public Object resolveArgument(MethodParameter parameter, @Nullable ModelAndViewContainer mavContainer,
			NativeWebRequest webRequest, @Nullable WebDataBinderFactory binderFactory) throws Exception {

		Assert.state(mavContainer != null, "ModelAndViewContainer is required for model exposure");
		return mavContainer.getModel();//mavContainer是ModelAndViewContainer,通过getModel方法可以找到ModelAndViewContainer中有一个defaultModel属性,返回defaultModel,此时这个这个defaultModel会直接返回给形参object数组,以后会把这个defaultModel赋值给Map类型的形参

        //defaultModel实际上是一个BindingAwareModelMap,BindingAwareModelMap继承于ExtendedModelMap,ExtendedModelMap继承于ModelMap并实现了Model,ModelMap继承于LinkedHashMap<String,Object>,相当于用于形参列表中的Map类型既是Model也是Map

	}
}
1
2
3
4
5
6
7
8
9
10
11
12
13
14
15
16
17
18
19
20
21【ModelAndViewContainer中的defaultModel属性】
public class ModelAndViewContainer {
	...
	private final ModelMap defaultModel = new BindingAwareModelMap();
	...
	public ModelMap getModel() {
		if (useDefaultModel()) {
			return this.defaultModel;//返回defaulModel属性
		}
		else {
			if (this.redirectModel == null) {
				this.redirectModel = new ModelMap();
			}
			return this.redirectModel;
		}
	}
	...
}
1
2
3
4
5
6
7
8
9
10
11
12
13
14
15
16
17当参数类型为Model
- 核心1:匹配参数解析器的方法没说,以后研究一下
- 核心2:参数解析器ModelMethodProcessor的resolveArgument方法还是直接调用mavContainer. getModel()方法,仍然返回ModelAndViewContainer类型的mavContainer对象中BindingAwareModelMap类型的属性defaultModel,仍然是一个空的map,也是一个model
【ModelMethodProcessor的相关方法】
public class ModelMethodProcessor implements HandlerMethodArgumentResolver, HandlerMethodReturnValueHandler {

	@Override
	public boolean supportsParameter(MethodParameter parameter) {
		return Model.class.isAssignableFrom(parameter.getParameterType());//没进去,就说找到了,怎么找的没说
	}

	@Override
	@Nullable
	public Object resolveArgument(MethodParameter parameter, @Nullable ModelAndViewContainer mavContainer,
			NativeWebRequest webRequest, @Nullable WebDataBinderFactory binderFactory) throws Exception {

		Assert.state(mavContainer != null, "ModelAndViewContainer is required for model exposure");
		return mavContainer.getModel();//实际上,这个方法调用和MapMethodProcessor中的一模一样,也是返回ModelAndViewContainer对象mavContainer中BindingAwareModelMap类型的属性defaultModel,仍然是一个空的map,也是一个model
	}
	...
}
1
2
3
4
5
6
7
8
9
10
11
12
13
14
15
16
17
18
Modle和Map类型形参向请求域共享数据的原理
- 执行完形参数据封装成object数组,立即去执行控制器方法,获得控制器方法的返回值,随后将返回值处理封装到ModelAndView中【该过程给mav构造方法传参defaultModel,执行构造方法时defaultModel中的数据被封装成新的ModelMap存入ModelAndView】返回给doDispatch方法
- 转头立即去执行所有拦截器的postHandle方法,
- 随后执行processDispatchResult方法处理和派发结果,调用render方法获取视图名以及最佳匹配视图并
- 在render方法中调用view.render方法把ModelMap中的数据全部转移到LinkedHashMap类型的mergedModel中,然后调用renderMergedOutputModel方法,传参mergedModel和原生request对象
- 在renderMergedOutputModel方法中调用exposeModelAsRequestAttributes方法使用Map流式编程遍历key和value并全部放入请求域中
# 自定义对象参数
与属性同名的请求参数会被自动封装在对象中,场景举例:传递参数的名字和pojo类的属性名相同,或者与属性指向的对象的属性名相同(即级联属性),可以使用SpringBoot实现前端提交的数据被自动封装成pojo对象
- 数据绑定:页面提交的请求数据(GET、POST)都可以和对象属性进行绑定
【pojo类】
/**
 *     姓名: <input name="userName"/> <br/>
 *     年龄: <input name="age"/> <br/>
 *     生日: <input name="birth"/> <br/>
 *     宠物姓名:<input name="pet.name"/><br/>
 *     宠物年龄:<input name="pet.age"/>
 */
@Data
public class Person {

    private String userName;
    private Integer age;
    private Date birth;
    private Pet pet;

}

@Data
public class Pet {

    private String name;
    private String age;

}
2
3
4
5
6
7
8
9
10
11
12
13
14
15
16
17
18
19
20
21
22
23
24
【前端测试页面】
- 注意:
- 涉及级联属性的前端表单页面提交数据的名字也要用pet.name对级联属性进行区分,否则无法为级联属性赋值
- 且多个相同参数名而属性只能接收一个就只取第一个请求参数的值
<form action="/saveuser" method="post">
    姓名:<input name="userName" value="zhangsan"><br>
    年龄:<input name="age" value="18"><br>
    生日:<input name="birth" value="2019/12/10"><br>
    宠物姓名:<input name="pet.name" value="阿猫"><br>
    宠物年龄:<input name="pet.age" value="5"><br>
    <input TYPE="submit" value="保存">
</form>
2
3
4
5
6
7
8
【控制器方法代码】
@RestController
public class ParameterTestController {
    @PostMapping("/saveuser")
    public Person saveUser(Person person){
        return person;
        //{"userName":"zhangsan","age":18,"birth":"2019-12-09T16:00:00.000+00:00","pet":{"name":"阿猫","age":"5"}}
        //如果没有表单提交数据的参数名没有使用级联属性的命名,就无法为级联属性赋值,且多个相同参数名而属性只能接收一个就只取第一个请求参数
    }
}
2
3
4
5
6
7
8
9
数据绑定的底层原理
POJO类使用的参数解析器是ServletMethodAttributeMethodProcessor【注意有两个参数解析器都叫做ServletMethodAttributeMethodProcessor,第6个和第25个,只有第25个能解析Pojo类自定义参数,这是为什么呢】
- 这个参数解析器的supportsParameter方法是从父类ModelAttributeMethodProcessor继承来的且没有重写
- resolveArgument也是从父类ModelAttributeMethodProcessor继承来的且没有重写,打断点会直接进父类执行对应的方法
supportsParameter方法
- 只要有@ModelAttribute注解的参数或者不是必须标注注解且不是简单类型的参数ServletMethodAttributeMethodProcessor参数解析器就可以解析该参数
resolveArgument方法
- 先通过createAttribute方法创建一个对应自定义类型参数的空Pojo实例出来
- 判断pojo实例没有绑定数据就会通过绑定工厂的binderFactory.createBinder方法创建一个Web数据绑定器WebDataBinder binder对象
太烦了,先记住以后几个重点,自己慢慢理一下
- WebDataBinder
- WebDataBinder中有124个converter
- 可以自定义converter把任意类型转换成我们想要的类型【valueOf方法】
【源码解析】
public class ModelAttributeMethodProcessor implements HandlerMethodArgumentResolver, HandlerMethodReturnValueHandler {
	...
	@Override
	public boolean supportsParameter(MethodParameter parameter) {
		return (parameter.hasParameterAnnotation(ModelAttribute.class) ||
				(this.annotationNotRequired && !BeanUtils.isSimpleProperty(parameter.getParameterType())));//hasParameterAnnotation是判断参数是否标注@ModelAttribute注解,annotationNotRequired判断参数是否不需要注解,如果不需要注解就继续判断参数是否简单类型;只要有@ModelAttribute注解的参数或者不是必须标注注解且不是简单类型的参数ServletMethodAttributeMethodProcessor参数解析器就可以解析该参数
	}

	@Override
	@Nullable
	public final Object resolveArgument(MethodParameter parameter, @Nullable ModelAndViewContainer mavContainer,
			NativeWebRequest webRequest, @Nullable WebDataBinderFactory binderFactory) throws Exception {

		Assert.state(mavContainer != null, "ModelAttributeMethodProcessor requires ModelAndViewContainer");
		Assert.state(binderFactory != null, "ModelAttributeMethodProcessor requires WebDataBinderFactory");

		String name = ModelFactory.getNameForParameter(parameter);//获取参数的名字
		ModelAttribute ann = parameter.getParameterAnnotation(ModelAttribute.class);//获取@ModelAttribute注解
		if (ann != null) {
			mavContainer.setBinding(name, ann.binding());//如果有注解走这里绑定一堆东西
		}

        //自定义pojo没有@ModelAttribute注解直接到这儿
		Object attribute = null;
		BindingResult bindingResult = null;

		if (mavContainer.containsAttribute(name)) {//这一步是判断mavContainer中是否有所需参数,这个也是@ModelAttribute注解的功能,@ModelAttribute注解不常用,暂时不管
			attribute = mavContainer.getModel().get(name);
		}
		else {
			// Create attribute instance
			try {
				attribute = createAttribute(name, parameter, binderFactory, webRequest);//经过这一步会创建一个实例给attribute,创建的实例是一个空Pojo对象【这里是空Person对象】
			}
			catch (BindException ex) {
				if (isBindExceptionRequired(parameter)) {
					// No BindingResult parameter -> fail with BindException
					throw ex;
				}
				// Otherwise, expose null/empty value and associated BindingResult
				if (parameter.getParameterType() == Optional.class) {
					attribute = Optional.empty();
				}
				else {
					attribute = ex.getTarget();
				}
				bindingResult = ex.getBindingResult();
			}
		}

		if (bindingResult == null) {//空person对象最终需要跟请求数据进行绑定,bindingResult是绑定结果,就是用来进入请求数据赋值给pojo对象的判据,没有绑定结果就进行绑定
			// Bean property binding and validation;
			// skipped in case of binding failure on construction.

            ////以下就是将请求数据赋值给空的pojo对象
			WebDataBinder binder = binderFactory.createBinder(webRequest, attribute, name);//利用绑定工厂创建一个Web数据绑定器WebDataBinder binder对象,空pojo对象即attribute对象会直接封装到binder中作为binder的target属性;binder中还有一个conversionService属性称为转换服务,conversionService对应的WebConversionService对象中的converters属性里面封装者124个converter,因为Http协议规定传过来的都是字符串,所以SpringMVC就依靠这些转换器把String类型的数据转成各种类型的数据,但是我看到不止String转成其他,还有Number转成Number,各种类型转换都有;WebDataBinder使用转换器把数据转换成对应的数据类型后使用反射机制把数据封装到pojo对象的属性中

            if (binder.getTarget() != null) {//拿到pojo对象并判断对象不为空
				if (!mavContainer.isBindingDisabled(name)) {

                    //核心
					bindRequestParameters(binder, webRequest);//这一步是绑定请求数据,传参有web数据绑定器和原生请求webRequest,绑定器有实例化的空pojo对象【person】,在这一步就会完成空pojo的所有属性传参,这一步就是核心:原理是获取请求中的每个参数值,通过反射机制找到空pojo的属性值并把值封装到属性中,反射过程没咋说,反正javase有,主要还是获取转换器,转换器通过dicode或者valueOf转换参数类型,完事返回目标参数值在某个环节被ph.set绑定在pojo对象对应的属性中
				}
				validateIfApplicable(binder, parameter);
				if (binder.getBindingResult().hasErrors() && isBindExceptionRequired(binder, parameter)) {
					throw new BindException(binder.getBindingResult());//绑定期间有任何异常都会放到绑定结果中,使用getBindingResult方法就能获取绑定结果,SpringMVC数据校验时校验错误拿校验结果就是在这一块拿的
				}
			}
			// Value type adaptation, also covering java.util.Optional
			if (!parameter.getParameterType().isInstance(attribute)) {
				attribute = binder.convertIfNecessary(binder.getTarget(), parameter.getParameterType(), parameter);
			}
			bindingResult = binder.getBindingResult();
		}

		// Add resolved attribute and BindingResult at the end of the model
		Map<String, Object> bindingResultModel = bindingResult.getModel();
		mavContainer.removeAttributes(bindingResultModel);
		mavContainer.addAllAttributes(bindingResultModel);

		return attribute;
	}
	...
}
1
2
3
4
5
6
7
8
9
10
11
12
13
14
15
16
17
18
19
20
21
22
23
24
25
26
27
28
29
30
31
32
33
34
35
36
37
38
39
40
41
42
43
44
45
46
47
48
49
50
51
52
53
54
55
56
57
58
59
60
61
62
63
64
65
66
67
68
69
70
71
72
73
74
75
76
77
78
79
80
81
82
83
84
85- supportsParameter方法中调用的相关方法源码
【ModelAttributeMethodProcessor的supportsParameter方法中的BeanUtils.isSimpleProperty方法】
public abstract class BeanUtils {
	public static boolean isSimpleProperty(Class<?> type) {
        Assert.notNull(type, "'type' must not be null");
        return isSimpleValueType(type) || type.isArray() && isSimpleValueType(type.getComponentType());//isSimpleValueType(type)判断参数是不是简单类型,type.isArray()判断参数是不是数组,isSimpleValueType(type.getComponentType())是判断啥的没说,主要是不知道type.getComponentType()是什么,反正自定义POJO这个方法返回false,"||"和”&&“优先级相同
    }
}
1
2
3
4
5
6【BeanUtils.isSimpleProperty方法中的isSimpleValueType方法】
//简单类型包含以下几种
public static boolean isSimpleValueType(Class<?> type) {
        return Void.class != type && Void.TYPE != type &&
        (ClassUtils.isPrimitiveOrWrapper(type) ||
        Enum.class.isAssignableFrom(type) ||
        CharSequence.class.isAssignableFrom(type) ||
        Number.class.isAssignableFrom(type) ||
        Date.class.isAssignableFrom(type) ||
        Temporal.class.isAssignableFrom(type) ||
        URI.class == type || URL.class == type ||
        Locale.class == type || Class.class == type);
    }
1
2
3
4
5
6
7
8
9
10
11
12resolveArgument方法中调用的相关方法源码
此例中是String到Number类型的转换
【ModelAttributeMethodProcessor的resolveArgument方法中的bindRequestParameters方法】
public class ServletModelAttributeMethodProcessor extends ModelAttributeMethodProcessor {
    ...
	@Override
	protected void bindRequestParameters(WebDataBinder binder, NativeWebRequest request) {
		ServletRequest servletRequest = request.getNativeRequest(ServletRequest.class);//先获取原生的request请求
		Assert.state(servletRequest != null, "No ServletRequest");
		ServletRequestDataBinder servletBinder = (ServletRequestDataBinder) binder;//将binder的数据类型向下强转为ServletRequestDataBinder类型并赋值给servletBinder
		servletBinder.bind(servletRequest);//通过servletBinder的bind方法传入原生的request对象进行请求参数绑定,根据原来的请求参数,原参数类型,目标参数类型获取转换器,利用转换器进行类型转换,底层就是dicode方法和valueOf方法,转换完成后ph调用set方法把属性值绑定到目标属性中,一切都在bind方法中进行的
	}
    ...
}
1
2
3
4
5
6
7
8
9
10
11【bindRequestParameters方法中的bind方法】
public class ServletRequestDataBinder extends WebDataBinder {
	public void bind(ServletRequest request) {
		MutablePropertyValues mpvs = new ServletRequestParameterPropertyValues(request);//获取原生request中所有的k-v对,mpvs中有一个propertyValueList属性,是一个ArrayList集合,每一个元素都是一个PropertyValue,每个PropertyValue中都保存了请求参数的name和value还有一些其他的属性
		MultipartRequest multipartRequest = WebUtils.getNativeRequest(request, MultipartRequest.class);
		if (multipartRequest != null) {
			bindMultipart(multipartRequest.getMultiFileMap(), mpvs);
		}
		else if (StringUtils.startsWithIgnoreCase(request.getContentType(), MediaType.MULTIPART_FORM_DATA_VALUE)) {
			HttpServletRequest httpServletRequest = WebUtils.getNativeRequest(request, HttpServletRequest.class);
			if (httpServletRequest != null && HttpMethod.POST.matches(httpServletRequest.getMethod())) {
				StandardServletPartUtils.bindParts(httpServletRequest, mpvs, isBindEmptyMultipartFiles());
			}
		}

        addBindValues(mpvs, request);//添加额外要绑定的值到mpvs中,传参包含所有请求参数的mpvs和原生request,从 request请求域中通过属性名"org.springframework.web.servlet.HandlerMapping.uriTemplateVariables"获取请求域中的一个Map集合并赋值给变量uriVars,如果请求域存在该Map集合,就使用Map流式编程遍历并添加到mpvs中

        doBind(mpvs);//执行正式的绑定工作
	}
}
1
2
3
4
5
6
7
8
9
10
11
12
13
14
15
16
17
18
19MutablePropertyValues mpvs对象中请求参数的存在形式
- 这里age是数组是因为俺在测试级联属性不加前缀导致的age参数名重复
![MutablePropertyValues]()
【bind方法中的doBind方法】
public class WebDataBinder extends DataBinder {
	@Override
	protected void doBind(MutablePropertyValues mpvs) {
		checkFieldDefaults(mpvs);
		checkFieldMarkers(mpvs);//检查哪些属性需要被绑定
		adaptEmptyArrayIndices(mpvs);
		super.doBind(mpvs);//调用父类的doBind方法进行绑定
	}
}
1
2
3
4
5
6
7
8
9【doBind方法中的super.doBind方法】
public class DataBinder implements PropertyEditorRegistry, TypeConverter {
	protected void doBind(MutablePropertyValues mpvs) {
		checkAllowedFields(mpvs);
		checkRequiredFields(mpvs);
		applyPropertyValues(mpvs);//应用属性值
	}
}
1
2
3
4
5
6
7【super.doBind方法中的applyPropertyValues方法】
public class DataBinder implements PropertyEditorRegistry, TypeConverter {
	protected void applyPropertyValues(MutablePropertyValues mpvs) {
		try {
			// Bind request parameters onto target object.
			getPropertyAccessor().setPropertyValues(mpvs, isIgnoreUnknownFields(), isIgnoreInvalidFields());//这一步终于开始绑定属性值了
		}
		catch (PropertyBatchUpdateException ex) {
			// Use bind error processor to create FieldErrors.
			for (PropertyAccessException pae : ex.getPropertyAccessExceptions()) {
				getBindingErrorProcessor().processPropertyAccessException(pae, getInternalBindingResult());
			}
		}
	}
}
1
2
3
4
5
6
7
8
9
10
11
12
13
14【applyPropertyValues方法中的setPropertyValues方法】
public abstract class AbstractPropertyAccessor extends TypeConverterSupport implements ConfigurablePropertyAccessor {
	public void setPropertyValues(PropertyValues pvs, boolean ignoreUnknown, boolean ignoreInvalid) throws BeansException {
        List<PropertyAccessException> propertyAccessExceptions = null;
        List<PropertyValue> propertyValues = pvs instanceof MutablePropertyValues ? ((MutablePropertyValues)pvs).getPropertyValueList() : Arrays.asList(pvs.getPropertyValues());
        //这儿反编译好像有点问题,和雷神上课讲的不一样,雷神的课上讲的是获取所有的属性值pvs,对所有属性值pv(PropertyValue类型)进行遍历,调用setPropertyValue方法把属性值设置到pojo类中
        if (ignoreUnknown) {
            this.suppressNotWritablePropertyException = true;
        }

        try {
            Iterator var6 = propertyValues.iterator();//这一步就是拿到propertyValues集合的迭代器

            while(var6.hasNext()) {//还有属性值就就继续遍历,以前是增强for循环,现在编程迭代器迭代了
                PropertyValue pv = (PropertyValue)var6.next();//获取单个属性值

                try {
                    this.setPropertyValue(pv);//这一步就是真正为属性绑定属性值
                } catch (NotWritablePropertyException var14) {
                    if (!ignoreUnknown) {
                        throw var14;
                    }
                }
                ...额外操作不管
    }
}
1
2
3
4
5
6
7
8
9
10
11
12
13
14
15
16
17
18
19
20
21
22
23
24
25【setPropertyValues方法中的setPropertyValue方法】
public abstract class AbstractNestablePropertyAccessor extends AbstractPropertyAccessor {

	public void setPropertyValue(PropertyValue pv) throws BeansException {
        AbstractNestablePropertyAccessor.PropertyTokenHolder tokens = (AbstractNestablePropertyAccessor.PropertyTokenHolder)pv.resolvedTokens;
        if (tokens == null) {
            String propertyName = pv.getName();//从pv中获取对应属性值的属性名

            AbstractNestablePropertyAccessor nestedPa;//创建一个属性访问器
            try {

                //PropertyAccessor是一个反射工具类,getPropertyAccessorForPropertyPath方法获取的是一个属性的访问器,传参是属性名;属性访问器就是nestedPa,类型是BeanWrapperImpl,nestedPa对象中把空的Person对象封装在rootObject属性中
                nestedPa = this.getPropertyAccessorForPropertyPath(propertyName);

            } catch (NotReadablePropertyException var6) {
                throw new NotWritablePropertyException(this.getRootClass(), this.nestedPath + propertyName, "Nested property in path '" + propertyName + "' does not exist", var6);
            }

            tokens = this.getPropertyNameTokens(this.getFinalPath(nestedPa, propertyName));
            if (nestedPa == this) {
                pv.getOriginalPropertyValue().resolvedTokens = tokens;
            }

            nestedPa.setPropertyValue(tokens, pv);//调用BeanWrapperImpl对象的setPropertyValue方法把属性值绑定进去
        } else {
            this.setPropertyValue(tokens, pv);
        }

    }
}
1
2
3
4
5
6
7
8
9
10
11
12
13
14
15
16
17
18
19
20
21
22
23
24
25
26
27
28
29【setPropertyValue方法中的nestedPa.setPropertyValue方法】
public abstract class AbstractNestablePropertyAccessor extends AbstractPropertyAccessor {
	protected void setPropertyValue(AbstractNestablePropertyAccessor.PropertyTokenHolder tokens, PropertyValue pv) throws BeansException {
        if (tokens.keys != null) {
            this.processKeyedProperty(tokens, pv);
        } else {
            this.processLocalProperty(tokens, pv);//在这一步绑定值,属实是麻了
        }

    }
}
1
2
3
4
5
6
7
8
9
10【nestedPa.setPropertyValue方法中的processLocalProperty方法】
public abstract class AbstractNestablePropertyAccessor extends AbstractPropertyAccessor {

    private void processLocalProperty(AbstractNestablePropertyAccessor.PropertyTokenHolder tokens, PropertyValue pv) {
        AbstractNestablePropertyAccessor.PropertyHandler ph = this.getLocalPropertyHandler(tokens.actualName);//获取属性处理器ph
        if (ph != null && ph.isWritable()) {
            Object oldValue = null;

            PropertyChangeEvent propertyChangeEvent;
            try {
                Object originalValue = pv.getValue();
                Object valueToApply = originalValue;//拿到真正的属性值
                if (!Boolean.FALSE.equals(pv.conversionNecessary)) {
                    if (pv.isConverted()) {
                        valueToApply = pv.getConvertedValue();
                    } else {
                        if (this.isExtractOldValueForEditor() && ph.isReadable()) {
                            try {
                                oldValue = ph.getValue();
                            } catch (Exception var8) {
                                Exception ex = var8;
                                if (var8 instanceof PrivilegedActionException) {
                                    ex = ((PrivilegedActionException)var8).getException();
                                }

                                if (logger.isDebugEnabled()) {
                                    logger.debug("Could not read previous value of property '" + this.nestedPath + tokens.canonicalName + "'", ex);
                                }
                            }
                        }

                        //核心一步,把字符串类型的18转换成了Integer类型的18
                        valueToApply = this.convertForProperty(tokens.canonicalName, oldValue, originalValue, ph.toTypeDescriptor());//对属性值进行转换,convertForProperty方法进去先调用convertIfNecessary方法判断是否需要类型转换 ,先获取pojo类的属性类型,中间封的太深,反正最后调用valueOf方法转换成相应类型以后一路返回到这儿赋值给valueToApply,这一步此时真正的找数据类型转换器并进行数据转换的一步
                    }

                    pv.getOriginalPropertyValue().conversionNecessary = valueToApply != originalValue;
                }

                ph.setValue(valueToApply);//这一步才真正把转换后的值设置到属性值中,ph中保存了Person对象,之前说过,每一个属性值都经历了这个流程
            } catch (TypeMismatchException var9) {
                throw var9;
            }
            ...一些额外操作
    }
1
2
3
4
5
6
7
8
9
10
11
12
13
14
15
16
17
18
19
20
21
22
23
24
25
26
27
28
29
30
31
32
33
34
35
36
37
38
39
40
41
42
43【processLocalProperty方法中的this.convertForProperty方法解析】
public abstract class AbstractNestablePropertyAccessor extends AbstractPropertyAccessor {
	@Nullable
	protected Object convertForProperty(
			String propertyName, @Nullable Object oldValue, @Nullable Object newValue, TypeDescriptor td)
			throws TypeMismatchException {

		return convertIfNecessary(propertyName, oldValue, newValue, td.getType(), td);//td.getType()是拿到空pojo的属性值类型,这一步判断有必要就进行类型转换
	}
}
1
2
3
4
5
6
7
8
9【this.convertForProperty方法中的convertIfNecessary方法】
public abstract class AbstractNestablePropertyAccessor extends AbstractPropertyAccessor {
	@Nullable
	private Object convertIfNecessary(@Nullable String propertyName, @Nullable Object oldValue,
			@Nullable Object newValue, @Nullable Class<?> requiredType, @Nullable TypeDescriptor td)
			throws TypeMismatchException {

		Assert.state(this.typeConverterDelegate != null, "No TypeConverterDelegate");//typeConverterDelegate中124个转换器还在这里面的conversionService属性中
		try {
			return this.typeConverterDelegate.convertIfNecessary(propertyName, oldValue, newValue, requiredType, td);//这一步调用convertIfNecessary方法进行转换
		}
		...扔异常的一些操作
	}
}
1
2
3
4
5
6
7
8
9
10
11
12
13【convertIfNecessary方法中的typeConverterDelegate.convertIfNecessary方法解析】
class TypeConverterDelegate {
	@SuppressWarnings("unchecked")
	@Nullable
	public <T> T convertIfNecessary(@Nullable String propertyName, @Nullable Object oldValue, @Nullable Object newValue,
			@Nullable Class<T> requiredType, @Nullable TypeDescriptor typeDescriptor) throws IllegalArgumentException {

		// Custom editor for this type?
		PropertyEditor editor = this.propertyEditorRegistry.findCustomEditor(requiredType, propertyName);

		ConversionFailedException conversionAttemptEx = null;

		// No custom editor but custom ConversionService specified?
        //getConversionService方法分支1
		ConversionService conversionService = this.propertyEditorRegistry.getConversionService();//这一步拿到了conversionService里面有124个转换器
		if (editor == null && conversionService != null && newValue != null && typeDescriptor != null) {
			TypeDescriptor sourceTypeDesc = TypeDescriptor.forObject(newValue);
			if (conversionService.canConvert(sourceTypeDesc, typeDescriptor)) {//conversionService.canConvert方法判断能不能转换,找的到就返回true并把对应的转换器存入缓存converterCache中
				try {

                    //convert方法分支2
					return (T) conversionService.convert(newValue, sourceTypeDesc, typeDescriptor);//调用转换器的convert方法,在这个方法中获取对应类型转换的converter转换器,
				}
				catch (ConversionFailedException ex) {
					// fallback to default conversion logic below
					conversionAttemptEx = ex;
				}
			}
		}
		...额外操作
    }
}
1
2
3
4
5
6
7
8
9
10
11
12
13
14
15
16
17
18
19
20
21
22
23
24
25
26
27
28
29
30
31【getConversionService方法分支1】
【convertIfNecessary方法的canConvert方法】
public class GenericConversionService implements ConfigurableConversionService {
	public boolean canConvert(@Nullable TypeDescriptor sourceType, TypeDescriptor targetType) {
        Assert.notNull(targetType, "Target type to convert to cannot be null");
        if (sourceType == null) {
            return true;
        } else {
            GenericConverter converter = this.getConverter(sourceType, targetType);//getConverter方法获取合适的转换器
            return converter != null;//如果converter不为空则返回true
        }
    }
}
1
2
3
4
5
6
7
8
9
10
11【canConvert方法中的getConverter方法】
public class GenericConversionService implements ConfigurableConversionService {
	@Nullable
	protected GenericConverter getConverter(TypeDescriptor sourceType, TypeDescriptor targetType) {
		ConverterCacheKey key = new ConverterCacheKey(sourceType, targetType);
		GenericConverter converter = this.converterCache.get(key);//先尝试从缓存中拿转换器
		if (converter != null) {
			return (converter != NO_MATCH ? converter : null);
		}

		converter = this.converters.find(sourceType, targetType);//第一次缓存中没有转换器会进来调用find方法拿对应类型转换的转换器
		if (converter == null) {
			converter = getDefaultConverter(sourceType, targetType);
		}

		if (converter != null) {
			this.converterCache.put(key, converter);//这里把找到的converter存入转换器缓存converterCache中
			return converter;//并且继续向上返回converter
		}

		this.converterCache.put(key, NO_MATCH);
		return null;
	}
}
1
2
3
4
5
6
7
8
9
10
11
12
13
14
15
16
17
18
19
20
21
22
23【getConverter方法中的find方法】
这个GenericConversionService貌似编写了转换器转换规则的所有东西,设置每一个参数值的时候都会在所有converter中去找那个可以将前端请求参数的数据类型转换到指定的pojo属性的数据类型,请求参数的类型也有非字符串类型,比如文件上传就是以流的形式上传,转换器就会把流转换成文件类型进行操作
public class GenericConversionService implements ConfigurableConversionService {
	@Nullable
    public GenericConverter find(TypeDescriptor sourceType, TypeDescriptor targetType) {
        // Search the full type hierarchy
        List<Class<?>> sourceCandidates = getClassHierarchy(sourceType.getType());//获取请求参数的原类型
        List<Class<?>> targetCandidates = getClassHierarchy(targetType.getType());//获取请求参数的目标类型
        for (Class<?> sourceCandidate : sourceCandidates) {
            for (Class<?> targetCandidate : targetCandidates) {//增强for循环,遍历所有124个转换器
                ConvertiblePair convertiblePair = new ConvertiblePair(sourceCandidate, targetCandidate);
                GenericConverter converter = getRegisteredConverter(sourceType, targetType, convertiblePair);//调用getRegisteredConverter方法获取到当前能用的converter
                if (converter != null) {
                    return converter;//找到了converter就返回converter
                }
            }
        }
        return null;
    }
}
1
2
3
4
5
6
7
8
9
10
11
12
13
14
15
16
17
18【convert方法分支2】
【convertIfNecessary方法的conversionService.convert方法】
public class GenericConversionService implements ConfigurableConversionService {
	@Override
	@Nullable
    //source是请求携带的原生请求参数
    //sourceType是原来的参数类型
    //targetType是需要转成pojo中对应的参数类型
	public Object convert(@Nullable Object source, @Nullable TypeDescriptor sourceType, TypeDescriptor targetType) {
		Assert.notNull(targetType, "Target type to convert to cannot be null");
		if (sourceType == null) {
			Assert.isTrue(source == null, "Source must be [null] if source type == [null]");
			return handleResult(null, targetType, convertNullSource(null, targetType));
		}
		if (source != null && !sourceType.getObjectType().isInstance(source)) {
			throw new IllegalArgumentException("Source to convert from must be an instance of [" +
					sourceType + "]; instead it was a [" + source.getClass().getName() + "]");
		}
		GenericConverter converter = getConverter(sourceType, targetType);//调用getConverter拿到相应的转换器,这个getConverter方法之前说过,就是先从缓存拿,拿不到就去遍历所有的转换器,再将转化器存入缓存
		if (converter != null) {
			Object result = ConversionUtils.invokeConverter(converter, source, sourceType, targetType);//能拿到converter就调用静态方法ConversionUtils.invokeConverter对原请求数据进行类型转换
			return handleResult(sourceType, targetType, result);
		}
		return handleConverterNotFound(source, sourceType, targetType);
	}
}
1
2
3
4
5
6
7
8
9
10
11
12
13
14
15
16
17
18
19
20
21
22
23
24【convert方法中的ConversionUtils.invokeConverter方法解析】
abstract class ConversionUtils {
	@Nullable
	public static Object invokeConverter(GenericConverter converter, @Nullable Object source,
			TypeDescriptor sourceType, TypeDescriptor targetType) {
		try {
			return converter.convert(source, sourceType, targetType);//调用converter的convert方法进行类型转换
		}
		catch (ConversionFailedException ex) {
			throw ex;
		}
		catch (Throwable ex) {
			throw new ConversionFailedException(sourceType, targetType, source, ex);
		}
	}
}
1
2
3
4
5
6
7
8
9
10
11
12
13
14
15【invokeConverter方法中的converter.convert方法解析】
public class GenericConversionService implements ConfigurableConversionService {
	@Override
    @Nullable
    public Object convert(@Nullable Object source, TypeDescriptor sourceType, TypeDescriptor targetType) {
        if (source == null) {
            return convertNullSource(sourceType, targetType);
        }
        return this.converterFactory.getConverter(targetType.getObjectType()).convert(source);//这一步是通过converterFactory获取converter,获取完converter后立即调用converter的convert方法,convert方法又去调用NumberUtils.parseNumber方法
    }
}
1
2
3
4
5
6
7
8
9
10【convert方法中的this.converterFactory.getConverter方法】
最终使用的String转Number用的StringToNumberConverterFactory【String到Number的转换工厂】
final class StringToNumberConverterFactory implements ConverterFactory<String, Number> {
	@Override
	public <T extends Number> Converter<String, T> getConverter(Class<T> targetType) {
		return new StringToNumber<>(targetType);//传入目标属性的类型创建一个StringToNumber对象,该类是一个私有类
	}

    //这是一个私有类【StringToNumber类型:这就是一个String转换到Number类型的转换器】
    private static final class StringToNumber<T extends Number> implements Converter<String, T> {
	private final Class<T> targetType;

    public StringToNumber(Class<T> targetType) {
        this.targetType = targetType;
    }

    @Override
    @Nullable
    public T convert(String source) {
        if (source.isEmpty()) {
            return null;
        }
        return NumberUtils.parseNumber(source, this.targetType);//实际String到Number类型的转换在获取完上诉转换器后马上调用的是这个方法convert方法再调用NumberUtils.parseNumber方法进行类型转换
    }
}
}
1
2
3
4
5
6
7
8
9
10
11
12
13
14
15
16
17
18
19
20
21
22
23
24由此启发:我们可以依葫芦画瓢自定义一些类型转换器,T表示要转换的类型,由Converter接口继承来,在实现类中指定T要继承的目标类型,【还有这个用法,T还是妙啊】
【转换器中convert方法中的NumberUtils.parseNumber方法】
md封了这么多层最后还不是valueOf,服了
public abstract class NumberUtils {
	@SuppressWarnings("unchecked")
	public static <T extends Number> T parseNumber(String text, Class<T> targetClass) {
		Assert.notNull(text, "Text must not be null");
		Assert.notNull(targetClass, "Target class must not be null");
		String trimmed = StringUtils.trimAllWhitespace(text);//这特么是啥,这个好像就是请求数据参数值的字符串

        //看pojo类的属性是什么类型,根据类型去执行对应的转换方法
		if (Byte.class == targetClass) {
			return (T) (isHexNumber(trimmed) ? Byte.decode(trimmed) : Byte.valueOf(trimmed));
		}
		else if (Short.class == targetClass) {
			return (T) (isHexNumber(trimmed) ? Short.decode(trimmed) : Short.valueOf(trimmed));
		}
		else if (Integer.class == targetClass) {
			return (T) (isHexNumber(trimmed) ? Integer.decode(trimmed) : Integer.valueOf(trimmed));//isHexNumber好像是进行一些特殊符号判断的,判断结果为true就调用decode方法,为false就调用valueOf方法把字符串转换成integer类型,显然这里调用的是valueOf方法,雷神讲错了,然后这个值一路返回上一个方法,最终返回到valueToApply
		}
		...相似的类型判断
	}
}
1
2
3
4
5
6
7
8
9
10
11
12
13
14
15
16
17
18
19
20
WebDataBinder的配置
Web数据绑定器是使用ConfigurableWebBindingInitializer自动向容器中配置的数据绑定器,ConfigurableWebBindingInitializer的调用者之一是WebMvcAutoConfiguration的getConfigurableWebBindingInitializer方法通过ConfigurableWebBindingInitializer.class给容器中配置了一个ConfigurableWebBindingInitializer类型的数据绑定器,ConversionService也是从该容器中拿的;
ConfigurableWebBindingInitializer中有一个initBinder方法,该方法给WebDataBinder中设置了各种东西,其中之一就是conversionService类型转换器,ConversionService接口的子接口ConfigurableConversionService接口的实现类GenericConversionService中有非常多的converter转换器,这些Converter就是来进行类型转换的,所有converter的总接口就是Converter<S,T>,这是一个函数式接口:S表示SourceType,T表示TargetType
自定义Converter
<!--宠物姓名:<input name="pet.name" value="阿猫"><br>-->
<!--宠物年龄:<input name="pet.age" value="5"><br>-->
<!--宠物年龄:<input name="age" value="5"><br>-->

<!--公司现在认为宠物的数据分开组织不好,不想使用级联属性命名的方式,想自己组织如下的数据形式,
后端如何自定义类型转换器来处理这种数据进行对象的封装呢,如果不管直接发送请求,服务器会提示数据绑定错误:错误
信息是person的pet属性绑定"阿猫,3"发生了类型不匹配问题,String类型转换成Pet属性转换不过来,即springMVC不知道
怎么将"阿猫,3"按某种规则封装成宠物对象,因为底层转换是converter负责的,我们只需要自定义一个Converter即可-->
宠物:<input name="pet" value="阿猫,3">
1
2
3
4
5
6
7
8
9对SpringMVC的定制都采用给容器中放一个WebMvcConfigurer组件的方式,该组件中扩展的所有功能都能使用,WebMvcConfigurer是一个接口,里面有一个默认实现的方法叫做addFormatters,意为添加一些格式化器
public interface WebMvcConfigurer {

	/**
	 * Help with configuring {@link HandlerMapping} path matching options such as
	 * whether to use parsed {@code PathPatterns} or String pattern matching
	 * with {@code PathMatcher}, whether to match trailing slashes, and more.
	 * @since 4.0.3
	 * @see PathMatchConfigurer
	 * 之前做过开启矩阵变量功能,添加自己配置的urlPathHelper,把removeSemicolonContent属性设置成false
	 */
	default void configurePathMatch(PathMatchConfigurer configurer) {
        /*configurer中有一个configurer.setUrlPathHelper(urlPathHelper);方法可以添加urlPathHelper*/
	}

	...

	/**
	 * Add {@link Converter Converters} and {@link Formatter Formatters} in addition to the ones
	 * registered by default.
	 * 注释信息是可以给SpringMVC添加一些自定义的类型转换器和格式化器,一起请求数据日期和钱不仅涉及到String类型向其他类型的转换,还涉及到格式的转换如斜杠、横线、逗号等等,此例自定义前端页面数据提交格式只涉及到类型转换
	 */
	default void addFormatters(FormatterRegistry registry) {
        /*registry中有一个registry.addConverter(converter);方法可以添加converter*/
	}
	...
}
1
2
3
4
5
6
7
8
9
10
11
12
13
14
15
16
17
18
19
20
21
22
23
24
25
26具体实现自定义Converter代码
- 步骤一:在配置类中使用@Bean注解添加WebMvcConfigurer组件,感觉这个写法也是匿名内部类
- 步骤二:在WebMvcConfigurer的匿名内部类中重写addFormatters方法,传参是registry
- 步骤三:在addFormatters方法中调用registry.addConverter方法添加以匿名内部类的方式创建的自定义converter对象,并重写convert方法,传入的source就是页面提交会赋值给目标类的请求参数,在convert方法中完成对应的参数解析,并给属性值赋值即可
这样,当SpringMVC拿着"阿猫,3"要去给pet属性赋值时,需要把字符串的"阿猫,3"转换为Pet类型,一查有这个转换器,就用这个转换器的convert方法传入"阿猫,3"并返回Pet类型的对象,此时创建Pet对象和给参数值赋值都是用户自己完成的,不像之前springMVC自己创建空pojo
@Configuration(proxyBeanMethods = false)
public class WebConfig /*implements WebMvcConfigurer*/ {
    //方式一:使用@Bean配置一个WebMvcConfigurer组件
    @Bean
    public WebMvcConfigurer webMvcConfigurer(){
        return new WebMvcConfigurer() {//woc这是什么写法,没见过,记录一下,感觉像匿名内部类
            @Override//重写addFormatters方法,添加自己写的匿名内部类converter对象进去
            public void addFormatters(FormatterRegistry registry){
                registry.addConverter(new Converter<String, Pet>(){//这个converter的类型转换关系就会被参数对应pet属性自动获取调用其中的convert方法
                    @Override
                    public Pet convert(String source) {//这个source就是页面提交过来的值"阿猫,3",这
                        // 里面就是自定义类型转换的操作,这里面直接把数据转换就搞进去了,这样不好,违背OOP软件设计原则,而且
                        //pojo类写死了
                        //StringUtils工具类【这个工具类是Spring的】的方法可以去了解一下
                        if (!StringUtils.isEmpty(source)) {
                            Pet pet=new Pet();
                            String[] split = source.split(",");
                            pet.setName(split[0]);
                            pet.setAge(Integer.parseInt(split[1]));
                            return pet;//{"userName":"zhangsan","age":18,"birth":"2019-12-09T16:00:00.000+00:00","pet":{"name":"阿猫","age":3}}
                        }
                        return null;//如果传过来的字符串都是空的就返回null
                    }
                });
            }
        };
    }
}
1
2
3
4
5
6
7
8
9
10
11
12
13
14
15
16
17
18
19
20
21
22
23
24
25
26
27
28
# 响应数据处理
即控制器方法的返回值在SpringMVC中的处理过程
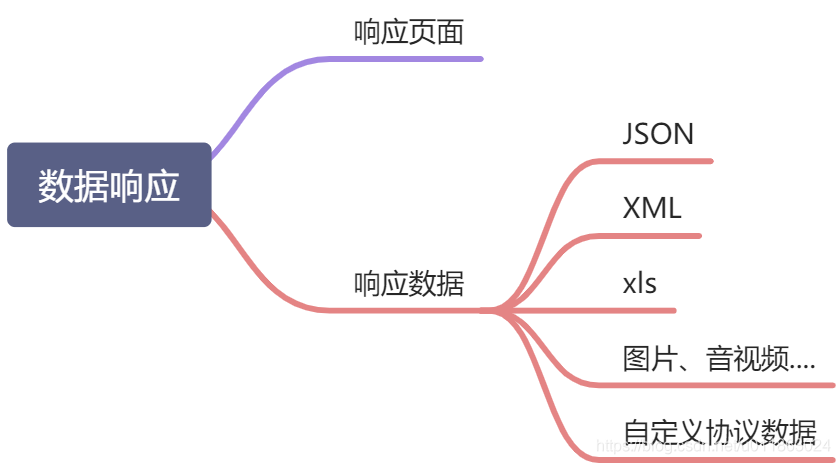
# 返回值处理器原理
ReturnValueHandler,这个在核心对象中已经进行了基本的讲解,这里讲一下返回值处理器的两个方法
返回值处理的核心流程【这个处理过程是在handle方法中执行完执行目标方法获取ModelAndView之前进行的】
- 遍历返回值处理器,调用所有返回值处理器的selectHandler方法获取合适的返回值处理器
- 通过获取的返回值处理器调用其handleReturnValue方法处理返回值
- 在处理响应json的返回值处理器中的handleReturnValue方法中调用writeWithMessageConverters方法通过消息转换器MessageConverter进行处理,实现将返回数据写为json
# 响应json
jackson.jar+@ResponseBody
这种方式只要引入web场景,给控制器方法添加@ResponseBody注解就会自动给前端响应json数据格式的字符串
引入starter-web依赖
<dependency>
    <groupId>org.springframework.boot</groupId>
    <artifactId>spring-boot-starter-web</artifactId>
</dependency>
1
2
3
4<dependency> <groupId>org.springframework.boot</groupId> <artifactId>spring-boot-starter-json</artifactId> <version>2.3.4.RELEASE</version> <scope>compile</scope> </dependency>1
2
3
4
5
6给控制器方法标注@ResponseBody注解
能够处理标注了@ResponseBody注解的返回值处理器是RequestResponseBodyMethodProcessor
控制器方法返回一个对象会自动返回对应的json格式字符串
源码分析
4.4.2中的重点3中的【invokeAndHandle方法中的this.returnValueHandlers.handleReturnValue方法解析】已经对处理返回值的代码进行过简单解析了,这里只讲重点
标注了@ResponseBody注解的控制器方法会利用RequestResponseBodyMethodProcessor返回值处理器中的消息转换器进行处理,把对象自动转成json格式的Byte数组会使用处理器中的消息转换器MappingJackson2HttpMessageConverter将对象转成json
【invokeHandlerMethod方法中的invokeAndHandle方法解析】
- 重点:调用this.returnValueHandlers.handleReturnValue方法,传参返回值、返回值类型、webRequest、mavContainer;handleReturnValue方法是开始处理控制器方法的返回结果的核心方法
public class ServletInvocableHandlerMethod extends InvocableHandlerMethod {
	public void invokeAndHandle(ServletWebRequest webRequest, ModelAndViewContainer mavContainer,
			Object... providedArgs) throws Exception {

		Object returnValue = invokeForRequest(webRequest, mavContainer, providedArgs);
        setResponseStatus(webRequest);
		if (returnValue == null) {//如果控制器方法返回null,则invokeAndHandle方法直接返回
			if (isRequestNotModified(webRequest) || getResponseStatus() != null || mavContainer.isRequestHandled()) {
				disableContentCachingIfNecessary(webRequest);
				mavContainer.setRequestHandled(true);
				return;
			}
		}
		else if (StringUtils.hasText(getResponseStatusReason())) {//这个检测返回值中有没有一些失败原因
			mavContainer.setRequestHandled(true);
			return;
		}

		//如果有返回值且返回值不是字符串,就会执行以下代码
		mavContainer.setRequestHandled(false);
		Assert.state(this.returnValueHandlers != null, "No return value handlers");
		try {
			this.returnValueHandlers.handleReturnValue(
					returnValue, getReturnValueType(returnValue), mavContainer, webRequest);//this.returnValueHandlers.handleReturnValue方法是开始处理控制器方法的返回结果,其实是把返回值的字符串或者其他东西处理赋值给mavContainer的view属性,getReturnValueType(returnValue)是获取返回值的类型,实际上获取的是HandlerMethod$ReturnValueMethodParameter类型的对象,其中的returnValue属性保存的是返回值,executable属性指向的对象的name属性为对应控制的方法名,returnType保存的是返回值类型,这一段代码就是处理返回值的核心代码
		}
		catch (Exception ex) {
			if (logger.isTraceEnabled()) {
				logger.trace(formatErrorForReturnValue(returnValue), ex);
			}
			throw ex;
		}
	}
}
1
2
3
4
5
6
7
8
9
10
11
12
13
14
15
16
17
18
19
20
21
22
23
24
25
26
27
28
29
30
31
32
33【invokeAndHandle方法中的handleReturnValue方法】
- 返回值处理器都继承了HandlerMethodReturnValueHandler接口,重写了其中的用于判断是否支持当前类型返回值returnType的supportsReturnType方法和对返回值进行处理的handleReturnValue方法
public class HandlerMethodReturnValueHandlerComposite implements HandlerMethodReturnValueHandler {
    @Override
    public void handleReturnValue(@Nullable Object returnValue, MethodParameter returnType,
            ModelAndViewContainer mavContainer, NativeWebRequest webRequest) throws Exception {

        //分支一:
        HandlerMethodReturnValueHandler handler = selectHandler(returnValue, returnType);//先通过返回值和返回值类型调用selectHandler方法找到能处理对应返回值的返回值处理器
        if (handler == null) {
            throw new IllegalArgumentException("Unknown return value type: " + returnType.getParameterType().getName());
        }

        //分支二:
        handler.handleReturnValue(returnValue, returnType, mavContainer, webRequest);//通过返回值处理器调用handleReturnValue方法来处理返回值,和参数解析器的原理是一样的
    }
}
1
2
3
4
5
6
7
8
9
10
11
12
13
14
15【分支一:selectHandler方法分支】
【handleReturnValue方法中的selectHandler方法】
public class HandlerMethodReturnValueHandlerComposite implements HandlerMethodReturnValueHandler {
	@Nullable
	private HandlerMethodReturnValueHandler selectHandler(@Nullable Object value, MethodParameter returnType) {
        //小分支一
		boolean isAsyncValue = isAsyncReturnValue(value, returnType);//判断返回值类型是否异步返回值,对每个返回值处理器进行遍历,判断每个handler是否AsyncHandlerMethodReturnValueHandler类型,并且调用对应的isAsyncReturnValue传参控制器方法传参和参数类型判断判断是否异步返回值
		for (HandlerMethodReturnValueHandler handler : this.returnValueHandlers) {
			if (isAsyncValue && !(handler instanceof AsyncHandlerMethodReturnValueHandler)) {
				continue;
			}
			if (handler.supportsReturnType(returnType)) {//判断处理器是否支持该类型的返回值
				return handler;
			}
		}
		return null;
	}
}
1
2
3
4
5
6
7
8
9
10
11
12
13
14
15
16【selectHandler方法中的supportsReturnType(returnType)方法】
因为这里遍历会调用所有返回值处理器的supportsReturnType方法,这里只以第一个ModelAndViewMethodReturnValueHandler为例
public class ModelAndViewMethodReturnValueHandler implements HandlerMethodReturnValueHandler {
    ...
	@Override
	public boolean supportsReturnType(MethodParameter returnType) {
		return ModelAndView.class.isAssignableFrom(returnType.getParameterType());//判断ModelAndViewMethodReturnValueHandler返回值处理器是否支持当前返回值是判断当前返回值是否ModelAndView类型,所以该处理器不支持当前返回值;一般判断方式就是判断返回值类型是否是特定的某种类型,由这些处理器的判断方法可以知道SpringMVC一共支持哪些返回值类型,如下列表所示
	}

	@Override
	public void handleReturnValue(@Nullable Object returnValue, MethodParameter returnType,ModelAndViewContainer mavContainer, NativeWebRequest webRequest) throws Exception {
		...
	}
    ...
}
1
2
3
4
5
6
7
8
9
10
11
12
13【分支二:handleReturnValue方法分支】
这里返回person类型的字符串添加了@ResponseBody注解,对应的返回值处理器是RequestResponseBodyMethodProcessor,分析handleReturnValue方法选取相应返回值处理器的
【handleReturnValue方法中的handler.handleReturnValue方法】
public class RequestResponseBodyMethodProcessor extends AbstractMessageConverterMethodProcessor {
	@Override
	public void handleReturnValue(@Nullable Object returnValue, MethodParameter returnType,
			ModelAndViewContainer mavContainer, NativeWebRequest webRequest)
			throws IOException, HttpMediaTypeNotAcceptableException, HttpMessageNotWritableException {

		mavContainer.setRequestHandled(true);
        //对webRequest和webrequest进行进一步封装
		ServletServerHttpRequest inputMessage = createInputMessage(webRequest);
		ServletServerHttpResponse outputMessage = createOutputMessage(webRequest);

		// Try even with null return value. ResponseBodyAdvice could get involved.
		writeWithMessageConverters(returnValue, returnType, inputMessage, outputMessage);//将返回值,返回值类型,请求以及响应都传递给writeWithMessageConverters方法,作用是使用消息转换器进行写出操作
	}
}
1
2
3
4
5
6
7
8
9
10
11
12
13
14
15【handler.handleReturnValue方法中的writeWithMessageConverters方法】
媒体类型涉及内容协商
在请求头的Accept相关信息中声明了浏览器能接受的响应内容类型
![]()
服务器会根据自己自身的能力,决定服务器能生产出什么样内容类型的数据
SpringMVC会挨个遍历所有容器底层的HttpMessageConverter【HttpMessageConverter是所有消息转换器都要实现的接口】查找能处理相应响应内容的消息转换器
![]()
- 响应Json会找到MappingJackson2HttpMessageConverter,该消息转换器可以把对象转成json写出到浏览器,在writeSuffix方法一执行完浏览器就会显示对应的结果,此时还在handle方法中
public abstract class AbstractMessageConverterMethodProcessor extends AbstractMessageConverterMethodArgumentResolver
		implements HandlerMethodReturnValueHandler {
	@SuppressWarnings({"rawtypes", "unchecked"})
	protected <T> void writeWithMessageConverters(@Nullable T value, MethodParameter returnType,ServletServerHttpRequest inputMessage, ServletServerHttpResponse outputMessage) throws IOException, HttpMediaTypeNotAcceptableException, HttpMessageNotWritableException {

		Object body;
		Class<?> valueType;
		Type targetType;

		if (value instanceof CharSequence) {//判断值是不是字符串类型
			body = value.toString();
			valueType = String.class;
			targetType = String.class;
		}
		else {
			body = value;//把值赋值给body
			valueType = getReturnValueType(body, returnType);//把返回值类型赋值给valueType
			targetType = GenericTypeResolver.resolveType(getGenericType(returnType), returnType.getContainingClass());//要转成的类型赋值给targetType,这里两个都是person类型?难不成你这里还可以自动类型转换?
		}

		if (isResourceType(value, returnType)) {//判断是不是资源类型,这里判断的是返回值类型是不是InputStreamResource类型或者Resource类型,即如果是流数据就调用下方对流数据的相应处理办法
			outputMessage.getHeaders().set(HttpHeaders.ACCEPT_RANGES, "bytes");
			if (value != null && inputMessage.getHeaders().getFirst(HttpHeaders.RANGE) != null &&
					outputMessage.getServletResponse().getStatus() == 200) {
				Resource resource = (Resource) value;
				try {
					List<HttpRange> httpRanges = inputMessage.getHeaders().getRange();
					outputMessage.getServletResponse().setStatus(HttpStatus.PARTIAL_CONTENT.value());
					body = HttpRange.toResourceRegions(httpRanges, resource);
					valueType = body.getClass();
					targetType = RESOURCE_REGION_LIST_TYPE;
				}
				catch (IllegalArgumentException ex) {
					outputMessage.getHeaders().set(HttpHeaders.CONTENT_RANGE, "bytes */" + resource.contentLength());
					outputMessage.getServletResponse().setStatus(HttpStatus.REQUESTED_RANGE_NOT_SATISFIABLE.value());
				}
			}
		}

        //不是流数据就到这儿
		MediaType selectedMediaType = null;//MediaType是媒体类型,媒体类型牵扯到内容协商,selectedMediaType意为被选中的媒体类型;内容协商是指:浏览器在发送请求时就要求了响应数据的格式,在请求头的Accept、Accept-Encoding、Accept-Language内容下就对响应内容的规则做了要求;以下代码就是进行内容协商的,这里先不管
		MediaType contentType = outputMessage.getHeaders().getContentType();//先看响应头有没有内容类型,可能存在前置处理已经设定好响应内容的内容类型了
		boolean isContentTypePreset = contentType != null && contentType.isConcrete();
		if (isContentTypePreset) {
			if (logger.isDebugEnabled()) {
				logger.debug("Found 'Content-Type:" + contentType + "' in response");
			}
			selectedMediaType = contentType;//如果之前响应头已经有了内容类型就直接用相应的内容类型
		}
		else {//如果没有前置的响应处理,没有设置响应内容类型,就执行以下代码来决定响应内容类型
			HttpServletRequest request = inputMessage.getServletRequest();//拿到原生的request对象
			List<MediaType> acceptableTypes;
			try {
				acceptableTypes = getAcceptableMediaTypes(request);//通过原生请求对象获取能接受的内容类型,这里能接受的内容类型有七种,就是对应上述截图请求头中相应的七种内容类型
			}
			catch (HttpMediaTypeNotAcceptableException ex) {
				int series = outputMessage.getServletResponse().getStatus() / 100;
				if (body == null || series == 4 || series == 5) {
					if (logger.isDebugEnabled()) {
						logger.debug("Ignoring error response content (if any). " + ex);
					}
					return;
				}
				throw ex;
			}
			List<MediaType> producibleTypes = getProducibleMediaTypes(request, valueType, targetType);//这个是服务器能响应的内容类型,其中包含四种内容类型,全是json类型的数据,我这儿测试的和雷神演示的是一样的,getProducibleMediaTypes方法中就牵涉到内容协商原理,在该方法中服务器根据自身的的能力,决定服务器能生产处什么内容类型的数据

			if (body != null && producibleTypes.isEmpty()) {
				throw new HttpMessageNotWritableException(
						"No converter found for return value of type: " + valueType);
			}
			List<MediaType> mediaTypesToUse = new ArrayList<>();
			for (MediaType requestedType : acceptableTypes) {//对浏览器可接受内容类型遍历
				for (MediaType producibleType : producibleTypes) {//对服务器可生产内容类型遍历
					if (requestedType.isCompatibleWith(producibleType)) {//根据生产内容类型对浏览器可接受内容类型进行匹配,服务器能生产且浏览器能接受,符合要求就把相应内容类型放入一个ArrayList数组mediaTypesToUse,因为这里的示例浏览器能接受*/*,所以四种json浏览器都能接受,mediaTypesToUse中最终存放四种json相关的内容类型
						mediaTypesToUse.add(getMostSpecificMediaType(requestedType, producibleType));
					}
				}
			}
			if (mediaTypesToUse.isEmpty()) {
				if (logger.isDebugEnabled()) {
					logger.debug("No match for " + acceptableTypes + ", supported: " + producibleTypes);
				}
				if (body != null) {
					throw new HttpMediaTypeNotAcceptableException(producibleTypes);
				}
				return;
			}

			MediaType.sortBySpecificityAndQuality(mediaTypesToUse);

			for (MediaType mediaType : mediaTypesToUse) {//这一步讲的不清楚
				if (mediaType.isConcrete()) {
					selectedMediaType = mediaType;
					break;
				}
				else if (mediaType.isPresentIn(ALL_APPLICATION_MEDIA_TYPES)) {
					selectedMediaType = MediaType.APPLICATION_OCTET_STREAM;
					break;
				}
			}

			if (logger.isDebugEnabled()) {
				logger.debug("Using '" + selectedMediaType + "', given " +
						acceptableTypes + " and supported " + producibleTypes);
			}
		}

		if (selectedMediaType != null) {
			selectedMediaType = selectedMediaType.removeQualityValue();
			for (HttpMessageConverter<?> converter : this.messageConverters) {// this.messageConverters是所有的MessageConverter,SpringMVC遍历所有HttpMessageConverter,HttpMessageConverter是所有消息转换器要实现的接口
				GenericHttpMessageConverter genericConverter = (converter instanceof GenericHttpMessageConverter ?
						(GenericHttpMessageConverter<?>) converter : null);//判断converter是不是GenericHttpMessageConverter类型的,是的话就强转成该类型,不是就直接赋值null
				if (genericConverter != null ?
						((GenericHttpMessageConverter) converter).canWrite(targetType, valueType, selectedMediaType) ://被遍历到的converter调用canWrite方法判断能不能支持对应返回值的写操作,判断方法一般是converter在canWrite方法中调用support方法判断是否支持对应类型的返回值,对应消息转换器支持的返回值见4.2.2中核心对象并且调用重载canWrite方法(mediaType)判断是否支持对应媒体类型的写操作,这个canWrite方法都是各个转化器中自己重写的方法,包括调用的子方法也是;这个方法就是判断canWrite方法能不能适配对应返回值类型,针对是不是GenericHttpMessageConverter进行了强制类型转换,如果有一个转换器支持就执行下述代码
						converter.canWrite(valueType, selectedMediaType)) {
					body = getAdvice().beforeBodyWrite(body, returnType, selectedMediaType,
							(Class<? extends HttpMessageConverter<?>>) converter.getClass(),
							inputMessage, outputMessage);//获取需要响应的内容,这里用例就是对应的person对象
					if (body != null) {//这里是把响应内容写出json的格式
						Object theBody = body;
						LogFormatUtils.traceDebug(logger, traceOn ->
								"Writing [" + LogFormatUtils.formatValue(theBody, !traceOn) + "]");
						addContentDispositionHeader(inputMessage, outputMessage);//这里是加一些头信息
						if (genericConverter != null) {
							genericConverter.write(body, targetType, selectedMediaType, outputMessage);//使用消息转换器的write方法
						}
						else {
							((HttpMessageConverter) converter).write(body, selectedMediaType, outputMessage);
						}
					}
					else {
						if (logger.isDebugEnabled()) {
							logger.debug("Nothing to write: null body");
						}
					}
					return;
				}
			}
		}

		if (body != null) {
			Set<MediaType> producibleMediaTypes =
					(Set<MediaType>) inputMessage.getServletRequest()
							.getAttribute(HandlerMapping.PRODUCIBLE_MEDIA_TYPES_ATTRIBUTE);

			if (isContentTypePreset || !CollectionUtils.isEmpty(producibleMediaTypes)) {
				throw new HttpMessageNotWritableException(
						"No converter for [" + valueType + "] with preset Content-Type '" + contentType + "'");
			}
			throw new HttpMediaTypeNotAcceptableException(getSupportedMediaTypes(body.getClass()));
		}
	}
}
1
2
3
4
5
6
7
8
9
10
11
12
13
14
15
16
17
18
19
20
21
22
23
24
25
26
27
28
29
30
31
32
33
34
35
36
37
38
39
40
41
42
43
44
45
46
47
48
49
50
51
52
53
54
55
56
57
58
59
60
61
62
63
64
65
66
67
68
69
70
71
72
73
74
75
76
77
78
79
80
81
82
83
84
85
86
87
88
89
90
91
92
93
94
95
96
97
98
99
100
101
102
103
104
105
106
107
108
109
110
111
112
113
114
115
116
117
118
119
120
121
122
123
124
125
126
127
128
129
130
131
132
133
134
135
136
137
138
139
140
141
142
143
144
145
146
147
148
149
150
151
152
153
154【writeWithMessageConverters方法中的write方法】
public abstract class AbstractGenericHttpMessageConverter<T> extends AbstractHttpMessageConverter<T> implements GenericHttpMessageConverter<T> {
	@Override
	public final void write(final T t, @Nullable final Type type, @Nullable MediaType contentType,
			HttpOutputMessage outputMessage) throws IOException, HttpMessageNotWritableException {

		final HttpHeaders headers = outputMessage.getHeaders();//拿到响应头,此时响应头中什么都没有,headers是ServletServerHttpResponse$ServletResponseHttpHeader类型
		addDefaultHeaders(headers, t, contentType);//向headers添加一个默认的响应头,此例添加的是一个Content-Type,是一个LinkedList集合,key是Content-Type,value是application/json

		if (outputMessage instanceof StreamingHttpOutputMessage) {
			StreamingHttpOutputMessage streamingOutputMessage = (StreamingHttpOutputMessage) outputMessage;
			streamingOutputMessage.setBody(outputStream -> writeInternal(t, type, new HttpOutputMessage() {
				@Override
				public OutputStream getBody() {
					return outputStream;
				}
				@Override
				public HttpHeaders getHeaders() {
					return headers;
				}
			}));
		}
		else {
			writeInternal(t, type, outputMessage);//把数据(即person)、数据原类型(Person)、outputMessage是ServletServerHttpResponse类型,是响应对象
			outputMessage.getBody().flush();
		}
	}
}
1
2
3
4
5
6
7
8
9
10
11
12
13
14
15
16
17
18
19
20
21
22
23
24
25
26
27【write方法中的writeInternal方法】
注意,这个writeInternal方法是消息转换器MappingJackson2HttpMessageConverter继承于AbstractGenericHttpMessageConverter的,在这个方法中实现了把对象转成json格式的Byte数组
public abstract class AbstractJackson2HttpMessageConverter extends AbstractGenericHttpMessageConverter<Object> {
	@Override
	protected void writeInternal(Object object, @Nullable Type type, HttpOutputMessage outputMessage)
			throws IOException, HttpMessageNotWritableException {

        //这是把对象转json的流程
		MediaType contentType = outputMessage.getHeaders().getContentType();
		JsonEncoding encoding = getJsonEncoding(contentType);

		Class<?> clazz = (object instanceof MappingJacksonValue ?
				((MappingJacksonValue) object).getValue().getClass() : object.getClass());
		ObjectMapper objectMapper = selectObjectMapper(clazz, contentType);
		Assert.state(objectMapper != null, () -> "No ObjectMapper for " + clazz.getName());

		OutputStream outputStream = StreamUtils.nonClosing(outputMessage.getBody());
		try (JsonGenerator generator = objectMapper.getFactory().createGenerator(outputStream, encoding)) {//拿到生成器generator
			writePrefix(generator, object);

			Object value = object;//把返回值对象赋值给value
			Class<?> serializationView = null;//创造一些空引用
			FilterProvider filters = null;
			JavaType javaType = null;

			if (object instanceof MappingJacksonValue) {
				MappingJacksonValue container = (MappingJacksonValue) object;
				value = container.getValue();
				serializationView = container.getSerializationView();
				filters = container.getFilters();
			}
			if (type != null && TypeUtils.isAssignable(type, value.getClass())) {
				javaType = getJavaType(type, null);
			}

			ObjectWriter objectWriter = (serializationView != null ?
					objectMapper.writerWithView(serializationView) : objectMapper.writer());//拿到objectWriter
			if (filters != null) {
				objectWriter = objectWriter.with(filters);
			}
			if (javaType != null && javaType.isContainerType()) {
				objectWriter = objectWriter.forType(javaType);
			}
			SerializationConfig config = objectWriter.getConfig();
			if (contentType != null && contentType.isCompatibleWith(MediaType.TEXT_EVENT_STREAM) &&
					config.isEnabled(SerializationFeature.INDENT_OUTPUT)) {
				objectWriter = objectWriter.with(this.ssePrettyPrinter);
			}
			objectWriter.writeValue(generator, value);//在这一步将对象以json格式写出去

			writeSuffix(generator, object);//write之前object还是一个person对象,会将json写给outputMessage,该对象的ServletResponse的response的outputBuffer的bb属性中存放了这个json格式的Byte数组,我这上面的版本改了,直接在generator的outputBuffer属性就存放了json格式字符串数组,卧槽执行完这一步就能直接在浏览器看到结果
			generator.flush();
		}
		catch (InvalidDefinitionException ex) {
			throw new HttpMessageConversionException("Type definition error: " + ex.getType(), ex);
		}
		catch (JsonProcessingException ex) {
			throw new HttpMessageNotWritableException("Could not write JSON: " + ex.getOriginalMessage(), ex);
		}
	}
}
1
2
3
4
5
6
7
8
9
10
11
12
13
14
15
16
17
18
19
20
21
22
23
24
25
26
27
28
29
30
31
32
33
34
35
36
37
38
39
40
41
42
43
44
45
46
47
48
49
50
51
52
53
54
55
56
57
58
59
# 内容协商原理
根据不同的返回值类型或者控制器方法上标注的注解,SpringMVC底层会选择不同的返回值处理器,返回值处理器会根据转换返回值类型和服务器能提供的内容类型匹配合适的消息转换器,选择消息转换器的一个重点就是内容协商,通过遍历所有的消息转换器,最终找到一个能合适处理对应媒体类型的消息转换器
内容协商的核心是根据客户端的不同,返回不同媒体类型的数据
操作流程
第一步:引入XML依赖【jackson也支持XML类型的响应内容类型,需要引入对应的依赖,不像默认的json,自动就引入了,这个需要手动引入,不需要管理版本】
<dependency>
    <groupId>com.fasterxml.jackson.dataformat</groupId>
    <artifactId>jackson-dataformat-xml</artifactId>
</dependency>
1
2
3
4第二步:使用postman发送一个Accept为xml的请求
只需要更改请求头中的Accept字段,告诉服务器服务器该客户端可以接受的类型是application/json、application/xml
![]()
第三步:内容协商源码跟踪
这一部分的流程在响应json就已经跟过了,只是内容协商部分这里进行了细讲
要点一:如果内容协商前拦截器对响应进行了部分处理,可能已经确定了内容响应的内容类型,这时候直接设置内容类型为已经设定的内容类型
要点二:之前没有对响应进行处理就调用getAcceptableMediaTypes方法可以获取客户端请求头的Accept字段 【application/xml】,查询出所有客户端能接收的内容类型
通过contentNegotiationManager内容协商管理器【里面有一个strategies的ArrayList,保存了HeaderContentNegotiationStrategy,表示内容协商管理器默认使用基于请求头的内容协商策略】
下图是内容协商管理器中的所有策略
![]()
- 内容协商策略是一个函数式接口ContentNegotiationStrategy,有非常多的实现类,可以基于请求头,基于路径、扩展变量等等等等,HeaderContentNegotiationStrategy就是其中一个基于请求头的
- 所以strategy.resolveMediaTypes(request)调用的是HeaderContentNegotiationStrategy基于请求头的resolveMediaTypes方法来确定客户端可以接收的内容类型
使用PostMan可以自定义Accept字段,浏览器无法自定义请求头,除非浏览器发送Ajax时指定请求头的Content-Type属性,针对浏览器无法更改请求头Accept字段,SpringMVC底层也实现了针对浏览器内容协商的快速支持
要点三:遍历循环所有当前系统的MessageConverter,找到支持操作对应对象的消息转换器,把converter支持的媒体类型统计出来【application/json、application/*+json】(MappinJackson2能支持自定义对象的原因是supports方法直接返回true),服务端根据返回值类型和消息转换器统计出能支持的若干种可以转换的类型,这里对应Person有json、xml相关的十种处理能力
【result中具体保存的媒体类型】?为什么有不同元素相同对象的
result中保存了当前系统对当次请求支持返回json和xml类型的数据类型的统计结果
![]()
要点四:进行内容协商的最佳匹配
先遍历可以接收的媒体类型,嵌套遍历可以产生的媒体类型,将二者都有的媒体类型添加到mediaTypesToUse中,这里面保存了对应的媒体类型和相应权重
然后对mediaTypesToUse简单排序和依次判断,从前到后优先选取第一个有效的媒体类型存入selectedMediaType中,排序会把权重高的放在前面
![]()
for (MediaType requestedType : acceptableTypes) {//先遍历浏览器能接收的内容类型
    for (MediaType producibleType : producibleTypes) {//在选定可接收内容类型的前提下选定服务器可以产生的内容类型
        if (requestedType.isCompatibleWith(producibleType)) {//服务器接收类型和产生类型能否匹配,如果能匹配就把该内容类型加到mediaTypesToUse中,这个循环的目的就是匹配客户端需要的刚好我又能提供的媒体类型
        mediaTypesToUse.add(getMostSpecificMediaType(requestedType, producibleType));
        }
    }
}
1
2
3
4
5
6
7要点五:选择能处理对应媒体类型的消息转换器
- 根据selectedMediaType中的媒体类型,再次对消息转换器进行遍历,选出能够写出对应媒体类型的消息转换器,调用该消息转换器的write方法进行转换
MessageConverter在整个内容协商中用了两次,第一次是看当前系统所有的MessageConverter能够支持某个返回值类型能写出的所有媒体类型;第二次是遍历所有MessageConverter获取能够写出特定媒体类型的转换器;
这里可以对第一次进行优化,因为消息转换器总是固定的,可以在第一次请求进来的时候获取producibleTypes时将producibleTypes缓存起来,以后相同请求进来没必要再遍历所有消息转换器,直接从缓存中拿producibleTypes
public abstract class AbstractMessageConverterMethodProcessor extends AbstractMessageConverterMethodArgumentResolver
		implements HandlerMethodReturnValueHandler {
	@SuppressWarnings({"rawtypes", "unchecked"})
	protected <T> void writeWithMessageConverters(@Nullable T value, MethodParameter returnType,
			ServletServerHttpRequest inputMessage, ServletServerHttpResponse outputMessage)
			throws IOException, HttpMediaTypeNotAcceptableException, HttpMessageNotWritableException {

		Object body;
		Class<?> valueType;
		Type targetType;

		if (value instanceof CharSequence) {
			body = value.toString();
			valueType = String.class;
			targetType = String.class;
		}
		else {
			body = value;
			valueType = getReturnValueType(body, returnType);
			targetType = GenericTypeResolver.resolveType(getGenericType(returnType), returnType.getContainingClass());
		}

		if (isResourceType(value, returnType)) {
			outputMessage.getHeaders().set(HttpHeaders.ACCEPT_RANGES, "bytes");
			if (value != null && inputMessage.getHeaders().getFirst(HttpHeaders.RANGE) != null &&
					outputMessage.getServletResponse().getStatus() == 200) {
				Resource resource = (Resource) value;
				try {
					List<HttpRange> httpRanges = inputMessage.getHeaders().getRange();
					outputMessage.getServletResponse().setStatus(HttpStatus.PARTIAL_CONTENT.value());
					body = HttpRange.toResourceRegions(httpRanges, resource);
					valueType = body.getClass();
					targetType = RESOURCE_REGION_LIST_TYPE;
				}
				catch (IllegalArgumentException ex) {
					outputMessage.getHeaders().set(HttpHeaders.CONTENT_RANGE, "bytes */" + resource.contentLength());
					outputMessage.getServletResponse().setStatus(HttpStatus.REQUESTED_RANGE_NOT_SATISFIABLE.value());
				}
			}
		}

		MediaType selectedMediaType = null;//声明一个selectedMediaType
		MediaType contentType = outputMessage.getHeaders().getContentType();//看一下当前的响应有没有被处理过,比如拦截器是否给响应写了一些数据,已经把媒体类型写死了
		boolean isContentTypePreset = contentType != null && contentType.isConcrete();
		if (isContentTypePreset) {
			if (logger.isDebugEnabled()) {
				logger.debug("Found 'Content-Type:" + contentType + "' in response");
			}
			selectedMediaType = contentType;//如果有就用之前的媒体类型
		}
		else {
			HttpServletRequest request = inputMessage.getServletRequest();
			List<MediaType> acceptableTypes;
			try {

                //分支一
				acceptableTypes = getAcceptableMediaTypes(request);//关键一:getAcceptableMediaTypes
			}
			catch (HttpMediaTypeNotAcceptableException ex) {
				int series = outputMessage.getServletResponse().getStatus() / 100;
				if (body == null || series == 4 || series == 5) {
					if (logger.isDebugEnabled()) {
						logger.debug("Ignoring error response content (if any). " + ex);
					}
					return;
				}
				throw ex;
			}

            //分支二
			List<MediaType> producibleTypes = getProducibleMediaTypes(request, valueType, targetType);//获取服务器可以产生的内容类型,服务器会根据返回值类型自动判断对应返回值能根据哪种内容类型写出

			if (body != null && producibleTypes.isEmpty()) {
				throw new HttpMessageNotWritableException(
						"No converter found for return value of type: " + valueType);
			}
			List<MediaType> mediaTypesToUse = new ArrayList<>();
			for (MediaType requestedType : acceptableTypes) {//先遍历浏览器能接收的内容类型
				for (MediaType producibleType : producibleTypes) {//在选定可接收内容类型的前提下选定服务器可以产生的内容类型
					if (requestedType.isCompatibleWith(producibleType)) {//服务器接收类型和产生类型能否匹配,如果能匹配就把该内容类型加到mediaTypesToUse中,这个循环的目的就是匹配客户端需要的刚好我又能提供的媒体类型
					mediaTypesToUse.add(getMostSpecificMediaType(requestedType, producibleType));
					}
				}
			}
			if (mediaTypesToUse.isEmpty()) {
				if (logger.isDebugEnabled()) {
					logger.debug("No match for " + acceptableTypes + ", supported: " + producibleTypes);
				}
				if (body != null) {
					throw new HttpMediaTypeNotAcceptableException(producibleTypes);
				}
				return;
			}

			MediaType.sortBySpecificityAndQuality(mediaTypesToUse);//在这里对内容类型排个序

			for (MediaType mediaType : mediaTypesToUse) {
				if (mediaType.isConcrete()) {
					selectedMediaType = mediaType;//选中的媒体类型永远只有一个
					break;//这里只要判断第一个成功就直接break了,不成功继续遍历
				}
				else if (mediaType.isPresentIn(ALL_APPLICATION_MEDIA_TYPES)) {
					selectedMediaType = MediaType.APPLICATION_OCTET_STREAM;
					break;
				}
			}

			if (logger.isDebugEnabled()) {
				logger.debug("Using '" + selectedMediaType + "', given " +
						acceptableTypes + " and supported " + producibleTypes);
			}
		}

		if (selectedMediaType != null) {
			selectedMediaType = selectedMediaType.removeQualityValue();
			for (HttpMessageConverter<?> converter : this.messageConverters) {//这里遍历conveter看哪一个支持把对象转为xml,MessageConverter在这里面用了两次,第一次是看当前系统所有的MessageConverter能够支持某个返回值类型能写出的所有媒体类型;第二次是遍历所有MessageConverter获取能够写出特定媒体类型的转换器,通过这一步因为xml的优先级在前面,所以会获取能将Person转xml的消息转换器
				GenericHttpMessageConverter genericConverter = (converter instanceof GenericHttpMessageConverter ?
						(GenericHttpMessageConverter<?>) converter : null);//这里就是判断能转换对应xml的消息转换器的代码
				if (genericConverter != null ?
						((GenericHttpMessageConverter) converter).canWrite(targetType, valueType, selectedMediaType) :
						converter.canWrite(valueType, selectedMediaType)) {
					body = getAdvice().beforeBodyWrite(body, returnType, selectedMediaType,
							(Class<? extends HttpMessageConverter<?>>) converter.getClass(),
							inputMessage, outputMessage);//这个body就是最终要转成xml的原始返回值对象person
					if (body != null) {
						Object theBody = body;
						LogFormatUtils.traceDebug(logger, traceOn ->
								"Writing [" + LogFormatUtils.formatValue(theBody, !traceOn) + "]");
						addContentDispositionHeader(inputMessage, outputMessage);

                        //分支三
						if (genericConverter != null) {
							genericConverter.write(body, targetType, selectedMediaType, outputMessage);//这里是调用write方法把对象写成xml
						}
						else {
							((HttpMessageConverter) converter).write(body, selectedMediaType, outputMessage);
						}
					}
					else {
						if (logger.isDebugEnabled()) {
							logger.debug("Nothing to write: null body");
						}
					}
					return;
				}
			}
		}

		if (body != null) {
			Set<MediaType> producibleMediaTypes =
					(Set<MediaType>) inputMessage.getServletRequest()
							.getAttribute(HandlerMapping.PRODUCIBLE_MEDIA_TYPES_ATTRIBUTE);

			if (isContentTypePreset || !CollectionUtils.isEmpty(producibleMediaTypes)) {
				throw new HttpMessageNotWritableException(
						"No converter for [" + valueType + "] with preset Content-Type '" + contentType + "'");
			}
			throw new HttpMediaTypeNotAcceptableException(getSupportedMediaTypes(body.getClass()));
		}
	}
}
1
2
3
4
5
6
7
8
9
10
11
12
13
14
15
16
17
18
19
20
21
22
23
24
25
26
27
28
29
30
31
32
33
34
35
36
37
38
39
40
41
42
43
44
45
46
47
48
49
50
51
52
53
54
55
56
57
58
59
60
61
62
63
64
65
66
67
68
69
70
71
72
73
74
75
76
77
78
79
80
81
82
83
84
85
86
87
88
89
90
91
92
93
94
95
96
97
98
99
100
101
102
103
104
105
106
107
108
109
110
111
112
113
114
115
116
117
118
119
120
121
122
123
124
125
126
127
128
129
130
131
132
133
134
135
136
137
138
139
140
141
142
143
144
145
146
147
148
149
150
151
152
153
154
155
156
157
158
159
160
161【分支一:getAcceptableMediaTypes方法分支】
【writeWithMessageConverters方法中的getAcceptableMediaTypes方法】
public abstract class AbstractMessageConverterMethodProcessor extends AbstractMessageConverterMethodArgumentResolver
		implements HandlerMethodReturnValueHandler {
	private List<MediaType> getAcceptableMediaTypes(HttpServletRequest request)
			throws HttpMediaTypeNotAcceptableException {
		return this.contentNegotiationManager.resolveMediaTypes(new ServletWebRequest(request));//通过调用contentNegotiationManager内容协商管理器的resolveMediaTypes方法解析媒体类型,new ServletWebRequest(request)是包装请求对象
	}
}
1
2
3
4
5
6
7【getAcceptableMediaTypes方法中的resolveMediaTypes方法】
public class ContentNegotiationManager implements ContentNegotiationStrategy, MediaTypeFileExtensionResolver {
	@Override
	public List<MediaType> resolveMediaTypes(NativeWebRequest request) throws HttpMediaTypeNotAcceptableException {
		for (ContentNegotiationStrategy strategy : this.strategies) {//默认遍历内容协商管理器中的所有策略,strategies是一个ArrayList集合,里面有一个HeaderContentNegotiationStrategy请求头内容策略用于解析媒体类型
			List<MediaType> mediaTypes = strategy.resolveMediaTypes(request);//这是进行解析媒体类型的核心方法
			if (mediaTypes.equals(MEDIA_TYPE_ALL_LIST)) {
				continue;
			}
			return mediaTypes;
		}
		return MEDIA_TYPE_ALL_LIST;
	}
}
1
2
3
4
5
6
7
8
9
10
11
12
13【resolveMediaTypes方法中的resolveMediaTypes方法】
public class HeaderContentNegotiationStrategy implements ContentNegotiationStrategy {
	@Override
	public List<MediaType> resolveMediaTypes(NativeWebRequest request)
			throws HttpMediaTypeNotAcceptableException {

		String[] headerValueArray = request.getHeaderValues(HttpHeaders.ACCEPT);//通过原生请求获取请求头的Accept字段,headerValueArray中会以字符串数组的形式保存所有的Accept字段中的值,这个方法的调用基于默认内容协商策略是基于请求头的内容协商策略,拿请求头中Accept字段中的内容类型
		if (headerValueArray == null) {
			return MEDIA_TYPE_ALL_LIST;
		}

		List<String> headerValues = Arrays.asList(headerValueArray);//将字符串数组转成List数组
		try {
			List<MediaType> mediaTypes = MediaType.parseMediaTypes(headerValues);
			MediaType.sortBySpecificityAndQuality(mediaTypes);
			return !CollectionUtils.isEmpty(mediaTypes) ? mediaTypes : MEDIA_TYPE_ALL_LIST;//这里讲的不清楚,相当于返回从Accept解析出来能被处理的内容类型,封装成List集合一路返回
		}
		catch (InvalidMediaTypeException ex) {
			throw new HttpMediaTypeNotAcceptableException(
					"Could not parse 'Accept' header " + headerValues + ": " + ex.getMessage());
		}
	}
}
1
2
3
4
5
6
7
8
9
10
11
12
13
14
15
16
17
18
19
20
21
22【分支二:getProducibleMediaTypes分支】
【writeWithMessageConverters方法中的getProducibleMediaTypes方法】
public abstract class AbstractMessageConverterMethodProcessor extends AbstractMessageConverterMethodArgumentResolver
		implements HandlerMethodReturnValueHandler {
	@SuppressWarnings("unchecked")
	protected List<MediaType> getProducibleMediaTypes(
			HttpServletRequest request, Class<?> valueClass, @Nullable Type targetType) {

		Set<MediaType> mediaTypes =
				(Set<MediaType>) request.getAttribute(HandlerMapping.PRODUCIBLE_MEDIA_TYPES_ATTRIBUTE);//先从请求域中获取一个默认的媒体类型
		if (!CollectionUtils.isEmpty(mediaTypes)) {
			return new ArrayList<>(mediaTypes);
		}
		List<MediaType> result = new ArrayList<>();
		for (HttpMessageConverter<?> converter : this.messageConverters) {//会拿到所有的消息转换器,导入jackson的json相关依赖就是10个,导入jackson的xml相关依赖就有11个
			if (converter instanceof GenericHttpMessageConverter && targetType != null) {
				if (((GenericHttpMessageConverter<?>) converter).canWrite(targetType, valueClass, null)) {//如果某个消息转换器调用canWrite判断该消息转换器支持对valueClass类型向目标类型的转换
					result.addAll(converter.getSupportedMediaTypes(valueClass));//就把支持的媒体加入到媒体类型集合中,实际上除了MappingJackson2HttpMessageConverter和MappingJackson2XmlHttpMessageConverter对应的四个消息转换器(两个同名,woc连引用地址都一样,原理是什么,为什么要放两个一样的东西)外其他的消息转换器均不支持处理自定义对象,result中存放的是可用的消息转换器总共能支持哪些媒体类型的能力,getSupportedMediaTypes(valueClass)的结果是,这个result内部东西的原理不懂,一共有和json和xml相关的十种内容类型
				}
			}
			else if (converter.canWrite(valueClass, null)) {
				result.addAll(converter.getSupportedMediaTypes(valueClass));
			}
		}
		return (result.isEmpty() ? Collections.singletonList(MediaType.ALL) : result);
	}
}
1
2
3
4
5
6
7
8
9
10
11
12
13
14
15
16
17
18
19
20
21
22
23
24
25【分支三:write方法分支】
【writeWithMessageConverters方法中的write方法】
public abstract class AbstractGenericHttpMessageConverter<T> extends AbstractHttpMessageConverter<T>
		implements GenericHttpMessageConverter<T> {
	@Override
	public final void write(final T t, @Nullable final Type type, @Nullable MediaType contentType,
			HttpOutputMessage outputMessage) throws IOException, HttpMessageNotWritableException {

		final HttpHeaders headers = outputMessage.getHeaders();
		addDefaultHeaders(headers, t, contentType);//添加默认响应头,这时候响应头的headers的Content-Type已经和上一个响应json不同,这里是application/xml,charset=UTF-8;

		if (outputMessage instanceof StreamingHttpOutputMessage) {
			StreamingHttpOutputMessage streamingOutputMessage = (StreamingHttpOutputMessage) outputMessage;
			streamingOutputMessage.setBody(outputStream -> writeInternal(t, type, new HttpOutputMessage() {
				@Override
				public OutputStream getBody() {
					return outputStream;
				}
				@Override
				public HttpHeaders getHeaders() {
					return headers;
				}
			}));
		}
		else {
			writeInternal(t, type, outputMessage);//调用writeInternal方法在底层调用objectMapper把person对象转成xml
			outputMessage.getBody().flush();//outputMessage中的ServletResponse的response的outputBuffer的bb属性中存放了这个xml格式的Byte数组,view as String可以看到具体的xml内容
		}
	}
}
1
2
3
4
5
6
7
8
9
10
11
12
13
14
15
16
17
18
19
20
21
22
23
24
25
26
27
28【write方法中的writeInternal方法】
public abstract class AbstractJackson2HttpMessageConverter extends AbstractGenericHttpMessageConverter<Object> {
	@Override
	protected void writeInternal(Object object, @Nullable Type type, HttpOutputMessage outputMessage)
			throws IOException, HttpMessageNotWritableException {

		MediaType contentType = outputMessage.getHeaders().getContentType();
		JsonEncoding encoding = getJsonEncoding(contentType);

		Class<?> clazz = (object instanceof MappingJacksonValue ?
				((MappingJacksonValue) object).getValue().getClass() : object.getClass());
		ObjectMapper objectMapper = selectObjectMapper(clazz, contentType);
		Assert.state(objectMapper != null, () -> "No ObjectMapper for " + clazz.getName());

		OutputStream outputStream = StreamUtils.nonClosing(outputMessage.getBody());
		try (JsonGenerator generator = objectMapper.getFactory().createGenerator(outputStream, encoding)) {
			writePrefix(generator, object);

			Object value = object;
			Class<?> serializationView = null;
			FilterProvider filters = null;
			JavaType javaType = null;

			if (object instanceof MappingJacksonValue) {
				MappingJacksonValue container = (MappingJacksonValue) object;
				value = container.getValue();
				serializationView = container.getSerializationView();
				filters = container.getFilters();
			}
			if (type != null && TypeUtils.isAssignable(type, value.getClass())) {
				javaType = getJavaType(type, null);
			}

			ObjectWriter objectWriter = (serializationView != null ?
					objectMapper.writerWithView(serializationView) : objectMapper.writer());//通过objectMapper获取objectWriter
			if (filters != null) {
				objectWriter = objectWriter.with(filters);
			}
			if (javaType != null && javaType.isContainerType()) {
				objectWriter = objectWriter.forType(javaType);
			}
			SerializationConfig config = objectWriter.getConfig();
			if (contentType != null && contentType.isCompatibleWith(MediaType.TEXT_EVENT_STREAM) &&
					config.isEnabled(SerializationFeature.INDENT_OUTPUT)) {
				objectWriter = objectWriter.with(this.ssePrettyPrinter);
			}
			objectWriter.writeValue(generator, value);//用objectWriter的writeValue方法把person对象写成xml写出去到浏览器

			writeSuffix(generator, object);
			generator.flush();
		}
		catch (InvalidDefinitionException ex) {
			throw new HttpMessageConversionException("Type definition error: " + ex.getType(), ex);
		}
		catch (JsonProcessingException ex) {
			throw new HttpMessageNotWritableException("Could not write JSON: " + ex.getOriginalMessage(), ex);
		}
	}
}
1
2
3
4
5
6
7
8
9
10
11
12
13
14
15
16
17
18
19
20
21
22
23
24
25
26
27
28
29
30
31
32
33
34
35
36
37
38
39
40
41
42
43
44
45
46
47
48
49
50
51
52
53
54
55
56
57
58【writeInternal方法中的writeValue方法】
public class ObjectWriter implements Versioned,java.io.Serializable{
	public void writeValue(JsonGenerator g, Object value) throws IOException
    {
        _assertNotNull("g", g);
        _configureGenerator(g);//此时这个g即JsonGenerator是ToXmlGenerator,已验证;上一个响应ToJsonGenerator,自然而然数据就会写出xml格式
        if (_config.isEnabled(SerializationFeature.CLOSE_CLOSEABLE)
                && (value instanceof Closeable)) {

            Closeable toClose = (Closeable) value;
            try {
                _prefetch.serialize(g, value, _serializerProvider());
                if (_config.isEnabled(SerializationFeature.FLUSH_AFTER_WRITE_VALUE)) {
                    g.flush();
                }
            } catch (Exception e) {
                ClassUtil.closeOnFailAndThrowAsIOE(null, toClose, e);
                return;
            }
            toClose.close();
        } else {
            _prefetch.serialize(g, value, _serializerProvider());
            if (_config.isEnabled(SerializationFeature.FLUSH_AFTER_WRITE_VALUE)) {
                g.flush();
            }
        }
    }
}
1
2
3
4
5
6
7
8
9
10
11
12
13
14
15
16
17
18
19
20
21
22
23
24
25
26
27
# 基于请求参数的内容协商
开启基于请求参数的内容协商功能
为了方便浏览器内容协商,SpringMVC提供基于请求参数的内容协商功能【不改请求头,实现响应xml和json的随心所欲切换】
步骤:
第一步:在全局配置文件中配置spring.mvc.contentnegotiation.favor-parameter=true【默认是false】
表示开启基于参数方式的内容协商,该属性规定可以在请求参数中带名为format的请求参数,通过format指定需要响应的内容类型
spring:
  mvc:
    contentnegotiation:
      favor-parameter: true  #开启请求参数内容协商
1
2
3
4第二步:发送请求时请求字段带上format请求参数指定响应内容类型
- http://localhost:8080/test/person?format=xml
- http://localhost:8080/test/person?format=json
源码跟踪
边缘的不讲了,这里只讲内容协商的getAcceptableMediaType方法确定浏览器可以接受的内容类型
- 核心就是开启请求参数的内容协商功能后会自动把参数内容协商策略放在默认的请求头内容协商策略前面,优先获取请求参数format的参数值对应的内容类型,如果确定了内容类型就跳出策略遍历;如果获取的内容类型是
*/*,就继续遍历下一个内容协商策略
【writeWithMessageConverters方法中的getAcceptableMediaTypes方法】
public abstract class AbstractMessageConverterMethodProcessor extends AbstractMessageConverterMethodArgumentResolver
		implements HandlerMethodReturnValueHandler {
	private List<MediaType> getAcceptableMediaTypes(HttpServletRequest request)
			throws HttpMediaTypeNotAcceptableException {
		return this.contentNegotiationManager.resolveMediaTypes(new ServletWebRequest(request));//通过调用contentNegotiationManager内容协商管理器的resolveMediaTypes方法解析媒体类型,new ServletWebRequest(request)是包装请求对象
	}
}
1
2
3
4
5
6
7以前contentNegotiationManager中的strategies只有基于请求头的内容协商策略HeaderContentNegotiationStrategy,现在开启了基于请求参数的内容协商功能后,多了一个基于参数的内容协商策略ParameterContentNegotiationStrategy,里面参数的名字就叫做format
![]()
【getAcceptableMediaTypes方法中的resolveMediaTypes方法】
public class ContentNegotiationManager implements ContentNegotiationStrategy, MediaTypeFileExtensionResolver {
	@Override
	public List<MediaType> resolveMediaTypes(NativeWebRequest request) throws HttpMediaTypeNotAcceptableException {
		for (ContentNegotiationStrategy strategy : this.strategies) {//默认遍历内容协商管理器中的所有策略,优先遍历第一个基于参数的内容协商策略,只要解析出了媒体类型就会直接返回,不会在遍历第二个内容协商策略
			List<MediaType> mediaTypes = strategy.resolveMediaTypes(request);//这是进行解析媒体类型的核心方法
			if (mediaTypes.equals(MEDIA_TYPE_ALL_LIST)) {
				continue;//除非解析出的还是*/*才会继续遍历下一个内容协商策略
			}
			return mediaTypes;
		}
		return MEDIA_TYPE_ALL_LIST;
	}
}
1
2
3
4
5
6
7
8
9
10
11
12
13【resolveMediaTypes方法中的resolveMediaTypes方法】
注意啊这里第一个是基于参数的resolveMediaTypes方法了,不在是基于请求头的内容协商策略中的方法了
public abstract class AbstractMappingContentNegotiationStrategy extends MappingMediaTypeFileExtensionResolver
		implements ContentNegotiationStrategy {
	@Override
	public List<MediaType> resolveMediaTypes(NativeWebRequest webRequest)
			throws HttpMediaTypeNotAcceptableException {

		return resolveMediaTypeKey(webRequest, getMediaTypeKey(webRequest));//getMediaTypeKey是获取媒体类型参数的key,这个方法中会去调用request.getParameter(getParameterName())来获取请求参数的值即json或者xml,而getParameterName()就是获取常量值format,
	}
}
1
2
3
4
5
6
7
8
9【resolveMediaTypes方法中的resolveMediaTypeKey方法】
- 核心就是开启请求参数的内容协商功能后会自动把参数内容协商策略放在默认的请求头内容协商策略前面,优先获取请求参数format的参数值对应的内容类型,如果确定了内容类型就跳出策略遍历;如果获取的内容类型是
public abstract class AbstractMappingContentNegotiationStrategy extends MappingMediaTypeFileExtensionResolver
		implements ContentNegotiationStrategy {
	public List<MediaType> resolveMediaTypeKey(NativeWebRequest webRequest, @Nullable String key)
			throws HttpMediaTypeNotAcceptableException {

		if (StringUtils.hasText(key)) {//key就是json或者xml
			MediaType mediaType = lookupMediaType(key);//json对应的是application/json;xml对应的是application/xml
			if (mediaType != null) {
				handleMatch(key, mediaType);
				return Collections.singletonList(mediaType);//这儿返回的十个啥,是mediaType吗?最外层接收的是一个媒体类型List集合,所以这里能返回几个媒体类型?
			}
			mediaType = handleNoMatch(webRequest, key);
			if (mediaType != null) {
				addMapping(key, mediaType);
				return Collections.singletonList(mediaType);
			}
		}
		return MEDIA_TYPE_ALL_LIST;
	}
}
2
3
4
5
6
7
8
9
10
11
12
13
14
15
16
17
18
19
20
# 自定义MessageConverter
使用@ResponseBody注解标注控制器方法就意味着响应数据,会调用返回值处理器RequestResponseBodyMethodProcessor处理返回值,使用消息转换器进行处理,所有MessageConverter一起可以支持各种媒体类型数据的读和写操作,读对应canRead方法和read方法,写对应canWrite和write方法;通过内容协商就能找到最终的MessageConverter,调用消息转换器对应的write方法来实现内容类型的转换和写出
自定义消息转换器场景:
浏览器发请求希望返回xml数据,如果是ajax请求希望返回json数据,如果是其他的app请求,则返回自定义协议数据【以前的解决办法是写三个方法,每种场景发送不同路径的请求】;现在可以直接使用内容协商一个方法解决,分别规定请求发送时的需要的内容类型,服务器通过内容协商找到对应的消息转换器分别处理即可
需求:
扩展场景
如果是浏览器发请求直接返回xml数据 [application/xml] jacksonXmlConverter
如果是ajax请求,返回json数据 [application/json] jacksonJsonConverter
如果是客户端如硅谷app发请求,返回自定义协议数据 [application/x-guigu] xxxConverter
- 属性值1;属性值2;...[这种方式只要值,省了很多数据,传输更快]
即适配三种不同的场景
解决流程:
第一步:添加自定义的MessageConverter进系统底层
第二步:系统底层会自动统计处所有MessageConverter针对返回值类型能操作的内容类型
第三步:服务器根据客户端需要的内容类型以及自己能提供的内容类型进行内容协商,自动调用对应的自定义消息转换器处理返回值
如需要x-guigu,服务器一看刚好有x-guigu对应的转换器,就自动使用自定义消息转换器来处理相应的返回值
消息转换器的默认配置
在配置类WebMvcAutoConfiguration中的子配置类WebMvcAutoConfigurationAdapter中配置了一个configureMessageConverters组件,该组件在系统加载时会依靠这个组件来配置默认的所有MessageConverter
@Configuration(proxyBeanMethods = false)
@ConditionalOnWebApplication(type = Type.SERVLET)
@ConditionalOnClass({ Servlet.class, DispatcherServlet.class, WebMvcConfigurer.class })
@ConditionalOnMissingBean(WebMvcConfigurationSupport.class)
@AutoConfigureOrder(Ordered.HIGHEST_PRECEDENCE + 10)
@AutoConfigureAfter({ DispatcherServletAutoConfiguration.class, TaskExecutionAutoConfiguration.class,
		ValidationAutoConfiguration.class })
public class WebMvcAutoConfiguration {
    ...
	@Configuration(proxyBeanMethods = false)
	@Import(EnableWebMvcConfiguration.class)
	@EnableConfigurationProperties({ WebMvcProperties.class, ResourceProperties.class })
	@Order(0)
	public static class WebMvcAutoConfigurationAdapter implements WebMvcConfigurer {
		...
		@Override
		public void configureMessageConverters(List<HttpMessageConverter<?>> converters) {
			this.messageConvertersProvider
					.ifAvailable((customConverters) -> converters.addAll(customConverters.getConverters()));//将从customConverters.getConverters()获取到的所有converter直接加载到converters中
		}
        ...
    }
}
1
2
3
4
5
6
7
8
9
10
11
12
13
14
15
16
17
18
19
20
21
22
23【WebMvcAutoConfiguration中的configureMessageConverters方法中的getConverters()方法】
public class HttpMessageConverters implements Iterable<HttpMessageConverter<?>> {
	...
    private final List<HttpMessageConverter<?>> converters;//这个converters是在创建HttpMessageConverters对象时会自动添加默认的converter
    ...
    public HttpMessageConverters(boolean addDefaultConverters, Collection<HttpMessageConverter<?>> converters) {
		List<HttpMessageConverter<?>> combined = getCombinedConverters(converters,
				addDefaultConverters ? getDefaultConverters() : Collections.emptyList());//getDefaultConverters()就是获取默认的converters
		combined = postProcessConverters(combined);
		this.converters = Collections.unmodifiableList(combined);//把这些默认的converter赋值给属性converters
	}

    ...
	public List<HttpMessageConverter<?>> getConverters() {
		return this.converters;
	}
    ...
}
1
2
3
4
5
6
7
8
9
10
11
12
13
14
15
16
17【HttpMessageConverters构造方法中的getDefaultConverters()方法】
public class HttpMessageConverters implements Iterable<HttpMessageConverter<?>> {
	...
    private List<HttpMessageConverter<?>> getDefaultConverters() {
		List<HttpMessageConverter<?>> converters = new ArrayList<>();
		if (ClassUtils.isPresent("org.springframework.web.servlet.config.annotation.WebMvcConfigurationSupport",
				null)) {
			converters.addAll(new WebMvcConfigurationSupport() {

				public List<HttpMessageConverter<?>> defaultMessageConverters() {
					return super.getMessageConverters();
				}
			}.defaultMessageConverters());//默认的converter是从defaultMessageConverters()方法获取的
		}
		else {
			converters.addAll(new RestTemplate().getMessageConverters());
		}
		reorderXmlConvertersToEnd(converters);
		return converters;
	}
    ...
}
1
2
3
4
5
6
7
8
9
10
11
12
13
14
15
16
17
18
19
20
21【getDefaultConverters()方法中的super.getMessageConverters()方法】
public class WebMvcConfigurationSupport implements ApplicationContextAware, ServletContextAware {
	protected final List<HttpMessageConverter<?>> getMessageConverters() {
		if (this.messageConverters == null) {
			this.messageConverters = new ArrayList<>();
			configureMessageConverters(this.messageConverters);
			if (this.messageConverters.isEmpty()) {
				addDefaultHttpMessageConverters(this.messageConverters);//默认的converter是从addDefaultHttpMessageConverters方法获取的
			}
			extendMessageConverters(this.messageConverters);
		}
		return this.messageConverters;
	}
}
1
2
3
4
5
6
7
8
9
10
11
12
13【getMessageConverters()方法中的addDefaultHttpMessageConverters方法】
解释了只要导入了jackson处理xml的相关类,xml的MessageConverters就会自动添加到converters集合中
public class WebMvcConfigurationSupport implements ApplicationContextAware, ServletContextAware {
	protected final void addDefaultHttpMessageConverters(List<HttpMessageConverter<?>> messageConverters) {
		messageConverters.add(new ByteArrayHttpMessageConverter());//这个就是加载时添加各个MessageConverter的代码
		messageConverters.add(new StringHttpMessageConverter());
		messageConverters.add(new ResourceHttpMessageConverter());
		messageConverters.add(new ResourceRegionHttpMessageConverter());
		try {
			messageConverters.add(new SourceHttpMessageConverter<>());
		}
		catch (Throwable ex) {
			// Ignore when no TransformerFactory implementation is available...
		}
		messageConverters.add(new AllEncompassingFormHttpMessageConverter());

		if (romePresent) {
			messageConverters.add(new AtomFeedHttpMessageConverter());
			messageConverters.add(new RssChannelHttpMessageConverter());
		}

		if (jackson2XmlPresent) {//这是一个boolean类型的变量,当静态代码块使用类工具ClassUtils的isPresent方法判断系统类是否导了对应变量的类,导了就是true,就会执行添加对应消息转化器的代码
			Jackson2ObjectMapperBuilder builder = Jackson2ObjectMapperBuilder.xml();
			if (this.applicationContext != null) {
				builder.applicationContext(this.applicationContext);
			}
			messageConverters.add(new MappingJackson2XmlHttpMessageConverter(builder.build()));//这里如果导入jacksonXML的依赖这里就会自动去添加消息转换器MappingJackson2XmlHttpMessageConverter
		}
		else if (jaxb2Present) {
			messageConverters.add(new Jaxb2RootElementHttpMessageConverter());
		}

		if (jackson2Present) {
			Jackson2ObjectMapperBuilder builder = Jackson2ObjectMapperBuilder.json();
			if (this.applicationContext != null) {
				builder.applicationContext(this.applicationContext);
			}
			messageConverters.add(new MappingJackson2HttpMessageConverter(builder.build()));
		}
		else if (gsonPresent) {
			messageConverters.add(new GsonHttpMessageConverter());
		}
		else if (jsonbPresent) {
			messageConverters.add(new JsonbHttpMessageConverter());
		}

		if (jackson2SmilePresent) {
			Jackson2ObjectMapperBuilder builder = Jackson2ObjectMapperBuilder.smile();
			if (this.applicationContext != null) {
				builder.applicationContext(this.applicationContext);
			}
			messageConverters.add(new MappingJackson2SmileHttpMessageConverter(builder.build()));
		}
		if (jackson2CborPresent) {
			Jackson2ObjectMapperBuilder builder = Jackson2ObjectMapperBuilder.cbor();
			if (this.applicationContext != null) {
				builder.applicationContext(this.applicationContext);
			}
			messageConverters.add(new MappingJackson2CborHttpMessageConverter(builder.build()));
		}
	}
}
1
2
3
4
5
6
7
8
9
10
11
12
13
14
15
16
17
18
19
20
21
22
23
24
25
26
27
28
29
30
31
32
33
34
35
36
37
38
39
40
41
42
43
44
45
46
47
48
49
50
51
52
53
54
55
56
57
58
59
60
自定义消息转换器的流程【使用设置Accept为自定义内容类型的方式】
步骤一:WebMvcConfigurer接口中有一个configureMessageConverters方法【配置消息转换器,这个会覆盖掉所有默认的消息转换器】,还有一个extendMessageConverters方法【扩展消息转换器,在默认的基础上额外追加】,所以添加自定义消息转换器只需要添加WebMvcConfigurer组件的匿名内部类并重写该组件中的extendMessageConverters方法
@Configuration(proxyBeanMethods = false)
public class WebConfig /*implements WebMvcConfigurer*/ {
    @Bean
    public WebMvcConfigurer webMvcConfigurer(){
        return new WebMvcConfigurer() {
            @Override
            public void extendMessageConverters(List<HttpMessageConverter<?>> converters) {
                converters.add(new GuiGuMessageConverter());//这是创建自定义消息转换器并通过add方法把消息转换器加入converters集合中
            }
        };
    }
}
1
2
3
4
5
6
7
8
9
10
11
12第二步:自己在converter包下写一个自定义的消息转换器GuiGuConverter实现消息转换器的总接口HttpMessageConverter<>,括号中为该消息转换器支持的数据类型,这里只设定为Person
/**
 * 自定义的Converter,这个转换器统一不支持读,canRead直接返回false
 * 支持读的意思是形参使用@RequestBody注解进行标注,传过来的请求数据是json或者xml或者自定义类型,
 *      该消息转换器可以把请求数据读成对应的类型如Person
 * */
public class GuiGuMessageConverter implements HttpMessageConverter<Person> {

    @Override
    public boolean canRead(Class<?> clazz, MediaType mediaType) {
        return false;
    }

    @Override
    public boolean canWrite(Class<?> clazz, MediaType mediaType) {//这个mediaType在后续执行会传参最佳匹配的内容类型作为判断依据,有需要可以使用
        //支持写只要返回值类型是Person类型就支持,isAssignableFrom是判断传参类型的方法
        return clazz.isAssignableFrom(Person.class);
    }

    /**
     * @return {@link List }<{@link MediaType } 返回支持类型的集合>
     * @描述 服务器统计所有的MessageConverter都能支持写哪些内容就是调用的这个方法,这是告诉SpringMVC这个转换器
     * 能够将特定返回值类型转换成哪些内容类型
     * @author Earl
     * @version 1.0.0
     * @创建日期 2023/05/29
     * @since 1.0.0
     */
    @Override
    public List<MediaType> getSupportedMediaTypes() {
        /**自定义转换器用MediaType.parseMediaTypes方法,可以把字符串解析成媒体类型集合,这里面的字符串只是一个标识,
        只要能用来和请求中的内容类型匹配就行*/
        return MediaType.parseMediaTypes("application/x-guigu");
    }

    @Override
    public Person read(Class<? extends Person> clazz, HttpInputMessage inputMessage) throws IOException, HttpMessageNotReadableException {
        return null;
    }

    /**
     * @param person        人,这个在括号中写了会自动出现
     * @param contentType   内容类型
     * @param outputMessage 输出消息
     * @描述 自定义协议数据的写出,这玩意儿直接把对应对象要写成的格式弄成字符串直接通过输出流写出去即可
     * @author Earl
     * @version 1.0.0
     * @创建日期 2023/05/29
     * @since 1.0.0
     */
    @Override
    public void write(Person person, MediaType contentType, HttpOutputMessage outputMessage) throws IOException, HttpMessageNotWritableException {
        //自定义协议数据的写出
        String data=person.getUserName()+";"+person.getAge()+";"+person.getBirth()+";"+person.getPet();
        //写出数据
        OutputStream body=outputMessage.getBody();//这个outputMessage.getBody方法可以获取输出流
        body.write(data.getBytes());//输出流的write方法可以直接写出字符串的byte数组,有点像原生响应的out.print方法
    }
}
1
2
3
4
5
6
7
8
9
10
11
12
13
14
15
16
17
18
19
20
21
22
23
24
25
26
27
28
29
30
31
32
33
34
35
36
37
38
39
40
41
42
43
44
45
46
47
48
49
50
51
52
53
54
55
56
57
58第三步:通过postMan发送Accept为x-guigu的请求
注意,这里还是使用的请求头内容协商策略,参数内容协商策略执行了但是没有得到结果
在获取所有服务器支持的内容类型中this.messageConverters多出一个自定义的消息转换器,result中保存的是application/x-guigu,此外加上可以转json和xml的,最终producibleTypes可以产生11种数据,但是浏览器只需要一种application/x-guigu,最佳匹配最终确定application/x-guigu;接着遍历消息转换器,查看哪种消息转换器可以处理,找到调用对应的write方法写出去
自定义消息转换器的流程【基于请求参数的内容协商方式】
基于参数的内容协商默认只支持xml和json,需要自己自定义内容协商管理器来支持第三方的内容协商策略,WebMvcConfigurer中的configureContentNegotiation方法传参configurer对象的.strategies方法可以自定义内容协商策略,这个内容协商策略会覆盖掉默认的相同类型的内容协商策略【还会取代内容协商管理器中的所有内容协商策略,如基于请求头的内容协商策略】,所以需要补充json和xml,注意:当前策略没法解析出结果,比如基于请求头内容解析策略但是没有请求头内容解析策略对象就会默认媒体类型为
*/*,即服务器认为浏览器什么类型都能接受,会直接匹配服务器能提供的第一个媒体类型进行返回,也就导致Accept随便怎么写都返回application/json类型的数据public interface WebMvcConfigurer { default void configureContentNegotiation(ContentNegotiationConfigurer configurer) { } }1
2
3
4自定义基于参数内容协商策略的代码
@Configuration(proxyBeanMethods = false)
public class WebConfig /*implements WebMvcConfigurer*/ {
    //方式一:使用@Bean配置一个WebMvcConfigurer组件
    @Bean
    public WebMvcConfigurer webMvcConfigurer(){
        return new WebMvcConfigurer() {
            @Override
            public void configureContentNegotiation(ContentNegotiationConfigurer configurer) {
                Map<String, MediaType> mediaTypes=new HashMap<String,MediaType>();
                mediaTypes.put("json",MediaType.APPLICATION_JSON);
                mediaTypes.put("xml",MediaType.APPLICATION_ATOM_XML);
                //自定义的媒体类型使用MediaType.parseMediaType对字符串进行转换
                mediaTypes.put("x-guigu",MediaType.parseMediaType("application/x-guigu"));
                //创建基于参数的内容协商策略对象,需要传入mediaTypes属性,这个属性是从父类的父类继承来的,是一个Map集合,存储了可以处理的客户端要求的媒体类型
                ParameterContentNegotiationStrategy parameterStrategies = new ParameterContentNegotiationStrategy(mediaTypes);
                parameterStrategies.setParameterName("mediaType");//这一步可以将默认参数名format改为mediaType
                HeaderContentNegotiationStrategy headerStrategy = new HeaderContentNegotiationStrategy();
                //Arrays.asList(parameterStrategies)这个是什么意思没说
                configurer.strategies(Arrays.asList(parameterStrategies,headerStrategy));
            }
        }
    }
}
1
2
3
4
5
6
7
8
9
10
11
12
13
14
15
16
17
18
19
20
21
22
23【自定义基于参数的内容协商管理器后的内容协商管理器】
只有一个自定义的策略了,自定义策略支持三种媒体类型,注意还要和自定义的对应消息转换器的媒体类型联动,否则没法获取相应的消息转换器处理对应返回对象
![]()
# 视图解析
# 视图解析
视图解析
视图解析是服务器处理完请求后跳转某个页面的过程
视图解析的方式包括转发、重定向、自定义视图
![]()
一般来说处理完请求可以通过以上三种方式跳转JSP页面,但是由于SpringBoot打的是小胖jar,而JSP不支持在压缩包内编译的方式,所有SpringBoot不支持JSP,想要实现页面渲染需要引入第三方模板引擎技术【JSP也是一种模板引擎】
SpringBoot支持的第三方模板引擎
在Using SpringBoot的Starter中有以下场景是springBoot支持整合的模板引擎
- spring-boot-starter-freemarker
- spring-boot-starter-groovy-templates
- spring-boot-starter-thymeleaf
Thymeleaf简介
- Thymeleaf is a modern server-side Java template;Thymeleaf是一个服务端的java模板引擎,后台开发人员经常会使用Thymeleaf
- 优点:
- 语法简单,贴近JSP的方式
- 缺点:
- 性能不是很好,高并发场景以及后台管理系统一般都不使用Thymeleaf采用前后端分离的方式,Thymeleaf一般适用于简单的单体应用
Thymeleaf的使用
Thymeleaf的语法可以参考官方文档的第四小节Standard Expression Syntax
使用流程
第一步:引入Thymeleaf的相关依赖spring-boot-starter-thymeleaf
<dependency>
    <groupId>org.springframework.boot</groupId>
    <artifactId>spring-boot-starter-thymeleaf</artifactId>
</dependency>
1
2
3
4第二步:引入了相关依赖Thymeleaf会使用ThymeleafAutoConfiguration自动配置Thymeleaf
自动配置的策略:
所有Thymeleaf的配置值都在ThymeleafProperties类中
@ConfigurationProperties(prefix = "spring.thymeleaf")
public class ThymeleafProperties {

	private static final Charset DEFAULT_ENCODING = StandardCharsets.UTF_8;

	public static final String DEFAULT_PREFIX = "classpath:/templates/";//默认类路径下templates目录放页面

	public static final String DEFAULT_SUFFIX = ".html";//所有的页面都默认以xxx.html命名
	...
}
1
2
3
4
5
6
7
8
9
10配置好了SpringTemplateEngine【但是在更新的版本没看到SpringTemplateEngine】
配置好了ThymeleafViewResolver
@AutoConfiguration(after = { WebMvcAutoConfiguration.class, WebFluxAutoConfiguration.class })
@EnableConfigurationProperties(ThymeleafProperties.class)
@ConditionalOnClass({ TemplateMode.class, SpringTemplateEngine.class })
@Import({ TemplateEngineConfigurations.ReactiveTemplateEngineConfiguration.class,
		TemplateEngineConfigurations.DefaultTemplateEngineConfiguration.class })//?没有SpringTemplateEngine是不是因为被Import自动已经配置好了?老版本注解上是没有关于模板引擎的
public class ThymeleafAutoConfiguration {

	@Configuration(proxyBeanMethods = false)
	@ConditionalOnMissingBean(name = "defaultTemplateResolver")
	static class DefaultTemplateResolverConfiguration {

		...其他代码

        //给IoC容器中放一个模板引擎解析器
		@Bean
		SpringResourceTemplateResolver defaultTemplateResolver() {
			SpringResourceTemplateResolver resolver = new SpringResourceTemplateResolver();
			resolver.setApplicationContext(this.applicationContext);
			resolver.setPrefix(this.properties.getPrefix());//指定thymeleaf的前缀
			resolver.setSuffix(this.properties.getSuffix());//指定后缀,这个前缀后缀是从这个类中的properties属性从配置文件绑定的
			resolver.setTemplateMode(this.properties.getMode());
			if (this.properties.getEncoding() != null) {
				resolver.setCharacterEncoding(this.properties.getEncoding().name());
			}
			resolver.setCacheable(this.properties.isCache());
			Integer order = this.properties.getTemplateResolverOrder();
			if (order != null) {
				resolver.setOrder(order);
			}
			resolver.setCheckExistence(this.properties.isCheckTemplate());
			return resolver;
		}

	}

	@Configuration(proxyBeanMethods = false)
	@ConditionalOnWebApplication(type = Type.SERVLET)
	@ConditionalOnProperty(name = "spring.thymeleaf.enabled", matchIfMissing = true)
	static class ThymeleafWebMvcConfiguration {

		...其他代码

		@Configuration(proxyBeanMethods = false)
		static class ThymeleafViewResolverConfiguration {

            //Thymeleaf的视图解析器
			@Bean
			@ConditionalOnMissingBean(name = "thymeleafViewResolver")
			ThymeleafViewResolver thymeleafViewResolver(ThymeleafProperties properties,
					SpringTemplateEngine templateEngine) {
				ThymeleafViewResolver resolver = new ThymeleafViewResolver();
				resolver.setTemplateEngine(templateEngine);
				resolver.setCharacterEncoding(properties.getEncoding().name());
				resolver.setContentType(
						appendCharset(properties.getServlet().getContentType(), resolver.getCharacterEncoding()));
				resolver.setProducePartialOutputWhileProcessing(
						properties.getServlet().isProducePartialOutputWhileProcessing());//视图解析器的所有配置也从properties属性来
				resolver.setExcludedViewNames(properties.getExcludedViewNames());
				resolver.setViewNames(properties.getViewNames());
				// This resolver acts as a fallback resolver (e.g. like a
				// InternalResourceViewResolver) so it needs to have low precedence
				resolver.setOrder(Ordered.LOWEST_PRECEDENCE - 5);
				resolver.setCache(properties.isCache());
				return resolver;
			}

			...其他代码
		}
	}

	@Configuration(proxyBeanMethods = false)
	@ConditionalOnWebApplication(type = Type.REACTIVE)
	@ConditionalOnProperty(name = "spring.thymeleaf.enabled", matchIfMissing = true)
	static class ThymeleafWebFluxConfiguration {
		...
	}
	@Configuration(proxyBeanMethods = false)
	@ConditionalOnClass(LayoutDialect.class)
	static class ThymeleafWebLayoutConfiguration {
		...
	}
	@Configuration(proxyBeanMethods = false)
	@ConditionalOnClass(DataAttributeDialect.class)
	static class DataAttributeDialectConfiguration {
		...
	}
	@Configuration(proxyBeanMethods = false)
	@ConditionalOnClass({ SpringSecurityDialect.class, CsrfToken.class })
	static class ThymeleafSecurityDialectConfiguration {
		...
	}
	@Configuration(proxyBeanMethods = false)
	@ConditionalOnClass(Java8TimeDialect.class)
	static class ThymeleafJava8TimeDialect {
		...
	}
}
1
2
3
4
5
6
7
8
9
10
11
12
13
14
15
16
17
18
19
20
21
22
23
24
25
26
27
28
29
30
31
32
33
34
35
36
37
38
39
40
41
42
43
44
45
46
47
48
49
50
51
52
53
54
55
56
57
58
59
60
61
62
63
64
65
66
67
68
69
70
71
72
73
74
75
76
77
78
79
80
81
82
83
84
85
86
87
88
89
90
91
92
93
94
95
96
97第三步:创建html页面,引入Thymeleaf命名空间,使用Thymeleaf就会自动提示,然后编写前端代码
<!DOCTYPE html>
<html lang="en" xmlns:th="http://www.thymeleaf.org">
<head>
    <meta charset="UTF-8">
    <title>success</title>
</head>
<body>
<!--th:text=""是修改该标签的文本值,${}可以获取所有域中的属性值}-->
<h1 th:text="${msg}">哈哈</h1>
<h2>
    <!--th:href表示修改a标签href属性值,注意所有的th: 冒号后面不能空一格,空了会报错-->
    <a href="www.atguigu.com" th:href="${link}">去百度</a>
    <!--@{/link}会把/link这个字符串直接拼接到域名+前置路径后面,而不是去域中取值-->
    <!--在属性配置文件中设置属性server.servlet.context-path为自定义上下文路径如/world即可【以后所有的请求都以/world开始】-->
    <a href="www.atguigu.com" th:href="@{/link}">去百度2</a>
</h2>
</body>
</html>
1
2
3
4
5
6
7
8
9
10
11
12
13
14
15
16
17
18第四步:编写后端代码
@Controller
public class ViewTestController {
    @GetMapping("/atguigu")
    public String atguigu(Model model){
        model.addAttribute("msg","你好,guigu");
        model.addAttribute("link","http://www.baidu.com");
        return "success";
    }
}
1
2
3
4
5
6
7
8
9
# Thymeleaf语法
# 表达式
| 表达式名字 | 语法 | 用途 |
|---|---|---|
| 变量取值 | ${...} | 获取请求域、session域、对象的值 |
| 选择变量 | *{...} | 获取上下文对象值 |
| 消息 | #{...} | 获取国际化等值 |
| 链接 | @{...} | 生成链接,使用@{}指定的超链接可以自动拼上上下文路径 |
| 片段表达式 | ~{...} | 相当于JSP的include的作用,引入公共页面片段 |
# 字面量
- 文本值: 'one text' , 'Another one!' ,…
- 数字: 0 , 34 , 3.0 , 12.3 ,…
- 布尔值: true , false
- 空值: null
- 变量: one,two,.... 变量不能有空格,变量一般用在表达式中
# 文本操作
- 字符串拼接: +
- 变量替换: |The name is ${name}|
# 数学运算
- 运算符: + , - , * , / , %
# 布尔运算
- 运算符: and , or
- 一元运算: ! , not
# 比较运算
- 比较: > , < , >= , <= ( gt , lt , ge , le )
- 等式: == , != ( eq , ne )
# 条件运算
- If-then: (if) ? (then)
- If-then-else: (if) ? (then) : (else)【三元运算】
- Default: (value) ?: (defaultvalue) 【如果:前面是真,直接给:后面括号中默认值】
# 特殊操作
- 无操作: _
# 设置属性值-th:attr
- 给单个value属性设置单个值
<form action="subscribe.html" th:attr="action=@{/subscribe}">
  <fieldset>
    <input type="text" name="email" />
    <input type="submit" value="Subscribe!" th:attr="value=#{subscribe.submit}"/>
  </fieldset>
</form>
2
3
4
5
6
- 给多个变量设置单个值
<img src="../../images/gtvglogo.png"
     th:attr="src=@{/images/gtvglogo.png},title=#{logo},alt=#{logo}" />
2
以上两个的代替写法 th:xxxx
直接用th:value代替th:attr="value=#{subscribe.submit}",th:value取值解析以后会直接覆盖value原来的值,即 th:xxxx相当于改xxxx属性的值,注意没有单独写xxxx属性直接写th:xxxx也是一样效果
<input type="submit" value="Subscribe!" th:value="#{subscribe.submit}"/>
<form action="subscribe.html" th:action="@{/subscribe}">
2
- 所有h5兼容的标签写法
https://www.thymeleaf.org/doc/tutorials/3.0/usingthymeleaf.html#setting-value-to-specific-attributes
# 标签迭代
使用th:each属性对list集合进行遍历,和JSP差不多,复习复习JSP
<tr th:each="prod : ${prods}">
    <td th:text="${prod.name}">Onions</td>
    <td th:text="${prod.price}">2.41</td>
    <td th:text="${prod.inStock}? #{true} : #{false}">yes</td>
</tr>
2
3
4
5
<tr th:each="prod,iterStat : ${prods}" th:class="${iterStat.odd}? 'odd'">
    <td th:text="${prod.name}">Onions</td>
    <td th:text="${prod.price}">2.41</td>
    <td th:text="${prod.inStock}? #{true} : #{false}">yes</td>
</tr>
2
3
4
5
【实际应用】
<table  class="display table table-bordered table-striped" id="dynamic-table">
    <thead>
        <tr>
            <th>#id</th>
            <th>用户名</th>
            <th>密码</th>
        </tr>
    </thead>
    <tbody>
        <tr class="gradeX" th:each="user,status:${users}">
            <!--status是遍历的状态属性和JSP类似,里面的count是下标从1开始,index是从0开始-->
            <td th:text="${status.count}">null</td>
            <td th:text="${user.username}">null</td>
            <td>[[${user.password}]]</td>
        </tr>
    </tbody>
</table>
2
3
4
5
6
7
8
9
10
11
12
13
14
15
16
17
# 条件运算
<a href="comments.html"
	th:href="@{/product/comments(prodId=${prod.id})}"
	th:if="${not #lists.isEmpty(prod.comments)}">view</a>
2
3
<div th:switch="${user.role}">
      <p th:case="'admin'">User is an administrator</p>
      <p th:case="#{roles.manager}">User is a manager</p>
      <p th:case="*">User is some other thing</p>
</div>
2
3
4
5
# 属性优先级
| Order | Feature | Attributes |
|---|---|---|
| 1 | Fragment inclusion | th:insert th:replace |
| 2 | Fragment iteration | th:each |
| 3 | Conditional evaluation | th:if th:unless th:switch th:case |
| 4 | Local variable definition | th:object th:with |
| 5 | General attribute modification | th:attr th:attrprepend th:attrappend |
| 6 | Specific attribute modification | th:value th:href th:src ... |
| 7 | Text (tag body modification) | th:text th:utext |
| 8 | Fragment specification | th:fragment |
| 9 | Fragment removal | th:remove |
官方文档 - 10 Attribute Precedence (opens new window)
# 后台管理系统构建
# 项目创建
使用IDEA的Spring Initializr构建项目
引入的相关依赖
thymeleaf
web-starter
devtools
lombok
# 添加登陆页面
/static放置 css,js等静态资源/templates/login.html登录页注意通过label标签设置提示信息
<html lang="en" xmlns:th="http://www.thymeleaf.org"><!-- 要加这玩意thymeleaf才能用 -->
<form class="form-signin" action="index.html" method="post" th:action="@{/login}">
    ...
    <!-- 消息提醒 -->
    <label style="color: red" th:text="${msg}"></label>

    <input type="text" name="userName" class="form-control" placeholder="User ID" autofocus>
    <input type="password" name="password" class="form-control" placeholder="Password">
    <button class="btn btn-lg btn-login btn-block" type="submit">
        <i class="fa fa-check"></i>
    </button>
    ...
</form>
1
2
3
4
5
6
7
8
9
10
11
12
13/templates/main.html主页thymeleaf内联写法【也叫行内写法,在文本中使用域中的参数,使用双中括号即可】:
<p>Hello, [[${session.user.name}]]!</p>1
# 登录功能代码
转发存在表单重复提交,一般都使用重定向到目标页面
@Controller
public class IndexController {
/**
* @return {@link String }
* @描述 登录页
* @author Earl
* @version 1.0.0
* @创建日期 2023/05/30
* @since 1.0.0
*/
@GetMapping({"/","/login"})
public String IndexController(){
return "login";
}
/**
* @param user 用户
* @param session 会话
* @param model 模型
* @return {@link String }
* @描述 登录成功跳转主页面,转发存在表单重复提交问题,一般适用重定向到目标页面
* @author Earl
* @version 1.0.0
* @创建日期 2023/05/30
* @since 1.0.0
*/
@PostMapping("/login")
//public String main(String username,String password){//直接用User对象封装表单提交的值
public String main(User user, HttpSession session, Model model){
//如果会话域中账户和密码不为空,则判定已经登录过,此时把username和password放入会话域供控制器方法mainPage做登录判断
//不为空的判断可以使用Spring下的StringUtils的isEmpty、hasText(有内容)、hasLength(有长度)方法进行判断
//if (StringUtils.isEmpty(user.getUsername())&&StringUtils.hasLength(user.getPassword())) {
if (!StringUtils.isEmpty(user.getUsername())&&"123".equals(user.getPassword())) {
session.setAttribute("loginUser",user.getUsername());
//不要放密码,这样不安全
//session.setAttribute("password",user.getPassword());
return "redirect:/main.html";
}
//return "main";
//return "redirect:/main.html";
//登录不成功就回到登录页面,此时可以给登录页面传递信息,给请求域中放提示错误信息
model.addAttribute("msg","账号密码错误");
return "login";
}
/**
* @return {@link String }
* @描述 主页面,这样也存在问题,只要前端一敲这个地址就可以不登录直接来到主页面,需要在这个控制器方法中加一个登录状态判断
* 解决办法:创建一个User的bean类
* @author Earl
* @version 1.0.0
* @创建日期 2023/05/30
* @since 1.0.0
*/
@GetMapping("/main.html")
public String mainPage(HttpSession session,Model model){
//直接通过路径访问主页面需要判断是否经过登录,合理的做法是通过拦截器或者过滤器判断登录状态,这里直接为了遍历写在方法里面
if (session.getAttribute("loginUser") != null) {
//如果会话域有用户名,跳转主页面【这还是有bug,一个登录处处登录,可以改善,暂时不管】
return "main";
}else {
//登录不成功就回到登录页面,此时可以给登录页面传递信息,给请求域中放提示错误信息
model.addAttribute("msg","请重新登录");
return "login";
}
}
}
2
3
4
5
6
7
8
9
10
11
12
13
14
15
16
17
18
19
20
21
22
23
24
25
26
27
28
29
30
31
32
33
34
35
36
37
38
39
40
41
42
43
44
45
46
47
48
49
50
51
52
53
54
55
56
57
58
59
60
61
62
63
64
65
66
67
68
# 导入菜单模板页面
导入table相关模板
- 将4个table相关页面复制到templates/table/目录下【table目录存放与表格相关的目录】,代表了Data Table下的所有页面
编写控制器方法实现页面跳转
控制器方法代码
/** * 负责处理table相关的路径跳转 */ @Controller public class TableController { @GetMapping("/basic_table.html") public String basic_table(){ return "table/basic_table"; } @GetMapping("/dynamic_table.html") public String dynamic_table(){ return "table/dynamic_table"; } @GetMapping("/responsive_table.html") public String responsive_table(){ return "table/responsive_table"; } @GetMapping("/editable_table.html") public String editable_table(){ return "table/editable_table"; } }1
2
3
4
5
6
7
8
9
10
11
12
13
14
15
16
17
18
19
20
21
22
23
24
25
抽取公共页面
公共部分的Html代码
<!DOCTYPE html> <html lang="en" xmlns:th="http://www.thymeleaf.org"> <head> ... <!--公共部分1--> <!--以下4个css、js文件在每个table相关文件中都有,所有包含侧边和顶部的页面这个部分都是一样的--> <link href="css/style.css" rel="stylesheet"> <link href="css/style-responsive.css" rel="stylesheet"> <!-- HTML5 shim and Respond.js IE8 support of HTML5 elements and media queries --> <!--[if lt IE 9]> <script src="js/html5shiv.js"></script> <script src="js/respond.min.js"></script> <![endif]--> </head> <body class="sticky-header"> <section> <!--公共部分2--> <!--这个导航栏在各个页面也是一样的--> <!-- left side start:左侧导航开始--> <div class="left-side sticky-left-side"> ... </div> <!-- left side end:左侧导航结束--> ... <!--公共部分3--> <!-- header section start--> <div class="header-section"> ... </div> <!-- header section end--> ... </section> <!--公共部分4--> <!--这6个js的引用在每个table中也是公共的,所有包含侧边和顶部的页面这个部分都是一样的--> <!-- Placed js at the end of the document so the pages load faster --> <script src="js/jquery-1.10.2.min.js"></script> <script src="js/jquery-ui-1.9.2.custom.min.js"></script> <script src="js/jquery-migrate-1.2.1.min.js"></script> <script src="js/bootstrap.min.js"></script> <script src="js/modernizr.min.js"></script> <script src="js/jquery.nicescroll.js"></script> ... </body> </html>1
2
3
4
5
6
7
8
9
10
11
12
13
14
15
16
17
18
19
20
21
22
23
24
25
26
27
28
29
30
31
32
33
34
35
36
37
38
39
40
41
42
43
44
45
46
47
48
49
50
51
52抽取公共信息
新建一个html,把所有公共信息写在这个html中,这个页面专门给第三方引用,抽取公共信息的文档参考官方文档第八章Template Layout
抽取步骤:
第一步:声明公共信息
方式一:公共的信息使用th:fragment="xxxx"属性进行声明
公共信息的html文件假如为templates/footer.html
在别处对公共信息进行引用,对应的标签类型要相同,footer是公共信息所在html文件的文件名,xxxx是公共信息的标识名,标识名可以是id属性也可以是fragment属性
对公共信息的引用可以使用三种方式:th:insert、th:replace、th:include,官方文档不推荐3.0以后得Thymeleaf使用th:include
在footer.html中使用fragment属性对标签进行标注
<!DOCTYPE html SYSTEM "http://www.thymeleaf.org/dtd/xhtml1-strict-thymeleaf-4.dtd"> <html xmlns="http://www.w3.org/1999/xhtml" xmlns:th="http://www.thymeleaf.org"> <body> <div th:fragment="copy"> © 2011 The Good Thymes Virtual Grocery </div> </body> </html>1
2
3
4
5
6
7
8
9在目标页面的对应标签中使用th:include通过fragment属性对对应公共信息进行引用
<body> ... <div th:include="footer :: copy"></div> </body>1
2
3
4在目标页面的对应标签中使用th:insert通过fragment属性对对应公共信息进行引用
<body> ... <div th:insert="~{footer :: copy}"></div> </body>1
2
3
4在目标页面的对应标签中使用th:replace通过fragment属性对对应公共信息进行引用
<body> ... <div th:replace="footer :: copy"></div> </body>1
2
3
4
方式二:公共信息使用选择器进行声明
在footer.html中使用id正常对标签进行标注
... <div id="copy-section"> © 2011 The Good Thymes Virtual Grocery </div> ...1
2
3
4
5在目标页面的对应标签中使用th:include通过id属性对对应公共信息进行引用
<body> ... <div th:include="footer :: #copy-section"></div> </body>1
2
3
4在目标页面的对应标签中使用th:insert通过id属性对对应公共信息进行引用
<body> ... <div th:insert="~{footer :: #copy-section}"></div> </body>1
2
3
4在目标页面的对应标签中使用th:replace通过fragment属性对对应公共信息进行引用
<body> ... <div th:replace="footer :: #copy-section"></div> </body>1
2
3
4
【公共信息部分】
<footer th:fragment="copy"> © 2011 The Good Thymes Virtual Grocery </footer>1
2
3【三种引入方式】
<body> ... <div th:insert="footer :: copy"></div> <div th:replace="footer :: copy"></div> <div th:include="footer :: copy"></div> </body>1
2
3
4
5
6
7
8【三种引入方式的效果】
<body> ... <!--th:insert的效果:在div中用insert就嵌入div--> <div> <footer> © 2011 The Good Thymes Virtual Grocery </footer> </div> <!--th:replace的效果:会把replace所在的标签div丢掉--> <footer> © 2011 The Good Thymes Virtual Grocery </footer> <!--th:include的效果:会直接把公共信息标签中的内容放在include所在的标签div中--> <div> © 2011 The Good Thymes Virtual Grocery </div> </body>1
2
3
4
5
6
7
8
9
10
11
12
13
14
15
16
17
18
19【前后端代码修改较多,看视频比较方便,这里不再列举】
使用Thymeleaf对后端数据进行循环遍历
【后端数据准备】
@GetMapping("/dynamic_table") public String dynamic_table(Model model){ //表格内容的遍历,准备表格 List<User> users= Arrays.asList(new User("zhangsan","123"), new User("lisi","1234"), new User("wangwu","12345"), new User("zhaoliu","123456")); model.addAttribute("users",users); return "table/dynamic_table"; }1
2
3
4
5
6
7
8
9
10【前端数据展示处理】
<table class="display table table-bordered table-striped" id="dynamic-table"> <thead> <tr> <th>#id</th> <th>用户名</th> <th>密码</th> </tr> </thead> <tbody> <tr class="gradeX" th:each="user,status:${users}"> <!--status是遍历的状态属性和JSP类似,里面的count是下标从1开始,index是从0开始--> <td th:text="${status.count}">null</td> <td th:text="${user.username}">null</td> <td>[[${user.password}]]</td> </tr> </tbody> </table>1
2
3
4
5
6
7
8
9
10
11
12
13
14
15
16
17【页面效果】
![]()
# 视图解析原理
视图解析器与视图原理
处理redirect:XXXX的返回值处理器是ViewNameMethodReturnHandler,返回不是null且为字符串就会用这个返回值处理器进行处理,该返回值处理器会把返回的字符串放入mavContainer的view属性中,之前讲过了
mavContainer中存放的信息
ignoreDefaultModelOnRedirect 后面再说
view 【控制器方法字符串返回值对应的字符串一字不差】
defaultModel 【这个就是mavContainer中最开始的那个Model】
redirectModel 【重定向新建的Model?】
SpringMVC会根据mavContainer创建ModelAndView
- 任何控制器方法都会得到一个ModelAndView,ModelAndView中保存了域数据和视图地址【ModelAndView中的Model都是新建的,在利用mavContainer创建ModelAndView时创建的ModelMap;只是重定向视图还会提前创建一个ModelMap,可暂时理解为转发和重定向创建ModelAndView时传入的model不是同一种,一个传参defaultModel(转发),一个传参ModelMap(重定向)】
doDispatch方法的processDispatchResult方法处理派发结果
这个方法决定了页面该如何响应
调用render方法对页面进行渲染
调用resolveViewName方法根据控制器方法的String类型返回值得到View对象【View对象中定义了页面的渲染逻辑】
resolveViewName方法的逻辑是遍历所有的视图解析器尝试是否有能根据当前返回值得到View对象,最终得到了RedirectView;RedirectView是View的一个实现类,View的实现类非常非常多,实际上View这个系统很复杂,AbstractUrlBasedView的同级View有非常非常多
![]()
![]()
得到视图对象是为了调用自定义的render方法来进行页面渲染工作
RedirectView通过重定向到一个页面进行渲染
- 获取目标url地址
- 使用原生Servlet的response的sendRedirect方法进行重定向
![]()
【render方法中的renderMergedOutputModel方法】
为什么这里render方法还在AbstractView中,renderMergedOutputModel方法就直接跳去RedirectView了,这里的renderMergedOutputModel方法和重点4中不一样,单独说一下,以下就是RedirectView的渲染方法
public class RedirectView extends AbstractUrlBasedView implements SmartView {
@Override
protected void renderMergedOutputModel(Map<String, Object> model, HttpServletRequest request,
HttpServletResponse response) throws IOException {
//分支1
String targetUrl = createTargetUrl(model, request);//获取要重定向的目标url
targetUrl = updateTargetUrl(targetUrl, model, request, response);
// Save flash attributes
RequestContextUtils.saveOutputFlashMap(targetUrl, request, response);
//分支2
// Redirect
sendRedirect(request, response, targetUrl, this.http10Compatible);//执行重定向
}
}
2
3
4
5
6
7
8
9
10
11
12
13
14
15
16
17
【分支1:createTargetUrl方法分支】
【renderMergedOutputModel方法中的createTargetUrl方法】
public class RedirectView extends AbstractUrlBasedView implements SmartView {
protected final String createTargetUrl(Map<String, Object> model, HttpServletRequest request) throws UnsupportedEncodingException {
// Prepare target URL.
StringBuilder targetUrl = new StringBuilder();//创建一个可变长度字符串对象
String url = getUrl();//这个url就是/main.html
Assert.state(url != null, "'url' not set");
if (this.contextRelative && getUrl().startsWith("/")) {
// Do not apply context path to relative URLs.
targetUrl.append(getContextPath(request));//向可变长度字符串添加获取的url,即/main.html
}
targetUrl.append(getUrl());
String enc = this.encodingScheme;
if (enc == null) {
enc = request.getCharacterEncoding();//准备编码格式
}
if (enc == null) {
enc = WebUtils.DEFAULT_CHARACTER_ENCODING;//设置编码UTF-8
}
if (this.expandUriTemplateVariables && StringUtils.hasText(targetUrl)) {
Map<String, String> variables = getCurrentRequestUriVariables(request);
targetUrl = replaceUriTemplateVariables(targetUrl.toString(), model, variables, enc);//这里还是/main.html
}
if (isPropagateQueryProperties()) {
appendCurrentQueryParams(targetUrl, request);
}
if (this.exposeModelAttributes) {//如果有一些属性如exposeModelAttributes要重定向,会将这些重定向属性以请求参数的形式拼接到url后边
appendQueryProperties(targetUrl, model, enc);
}
return targetUrl.toString();
}
}
2
3
4
5
6
7
8
9
10
11
12
13
14
15
16
17
18
19
20
21
22
23
24
25
26
27
28
29
30
31
32
33
34
35
【分支2:sendRedirect方法分支】
【renderMergedOutputModel方法中的sendRedirect方法】
public class RedirectView extends AbstractUrlBasedView implements SmartView {
protected void sendRedirect(HttpServletRequest request, HttpServletResponse response,
String targetUrl, boolean http10Compatible) throws IOException {
String encodedURL = (isRemoteHost(targetUrl) ? targetUrl : response.encodeRedirectURL(targetUrl));//拿到url,如果url中有中文进行编码
if (http10Compatible) {
HttpStatus attributeStatusCode = (HttpStatus) request.getAttribute(View.RESPONSE_STATUS_ATTRIBUTE);
if (this.statusCode != null) {
response.setStatus(this.statusCode.value());
response.setHeader("Location", encodedURL);
}
else if (attributeStatusCode != null) {
response.setStatus(attributeStatusCode.value());
response.setHeader("Location", encodedURL);
}
else {
// Send status code 302 by default.
response.sendRedirect(encodedURL);//调用原生servlet的response的sendRedirect方法来重定向,执行到这儿没有直接跳出页面,感觉像循环执行了多次请求后才逐渐出现页面的
}
}
else {
HttpStatus statusCode = getHttp11StatusCode(request, response, targetUrl);
response.setStatus(statusCode.value());
response.setHeader("Location", encodedURL);
}
}
}
2
3
4
5
6
7
8
9
10
11
12
13
14
15
16
17
18
19
20
21
22
23
24
25
26
27
不同场景下的视图解析
返回值以forward:开始:创建InternalResourceView(forwardUrl)-->render策略是request.getRequestDispatcher(request,diapatcherPath)拿到转发器rd[RequestDispatcher],通过rd的forward(request,response)方法进行转发;本质上就是原生Servlet的转发request.getRequestDispatcher(path).forward(request,response)
返回值以redirect:开始:创建RedirectView(redirectUrl)-->render就是调用原生的重定向response.sendRedirect(encodedURL);
返回值是普通字符串,会创建ThymeleafView
【ThymeleafView的render方法】
public class ThymeleafView extends AbstractThymeleafView { public void render(Map<String, ?> model, HttpServletRequest request, HttpServletResponse response) throws Exception { this.renderFragment(this.markupSelectors, model, request, response);//调用renderFragment进行渲染 } //ThymeleafView中的render方法中的renderFragment方法 protected void renderFragment(Set<String> markupSelectorsToRender, Map<String, ?> model, HttpServletRequest request, HttpServletResponse response) throws Exception { ServletContext servletContext = this.getServletContext(); String viewTemplateName = this.getTemplateName(); ISpringTemplateEngine viewTemplateEngine = this.getTemplateEngine();//拿到Thymeleaf模板引擎 if (viewTemplateName == null) { ... } else { Map<String, Object> mergedModel = new HashMap(30);//拿到要给页面渲染的数据 Map<String, Object> templateStaticVariables = this.getStaticVariables(); ... if (model != null) { mergedModel.putAll(model);//这个mergeModel中就有给请求域放入的数据如users的list集合,还有其他东西,暂时看不懂 } ... WebExpressionContext context = new WebExpressionContext(configuration, request, response, servletContext, this.getLocale(), mergedModel);//拿到Thymeleaf模板引擎的一些配置 String templateName; Set markupSelectors; if (!viewTemplateName.contains("::")) {//判断页面地址是不是有::,公共信息引用中有的【这个地址是页面中的地址解析】 templateName = viewTemplateName; markupSelectors = null; } else { ... } String templateContentType = this.getContentType();//拿到页面要响应的内容类型text/html;charset=utf-8 Locale templateLocale = this.getLocale(); String templateCharacterEncoding = this.getCharacterEncoding();//拿到字符编码 Set processMarkupSelectors; ... boolean producePartialOutputWhileProcessing = this.getProducePartialOutputWhileProcessing(); Writer templateWriter = producePartialOutputWhileProcessing ? response.getWriter() : new FastStringWriter(1024); viewTemplateEngine.process(templateName, processMarkupSelectors, context, (Writer)templateWriter);//模板引擎调用process方法,这里面拿到输出数据流writer,把所有的页面内容刷到writer中,刷出的页面内容在其中的writer中的out属性的bb属性的hb属性View as String就能看到;所以还是找出资源搞成字符串然后用输出流返回字符串给浏览器,而不是直接将静态页面直接返回 ... } } }1
2
3
4
5
6
7
8
9
10
11
12
13
14
15
16
17
18
19
20
21
22
23
24
25
26
27
28
29
30
31
32
33
34
35
36
37
38
39
40
41
42通过以上内容可知我们可以自定义视图解析器+自定义视图来完成更复杂的功能,比如把页面渲染的数据直接包装成excel表格,在自定义视图时在render方法中创建所有的excel表格,使用response将所有的表格响应出去【这些东西在尚硅谷大厂学院里面讲】
# 拦截器实现登录检查
所有拦截器都继承了接口HandlerInterceptor,拦截器相关的知识见web开发核心对象
自定义登录检查拦截器代码
@Slf4j public class LoginInterceptor implements HandlerInterceptor { /** * @return boolean * @描述 控制器方法执行前处理 * @since 1.0.0 */ @Override public boolean preHandle(HttpServletRequest request, HttpServletResponse response, Object handler) throws Exception { //获取请求路径的URI String uri = request.getRequestURI(); log.info("preHandle拦截的请求路径是{}",uri);//log打印日志可以直接在字符串的{}中添加变量自动拼接字符串 /** * 访问登录页拦截的静态资源有 * 拦截的请求路径是/js/modernizr.min.js * 拦截的请求路径是/js/bootstrap.min.js * 拦截的请求路径是/images/login-logo.png * 拦截的请求路径是/js/jquery-1.10.2.min.js * 拦截的请求路径是/css/style-responsive.css * 拦截的请求路径是/css/style.css * */ HttpSession session = request.getSession(); if (session.getAttribute("loginUser") != null) { //放行 return true; } /**拦截住最好跳转登录页面, * 注意1:这里拦截器拦截所有把静态资源的访问也拦截了【此时直接访问静态资源也会来到不完整的登录页】,比如CSS样式,这种情况下,无需拦截的页面的样式 * 等静态资源无法加载,导致页面很难看 * 注意2:重定向在页面中不一定能取出会话域中的信息,使用转发解决这个问题 * */ /*session.setAttribute("msg","请先登录!"); response.sendRedirect("/");*/ request.setAttribute("msg","请先登录!"); request.getRequestDispatcher("/").forward(request,response); return false; } @Override public void postHandle(HttpServletRequest request, HttpServletResponse response, Object handler, ModelAndView modelAndView) throws Exception { log.info("postHandle执行{}",modelAndView); } @Override public void afterCompletion(HttpServletRequest request, HttpServletResponse response, Object handler, Exception ex) throws Exception { log.info("afterCompletion执行异常{}",ex); } }1
2
3
4
5
6
7
8
9
10
11
12
13
14
15
16
17
18
19
20
21
22
23
24
25
26
27
28
29
30
31
32
33
34
35
36
37
38
39
40
41
42
43
44
45
46
47
48自定义拦截器添加到组件【注册时通过实现WebMvcConfiguration的addInterceptor方法】
在该步骤中指定拦截规则,拦截所有也包括静态资源在内,排除拦截的路径包括/和/login以及所有的静态资源访问;如果只是精确拦截则不需要管静态资源的事情
@Configuration public class AdminWebConfig implements WebMvcConfigurer { @Override public void addInterceptors(InterceptorRegistry registry) { registry.addInterceptor(new LoginInterceptor()) .addPathPatterns("/**")//所有请求都会被拦截包括静态资源 .excludePathPatterns("/","/login","/css/**","/fonts/**","/images/**","/js/**"); /** 除了登录页面还要放行所有的静态资源,包括 样式的/css/**, 字体的/fonts/**, 图片的/images/**, Script脚本的/js/**, 把以上路径添加到拦截器的排除路径中即可 注意:不能直接写/static来表示静态资源,因为静态资源访问请求路径中不含/static 要使用/static来排除静态资源需要通过spring.mvc.static-path-pattern属性配置静态资源访问前缀,以后所有访问静态资源的路径都需要添加 访问前缀如/static,自然可以通过放行/static/**来放行所有静态资源的访问 */ } }1
2
3
4
5
6
7
8
9
10
11
12
13
14
15
16
17
18
19
20
# 文件上传
# 文件上传实例
文件上传保存实例
前端页面文件上传表单准备
重点是表单的单文件和多文件上传
多文件上传input标签的type属性为file类型,且需要在input标签中添加multiple字段,没有multiple字段就表示单文件上传
<div class="panel-body"> <!--enctype就是encodetype是编码类型的意思。 multipart/form-data是指表单数据有多部分构成,既有文本数据,又有文件等二进制数据的意思。 默认情况下,enctype的值是application/x-www-form-urlencoded,不能用于文件上传,只有使用了multipart/form-data,才能完整的传递文件数据。--> <form role="form" th:action="@{/upload}" method="post" enctype="multipart/form-data"> <div class="form-group"> <label for="exampleInputEmail1">邮箱</label> <input type="email" name="email" class="form-control" id="exampleInputEmail1" placeholder="Enter email"> </div> <div class="form-group"> <label for="exampleInputPassword1">名字</label> <input type="password" name="username" class="form-control" id="exampleInputPassword1" placeholder="Password"> </div> <div class="form-group"> <label for="exampleInputFile">头像</label> <input type="file" name="headImg" id="exampleInputFile"> </div> <div class="form-group"> <label for="exampleInputFile">生活照</label> <!--multiple用在input的file中就是表示多文件上传,没有multiple就表示单文件上传--> <input type="file" name="photos" multiple> </div> <div class="checkbox"> <label> <input type="checkbox"> Check me out </label> </div> <button type="submit" class="btn btn-primary">提交</button> </form> </div>1
2
3
4
5
6
7
8
9
10
11
12
13
14
15
16
17
18
19
20
21
22
23
24
25
26
27
28
29
30
31【前端页面效果】
![]()
控制器方法
重点是如何接收前端上传的文件以及文件的保存
- 单个文件接收
- 使用@RequestPart("headImg")注解可以为MultipartFile类型形参自动封装名为headImg的单个文件为单个对象
- 多个文件接收
- 使用@RequestPart("photos")注解可以为MultipartFile[]类型形参自动封装名为photos的多个文件为数组、
- 文件保存
- MultipartFile对象的isEmpty方法可以判断文件有内容
- MultipartFile对象的getOriginalFilename方法可以获取原文件的名字,并不是表单中提交的名字而是文件原始名字
- MultipartFile对象的getName方法可以获取表单中文件的名字,不是原始文件的名字
- MultipartFile对象的getInputStream方法可以获取原始输入流可以对流进行操作
- MultipartFile对象的transferTo方法是对getInputStream方法获取的流对象的保存进行了封装,需要传参目标文件File对象【利用Spring自家的fileCopyUtils文件复制工具类的copy方法,传参操作文件对象,目标文件对象实现文件的复制转移】
- new File("F:\\cache\\"+originalFilename)
- 一定要注意,java中new File时文件名不存在没关系,没有会自己新建,但是目录名必须有,目录名不会自己新建,实在没有使用mkdir进行创建,
- 此外注意同名同内容的文件会直接进行覆盖而不会追加,同名文件不同内容也会直接覆盖掉原内容一般适用uuid解决这个问题
@Controller @Slf4j public class FormTestController { /** * @描述 *使用@RequestPart("headImg")注解可以为MultipartFile类型形参自动封装名为headImg的单个文件为单个对象 *使用@RequestPart("photos")注解可以为MultipartFile[]类型形参自动封装名为photos的多个文件为数组 * @author Earl * @version 1.0.0 */ @PostMapping("/upload") public String upload(@RequestParam("email") String email, @RequestParam("username") String username, @RequestPart("headImg") MultipartFile headImg, @RequestPart("photos") MultipartFile[] photos ) throws IOException { log.info("上传的信息:email={},username={},headImg的大小={},photos的个数={}", email,username,headImg.getSize(),photos.length); //上传的信息:email=2625074321@qq.com,username=zhangsan,headImg的大小=1347131,photos的个数=3 /** * 对文件进行保存操作 * SpringBoot的MultipartFile对象提供isEmpty实例方法判断文件对象是否为空 * 业务逻辑是不为空则保存到文件服务器或者阿里云的对象存储服务器OSS服务器 * 这里直接存入本地磁盘 * */ if (!headImg.isEmpty()) { /**可以通过MultipartFile对象的实例方法getOriginalFilename拿到原始文件的文件名,这个文件名可以作为保存文件的文件名*/ String originalFilename = headImg.getOriginalFilename(); /**通过MultipartFile对象的实例方法getInputStream()拿到原始输入流后想怎么操作就怎么操作,SpringBoot为了方便还专门封装成 一个transferTo方法直接将上传文件保存到对应的磁盘地址*/ //headImg.getInputStream() headImg.transferTo(new File("F:\\cache\\"+originalFilename)); } if (photos.length>0){ for (MultipartFile photo: photos) { if (!photo.isEmpty()) { String originalFilename = photo.getOriginalFilename(); /**一定要注意,java中new File时文件名不存在没关系,没有会自己新建,但是目录名必须有,目录名不会自己新建, * 实在没有使用mkdir进行创建,此外注意同名同内容的文件会直接进行覆盖而不会追加,同名文件不同内容也会直接覆盖掉原内容 * 一般适用uuid解决这个问题*/ photo.transferTo(new File("F:\\cache\\"+originalFilename)); } } } return "main"; } }1
2
3
4
5
6
7
8
9
10
11
12
13
14
15
16
17
18
19
20
21
22
23
24
25
26
27
28
29
30
31
32
33
34
35
36
37
38
39
40
41
42
43
44
45
46
47^注意: 上传文件过大需要在全局配置文件中设置以下属性值
spring.servlet.multipart.max-file-size: 20MB,因为SpringMVC默认只支持1MB,超过会直接报错【文件上传解析器】
这个也是Springboot自动配置的
@Configuration(proxyBeanMethods = false) @ConditionalOnClass({ Servlet.class, StandardServletMultipartResolver.class, MultipartConfigElement.class }) @ConditionalOnProperty(prefix = "spring.servlet.multipart", name = "enabled", matchIfMissing = true)//跟文件上传的相关属性都以spring.servlet.multipart为前缀,所有的属性最终都被封装到MultipartProperties中 @ConditionalOnWebApplication(type = Type.SERVLET) @EnableConfigurationProperties(MultipartProperties.class) public class MultipartAutoConfiguration { ... }1
2
3
4
5
6
7
8【MultipartProperties封装文件上传属性值的文件】
@ConfigurationProperties(prefix = "spring.servlet.multipart", ignoreUnknownFields = false) public class MultipartProperties { ... /** * Max file size. */ private DataSize maxFileSize = DataSize.ofMegabytes(1);//maxFileSize这个就是上传文件最大大小的属性,默认的最大文件限制是1MB /** * Max request size. */ private DataSize maxRequestSize = DataSize.ofMegabytes(10);//最大的请求大小限制默认是10MB【所有的总请求最大的总上传文件大小不超过10MB】 ... }1
2
3
4
5
6
7
8
9
10
11
12
13
14- 单个文件接收
# 文件上传原理
文件上传解析器的自动配置原理
- 文件上传自动配置类-MultipartAutoConfiguration-MultipartProperties【相应属性配置文件】
- 自动配置了StandardServletMultipartResolver【文件上传解析器】
- 这个文件上传解析器只能处理遵守Servlet协议上传过来的文件,如果是自定义以流的形式上传的文件需要自定义文件上传解析器
- 所有文件上传的有关配置属性全部封装在MultipartProperties中
@Configuration(proxyBeanMethods = false) @ConditionalOnClass({ Servlet.class, StandardServletMultipartResolver.class, MultipartConfigElement.class }) @ConditionalOnProperty(prefix = "spring.servlet.multipart", name = "enabled", matchIfMissing = true)//跟文件上传的相关属性都以spring.servlet.multipart为前缀,所有的属性最终都被封装到MultipartProperties中 @ConditionalOnWebApplication(type = Type.SERVLET) @EnableConfigurationProperties(MultipartProperties.class) public class MultipartAutoConfiguration { private final MultipartProperties multipartProperties; public MultipartAutoConfiguration(MultipartProperties multipartProperties) { this.multipartProperties = multipartProperties; } @Bean//文件上传的一些配置信息MultipartConfigElement @ConditionalOnMissingBean({ MultipartConfigElement.class, CommonsMultipartResolver.class }) public MultipartConfigElement multipartConfigElement() { return this.multipartProperties.createMultipartConfig(); } @Bean(name = DispatcherServlet.MULTIPART_RESOLVER_BEAN_NAME)//文件上传解析器StandardServletMultipartResolver,放入的名字也叫MULTIPART_RESOLVER_BEAN_NAME即multipartResolver @ConditionalOnMissingBean(MultipartResolver.class)//当容器中没有文件上传解析器的时候再装配这个默认的文件上传解析器 public StandardServletMultipartResolver multipartResolver() { StandardServletMultipartResolver multipartResolver = new StandardServletMultipartResolver(); multipartResolver.setResolveLazily(this.multipartProperties.isResolveLazily()); return multipartResolver; } }1
2
3
4
5
6
7
8
9
10
11
12
13
14
15
16
17
18
19
20
21
22
23
24
25
26
27文件上传实现源码追踪
第一步:判断是否文件上传请求
请求进入doDispatch方法的checkMultipart(request)方法,使用文件上传解析器的isMultipart方法判断是否文件上传请求,是文件上传请求使用文件上传解析器的resolveMultipart方法对原生请求封装成MultipartHttpServletRequest类型的StandardMultipartHttpServletRequest对象并赋值给processedRequest
在这一步就将请求所有的文件信息全部封装到一个MultiValueMap<String,MultipartFile>Map集合中了,之后直接通过注解的value属性从Map中拿文件作为参数值,这里雷神没有细讲怎么封装的Map【很诡异,value确实是MultiValueMap,但是实际上value是一个StrandradMultipartFile的ArrayList集合,而且也没有看到MultipartFile的继承结构里面有ArrayList】
如果不是文件上传请求则直接把原生请求赋值给processedRequest
第二步:如果是文件上传请求将multipartRequestParsed属性改为true
第三步:handle方法中对自动接收文件的形参的处理
protected void doDispatch(HttpServletRequest request, HttpServletResponse response) throws Exception { HttpServletRequest processedRequest=request;//这个request对象的request属性的coyoteRequest属性能看到请求是否是静态资源的请求 ... boolean multipartRequestParsed = false;//文件上传请求解析默认是false,即以multipartRequestParsed为true标志这是一个文件上传请求,默认不是文件上传请求;判断为true的依据是原生请求因为内容类型以multipart/开始就对原生请求进行包装,只要包装了就是文件上传请求 ... try { ... try { //分支一 processedRequest = checkMultipart(request);//检查是否文件上传请求,如果是文件上传请求把原生请求request赋值给processedRequest,即如果是文件上传请求,就把原生请求包装成文件上传请求processedRequest;checkMultipart方法中使用的是MultipartResolver的isMultipart方法对是否文件上传请求进行判断的,判断依据是请求的内容类型是否叫“multipart/”,所有这里决定了form表单需要写enctype="multipart/form-data";如果是文件上传请求使用MultipartResolver文件上传解析器的resolverMultipart(request)方法把文件上传请求进行解析包装成StandardMultipartHttpServletRequest这个类型并返回;这里如果是文件上传请求会进行包装,返回MultipartHttpServletRequest包装请求给processedRequest,如果不是文件上传请求,会直接把原生request直接赋值给processedRequest multipartRequestParsed = (processedRequest != request);//如果是文件上传请求根据检查结果重新设定文件上传请求解析,进行了请求包装就把multipartRequestParsed属性值改成true mappedHandler = getHandler(processedRequest); if (mappedHandler == null) { noHandlerFound(processedRequest, response); return; } HandlerAdapter ha = getHandlerAdapter(mappedHandler.getHandler()); ... if (!mappedHandler.applyPreHandle(processedRequest, response)) { return; }//执行拦截器的preHandle方法 //分支二 //处理文件上传请求,核心是形参处理,即对文件的自动封装原理 mv = ha.handle(processedRequest, response, mappedHandler.getHandler()); if (asyncManager.isConcurrentHandlingStarted()) { return; } applyDefaultViewName(processedRequest, mv);//如果控制器方法没有返回视图名,applyDefaultViewName方法,如果ModelAndView不为空但是view为空,会添加一个默认的视图地址,该默认视图地址还是会用请求地址作为页面地址,细节没说,暂时不管 mappedHandler.applyPostHandle(processedRequest, response, mv);//这里面就是单纯执行相关拦截器的postHandle方法,没有其他任何操作 } catch (Exception ex) { dispatchException = ex; } catch (Throwable err) { // As of 4.3, we're processing Errors thrown from handler methods as well, // making them available for @ExceptionHandler methods and other scenarios. dispatchException = new NestedServletException("Handler dispatch failed", err); } //重点四:处理派发最终的结果,这一步执行前,整个页面还没有跳转过去 processDispatchResult(processedRequest, response, mappedHandler, mv, dispatchException); } ... }1
2
3
4
5
6
7
8
9
10
11
12
13
14
15
16
17
18
19
20
21
22
23
24
25
26
27
28
29
30
31
32
33
34
35
36
37
38
39
40
41
42
43
44
45
46
47
48
49【分支一:checkMultipart方法分支】
【doDispatch方法中的checkMultipart方法】
@SuppressWarnings("serial") public class DispatcherServlet extends FrameworkServlet { protected HttpServletRequest checkMultipart(HttpServletRequest request) throws MultipartException { //小分支1 if (this.multipartResolver != null && this.multipartResolver.isMultipart(request)) {//调用文件上传解析器的isMultipart方法判断是否文件上传请求 if (WebUtils.getNativeRequest(request, MultipartHttpServletRequest.class) != null) { if (DispatcherType.REQUEST.equals(request.getDispatcherType())) { logger.trace("Request already resolved to MultipartHttpServletRequest, e.g. by MultipartFilter"); } } else if (hasMultipartException(request)) { logger.debug("Multipart resolution previously failed for current request - " + "skipping re-resolution for undisturbed error rendering"); } else { try { //小分支2 return this.multipartResolver.resolveMultipart(request);//调用文件上传解析器的resolveMultipart(request)方法对原生请求进行封装 } catch (MultipartException ex) { if (request.getAttribute(WebUtils.ERROR_EXCEPTION_ATTRIBUTE) != null) { logger.debug("Multipart resolution failed for error dispatch", ex); // Keep processing error dispatch with regular request handle below } else { throw ex; } } } } // If not returned before: return original request. return request; } }1
2
3
4
5
6
7
8
9
10
11
12
13
14
15
16
17
18
19
20
21
22
23
24
25
26
27
28
29
30
31
32
33
34【小分支1:isMultipart方法分支】
【checkMultipart方法中的isMultipart方法】
public class StandardServletMultipartResolver implements MultipartResolver { @Override public boolean isMultipart(HttpServletRequest request) { return StringUtils.startsWithIgnoreCase(request.getContentType(), (this.strictServletCompliance ? MediaType.MULTIPART_FORM_DATA_VALUE : "multipart/"));//判断请求的内容类型是不是以multipart/开始的,如果是则是文件上传请求,如果不是,则不是文件上传请求 } }1
2
3
4
5
6
7【小分支2:resolveMultipart方法分支】
【checkMultipart方法中的resolveMultipart方法】
public class StandardServletMultipartResolver implements MultipartResolver { @Override public MultipartHttpServletRequest resolveMultipart(HttpServletRequest request) throws MultipartException { return new StandardMultipartHttpServletRequest(request, this.resolveLazily);//通过原生request创建StandardMultipartHttpServletRequest对象以MultipartHttpServletRequest的类型返回 } }1
2
3
4
5
6【文件上传请求的参数处理过程】
文件上传请求的参数解析器是RequestPartMethodArgumentResolver,该参数解析器解析请求中的文件内容并封装成MultipartFile对象或者MultipartFile数组
【】
public class InvocableHandlerMethod extends HandlerMethod { @Nullable public Object invokeForRequest(NativeWebRequest request, @Nullable ModelAndViewContainer mavContainer, Object... providedArgs) throws Exception { Object[] args = getMethodArgumentValues(request, mavContainer, providedArgs);//获取所有形参的值 if (logger.isTraceEnabled()) { logger.trace("Arguments: " + Arrays.toString(args)); } return doInvoke(args); } //invokeForRequest方法中的getMethodArgumentValues方法 protected Object[] getMethodArgumentValues(NativeWebRequest request, @Nullable ModelAndViewContainer mavContainer, Object... providedArgs) throws Exception { MethodParameter[] parameters = getMethodParameters(); if (ObjectUtils.isEmpty(parameters)) { return EMPTY_ARGS; } Object[] args = new Object[parameters.length]; for (int i = 0; i < parameters.length; i++) {//对所有参数进行遍历,找到MultipartFile类型的参数 MethodParameter parameter = parameters[i]; parameter.initParameterNameDiscovery(this.parameterNameDiscoverer); args[i] = findProvidedArgument(parameter, providedArgs); if (args[i] != null) { continue; } if (!this.resolvers.supportsParameter(parameter)) {//在这里面对所有的参数解析器遍历,找出支持MultipartFile类型的参数解析的参数解析器,最后结果就是RequestPartMethodArgumentReolver throw new IllegalStateException(formatArgumentError(parameter, "No suitable resolver")); } try { args[i] = this.resolvers.resolveArgument(parameter, mavContainer, request, this.dataBinderFactory);//使用参数解析器的resolveArgument方法对参数进行解析,从缓存中拿参数解析器,拿不到就循环遍历 } ... } return args; } }1
2
3
4
5
6
7
8
9
10
11
12
13
14
15
16
17
18
19
20
21
22
23
24
25
26
27
28
29
30
31
32
33
34
35
36
37
38
39
40【文件上传参数的类型】
![]()
【RequestPartMethodArgumentReolver参数解析器中的resolveArgument方法】
public class RequestPartMethodArgumentResolver extends AbstractMessageConverterMethodArgumentResolver { @Override public boolean supportsParameter(MethodParameter parameter) { if (parameter.hasParameterAnnotation(RequestPart.class)) { return true; } else { if (parameter.hasParameterAnnotation(RequestParam.class)) { return false; } return MultipartResolutionDelegate.isMultipartArgument(parameter.nestedIfOptional()); } } @Override @Nullable public Object resolveArgument(MethodParameter parameter, @Nullable ModelAndViewContainer mavContainer, NativeWebRequest request, @Nullable WebDataBinderFactory binderFactory) throws Exception { HttpServletRequest servletRequest = request.getNativeRequest(HttpServletRequest.class); Assert.state(servletRequest != null, "No HttpServletRequest"); RequestPart requestPart = parameter.getParameterAnnotation(RequestPart.class);//拿到requestPart注解,这个注解中有很多信息 boolean isRequired = ((requestPart == null || requestPart.required()) && !parameter.isOptional()); String name = getPartName(parameter, requestPart);//通过注解获取相应提交文件的form表单名字 parameter = parameter.nestedIfOptional(); Object arg = null; Object mpArg = MultipartResolutionDelegate.resolveMultipartArgument(name, parameter, servletRequest);//使用文件上传解析的代理来解析文件上传请求的参数 if (mpArg != MultipartResolutionDelegate.UNRESOLVABLE) { arg = mpArg; } ... } }1
2
3
4
5
6
7
8
9
10
11
12
13
14
15
16
17
18
19
20
21
22
23
24
25
26
27
28
29
30
31
32
33
34
35
36【resolveArgument方法的resolveMultipartArgument方法】
public final class MultipartResolutionDelegate { @Nullable public static Object resolveMultipartArgument(String name, MethodParameter parameter, HttpServletRequest request) throws Exception { MultipartHttpServletRequest multipartRequest = WebUtils.getNativeRequest(request, MultipartHttpServletRequest.class);//拿到文件上传请求 boolean isMultipart = (multipartRequest != null || isMultipartContent(request)); ... else if (isMultipartFileArray(parameter)) {//判断参数是不是MultipartFile数组 if (!isMultipart) { return null; } if (multipartRequest == null) { multipartRequest = new StandardMultipartHttpServletRequest(request); } List<MultipartFile> files = multipartRequest.getFiles(name);//如果是MultipartFile数组通过注解的名字把请求中的文件获取并封装成MultipartFile集合,这个getFiles方法其实也是去提前封装好的multipartFiles集合中依靠名字直接拿的,在该方法执行以前所有的文件就已经被封装到multipartFiles属性中,该属性是一个LinkedMultiValueMap,key为form表单的对应name,value为一个StandardMultipartFile类型的ArrayList集合,这个multipartFiles是在在dodispatch()方法中的checkMultipart(request)方法中直接通过request生成的 return (!files.isEmpty() ? files.toArray(new MultipartFile[0]) : null); } ... } }1
2
3
4
5
6
7
8
9
10
11
12
13
14
15
16
17
18
19
20
21
22
# 异常处理机制
SpringBoot异常处理机制参考官方文档Spring Boot Features-->developing-web-applications-->Error Handling
# 异常机制总览
默认情况下,SpringBoot会启动一个/error的映射来处理所有的错误,发生错误会自动转发到/error,
如果是机器客户端,会产生一个JSON格式的响应数据【包含错误的时间戳、HTTP状态错误码和错误原因信息、异常信息、那个路径发生了错误】
【Postman响应的错误信息】
![]()
如果是浏览器客户端,会产生一个白页,白页渲染为一个HTML页面,展示相同的错误信息
【浏览器白页效果】
![]()
自定义错误页面
可以在静态资源目录如static目录下,以及templates目录下设置error/目录,该目录下的HTTP状态码对应的4xx.html,5xx.html会在发生对应错误时会被自动调用【比较常用就是404和服务器内部异常500】
【实际设置实例】
![]()
一般后台管理系统自己就写好了一些错误页面
【模板404页面】
![]()
【模板500页面】
![]()
自定义错误信息展示
【前端页面代码】
<section class="error-wrapper text-center"> <h1><img alt="" src="images/500-error.png"></h1> <h2>OOOPS!!!</h2> <!--message是Spring响应错误默认传递的错误信息,把他当做放在请求域中来处理,比较方便--> <h3 th:text="${message}">Something went wrong.</h3> <!--trace是错误相应的堆栈信息,都可以理解为直接从请求域中拿--> <p class="nrml-txt" th:text="${trace}">Why not try refreshing you page? Or you can <a href="#">contact our support</a> if the problem persists.</p> <a class="back-btn" href="index.html"> Back To Home</a> </section>1
2
3
4
5
6
7
8
9【实际效果展示】
![]()
# 异常自动配置原理
异常处理自动配置原理
springframework-boot-autoconfigure-web下的servlet下的error包下专门是针对错误处理的类
【web错误相关的错误自动配置类】
![]()
ErrorMvcAutoConfiguration【自动配置异常处理规则】
【ErrorMvcAutoConfiguration源码】
// Load before the main WebMvcAutoConfiguration so that the error View is available @AutoConfiguration(before = WebMvcAutoConfiguration.class) @ConditionalOnWebApplication(type = Type.SERVLET) @ConditionalOnClass({ Servlet.class, DispatcherServlet.class }) @EnableConfigurationProperties({ ServerProperties.class, WebMvcProperties.class })//异常自动类中绑定了ServerProperties和WebMvcProperties中的一些属性,对应属性配置文件的前缀分别为server和spring.mvc public class ErrorMvcAutoConfiguration { ... @Bean @ConditionalOnMissingBean(value = ErrorAttributes.class, search = SearchStrategy.CURRENT)//当容器中没有ErrorAttributes就会给容器注册组件DefaultErrorAttributes,有就使用自己的 public DefaultErrorAttributes errorAttributes() { return new DefaultErrorAttributes(); } @Bean @ConditionalOnMissingBean(value = ErrorController.class, search = SearchStrategy.CURRENT)//这是配置了一个Controller,当容器中没有ErrorController组件是配置默认的BasicErrorController,id为basicErrorController public BasicErrorController basicErrorController(ErrorAttributes errorAttributes, ObjectProvider<ErrorViewResolver> errorViewResolvers) { return new BasicErrorController(errorAttributes, this.serverProperties.getError(), errorViewResolvers.orderedStream().collect(Collectors.toList())); } @Bean//给容器配置了一个错误页定制化器,暂时不管 public ErrorPageCustomizer errorPageCustomizer(DispatcherServletPath dispatcherServletPath) { return new ErrorPageCustomizer(this.serverProperties, dispatcherServletPath); } ... @Configuration(proxyBeanMethods = false) @EnableConfigurationProperties({ WebProperties.class, WebMvcProperties.class }) static class DefaultErrorViewResolverConfiguration { ... @Bean//这里还配置了一个视图解析器,叫做错误视图解析器,id为conventionErrorViewResolver @ConditionalOnBean(DispatcherServlet.class) @ConditionalOnMissingBean(ErrorViewResolver.class) DefaultErrorViewResolver conventionErrorViewResolver() { return new DefaultErrorViewResolver(this.applicationContext, this.resources); } } @Configuration(proxyBeanMethods = false) @ConditionalOnProperty(prefix = "server.error.whitelabel", name = "enabled", matchIfMissing = true) @Conditional(ErrorTemplateMissingCondition.class) protected static class WhitelabelErrorViewConfiguration { private final StaticView defaultErrorView = new StaticView(); @Bean(name = "error")//给容器中添加了一个视图组件,该视图组件的名字就叫error @ConditionalOnMissingBean(name = "error")//注意如果自己自定义了一个名为error的视图,那么默认事务错误页就不会生效 public View defaultErrorView() { return this.defaultErrorView; } // If the user adds @EnableWebMvc then the bean name view resolver from // WebMvcAutoConfiguration disappears, so add it back in to avoid disappointment. @Bean @ConditionalOnMissingBean//以组件名作为视图名的视图解析器,猜想是有这个才能通过视图名去容器中找对应名字的视图组件,讲的不清楚 public BeanNameViewResolver beanNameViewResolver() { BeanNameViewResolver resolver = new BeanNameViewResolver(); resolver.setOrder(Ordered.LOWEST_PRECEDENCE - 10); return resolver; } } private static class ErrorTemplateMissingCondition extends SpringBootCondition { ... } //error视图组件的具体类型,白页html代码就写死在这里面 private static class StaticView implements View { ... } static class ErrorPageCustomizer implements ErrorPageRegistrar, Ordered { ... } static class PreserveErrorControllerTargetClassPostProcessor implements BeanFactoryPostProcessor { ... } }1
2
3
4
5
6
7
8
9
10
11
12
13
14
15
16
17
18
19
20
21
22
23
24
25
26
27
28
29
30
31
32
33
34
35
36
37
38
39
40
41
42
43
44
45
46
47
48
49
50
51
52
53
54
55
56
57
58
59
60
61
62
63
64
65
66
67
68
69
70
71
72
73
74
75
76
77
78
79
80
81
82
83
84
# 自动配置的容器组件
根据自动配置原理可以得出不同错误页需求下对应自定义的组件
- 扩展错误信息-->自定义DefaultErrorAttribute
- 不使用默认白页使用自定义白页-->自定义BasicErrorController
- 不想把错误页放在error文件夹下-->自定义BeanNameViewResolver
# DefaultErrorAttribute
DefaultErrorAttribute-->id:errorAttributes
DefaultErrorAttribute定义错误页面可以包含哪些属性,如果觉得默认的错误页面中的信息不够,就要自定义DefaultErrorAttribute
@Order(Ordered.HIGHEST_PRECEDENCE) public class DefaultErrorAttributes implements ErrorAttributes, HandlerExceptionResolver, Ordered {//DefaultErrorAttributes中规定着服务器返回错误的哪些属性,在getErrorAttributes方法中存放着 private static final String ERROR_INTERNAL_ATTRIBUTE = DefaultErrorAttributes.class.getName() + ".ERROR"; @Override public int getOrder() { return Ordered.HIGHEST_PRECEDENCE; } @Override//这个方法能返回一个ModelAndView public ModelAndView resolveException(HttpServletRequest request, HttpServletResponse response, Object handler, Exception ex) { storeErrorAttributes(request, ex);//保存错误属性,错误属性指 return null; } private void storeErrorAttributes(HttpServletRequest request, Exception ex) { request.setAttribute(ERROR_INTERNAL_ATTRIBUTE, ex); } @Override//这里面规定着返回错误信息的具体项目 public Map<String, Object> getErrorAttributes(WebRequest webRequest, ErrorAttributeOptions options) { Map<String, Object> errorAttributes = getErrorAttributes(webRequest, options.isIncluded(Include.STACK_TRACE));//这个getErrorAttributes可以获取时间戳、响应状态码、错误细节和路径等信息,这里面就是完整的信息了 if (!options.isIncluded(Include.EXCEPTION)) {//这里是判断options中不包含exception就从错误信息集合中把exception移除 errorAttributes.remove("exception"); } if (!options.isIncluded(Include.STACK_TRACE)) { errorAttributes.remove("trace"); } if (!options.isIncluded(Include.MESSAGE) && errorAttributes.get("message") != null) { errorAttributes.remove("message"); } if (!options.isIncluded(Include.BINDING_ERRORS)) { errorAttributes.remove("errors"); } return errorAttributes; } //这个就是上面getErrorAttributes方法中调用的getErrorAttributes重载方法 private Map<String, Object> getErrorAttributes(WebRequest webRequest, boolean includeStackTrace) { //这些方法都写在这个类中的 Map<String, Object> errorAttributes = new LinkedHashMap<>(); errorAttributes.put("timestamp", new Date());//时间戳 addStatus(errorAttributes, webRequest);//状态码 addErrorDetails(errorAttributes, webRequest, includeStackTrace);//错误细节 addPath(errorAttributes, webRequest);//错误对应的请求路径 return errorAttributes; } //添加状态码的方法 private void addStatus(Map<String, Object> errorAttributes, RequestAttributes requestAttributes) { ... } //添加错误细节的方法 private void addErrorDetails(Map<String, Object> errorAttributes, WebRequest webRequest,boolean includeStackTrace) { ... } ... }1
2
3
4
5
6
7
8
9
10
11
12
13
14
15
16
17
18
19
20
21
22
23
24
25
26
27
28
29
30
31
32
33
34
35
36
37
38
39
40
41
42
43
44
45
46
47
48
49
50
51
52
53
54
55
56
57
58
59
60
61
# BasicErrorController
BasicErrorController-->id:basicErrorController
如果不想跳转的白页不想是默认的错误页,而是自定义的白页或者json,就需要自定义BasicErrorController
控制器对应的请求映射${server.error.path:${error.path:/error}}是一个动态取的值,如果配置了server.error.path,路径就是动态取的值;如果没有配置,就取出error.path的配置值;如果error.path也没配置,就使用默认值/error作为请求映射路径
由控制器方法可知,spring既可以响应错误页也可以响应json,错误页是去容器中找名为error组件,由error组件的条件配置可以看出自定义了同名error错误页,SpringBoot就不会配置默认的error错误页了,即平常看到的白页
@Controller @RequestMapping("${server.error.path:${error.path:/error}}") public class BasicErrorController extends AbstractErrorController { private final ErrorProperties errorProperties; ... //以下两个请求映射默认都匹配/error @RequestMapping(produces = MediaType.TEXT_HTML_VALUE)//这就是响应html的,produces = MediaType.TEXT_HTML_VALUE表示匹需要产生HTML页面的,即对应浏览器,至于produces属性没有讲 public ModelAndView errorHtml(HttpServletRequest request, HttpServletResponse response) { HttpStatus status = getStatus(request);//得到响应的状态码,这里数学运算错误是500,这是从请求域中的异常中拿到的 Map<String, Object> model = Collections .unmodifiableMap(getErrorAttributes(request, getErrorAttributeOptions(request, MediaType.TEXT_HTML)));//这个model里面的信息已经是完整异常信息 response.setStatus(status.value()); ModelAndView modelAndView = resolveErrorView(request, response, status, model);//调用解析错误视图方法resolveErrorView获取ModelAndView return (modelAndView != null) ? modelAndView : new ModelAndView("error", model);//响应Html会响应一个ModelAndView,其中的ViewName属性为error页面 } @RequestMapping//ResponseEntity<Map<String, Object>>表示匹配需要产生json数据的,即对应客户端 public ResponseEntity<Map<String, Object>> error(HttpServletRequest request) { HttpStatus status = getStatus(request); if (status == HttpStatus.NO_CONTENT) { return new ResponseEntity<>(status); } Map<String, Object> body = getErrorAttributes(request, getErrorAttributeOptions(request, MediaType.ALL)); return new ResponseEntity<>(body, status);//响应json通过ResponseEntity<>把map里面的数据都响应出去 } ... }1
2
3
4
5
6
7
8
9
10
11
12
13
14
15
16
17
18
19
20
21
22
23
24
25
26
27【控制器方法中model异常信息总览】
- 自上而下依次是:时间戳、状态码、错误信息、堆栈信息、错误原因(除0错误)、错误路径
![]()
# StaticView
View-->id:error
上一个控制器组件响应浏览器是error页面,响应的就是这个error视图,因为之前涉及过,先根据名字去容器中找对应视图组件,找不到才调用Thymeleaf视图解析器去找资源最后响应字符串
这个StaticView就配置在ErrorMvcAutoConfiguration中
private static class StaticView implements View { private static final MediaType TEXT_HTML_UTF8 = new MediaType("text", "html", StandardCharsets.UTF_8);//响应一个html private static final Log logger = LogFactory.getLog(StaticView.class); //render方法中拼接的白页信息 @Override public void render(Map<String, ?> model, HttpServletRequest request, HttpServletResponse response) throws Exception { if (response.isCommitted()) { String message = getMessage(model); logger.error(message); return; } response.setContentType(TEXT_HTML_UTF8.toString()); StringBuilder builder = new StringBuilder(); Object timestamp = model.get("timestamp"); Object message = model.get("message"); Object trace = model.get("trace"); if (response.getContentType() == null) { response.setContentType(getContentType()); } //在这里直接拼接出默认的错误白页对应的html页面 builder.append("<html><body><h1>Whitelabel Error Page</h1>") .append("<p>This application has no explicit mapping for /error, so you are seeing this as a fallback.</p>") .append("<div id='created'>") .append(timestamp) .append("</div>") .append("<div>There was an unexpected error (type=") .append(htmlEscape(model.get("error"))) .append(", status=") .append(htmlEscape(model.get("status"))) .append(").</div>"); if (message != null) { builder.append("<div>").append(htmlEscape(message)).append("</div>"); } if (trace != null) { builder.append("<div style='white-space:pre-wrap;'>").append(htmlEscape(trace)).append("</div>"); } builder.append("</body></html>"); response.getWriter().append(builder.toString()); } ...其他方法 }1
2
3
4
5
6
7
8
9
10
11
12
13
14
15
16
17
18
19
20
21
22
23
24
25
26
27
28
29
30
31
32
33
34
35
36
37
38
39
40
41
42
43
44
45
# BeanNameViewResolver
BeanNameViewResolver-->id:beanNameViewResolver
如果不想把错误页放在error文件夹下就要自定义BeanNameViewResolver
- 这是一个视图解析器,作用是按照返回的视图名作为组件的id去容器中找View对象
整个的逻辑是,/error请求匹配basicErrorController,如果是浏览器请求控制器方法返回一个ModelAndView,其中的ViewName是error,然后利用视图解析器beanNameViewResolver去容器中找到名为error的视图组件View对象,这么找的没说,以及有了error/4xx.html就不去找error视图的原理也没说
# DefaultErrorViewResolver
DefaultErrorViewResolver-->id:conventionErrorViewResolver
这里面的resolve方法解释了为什么SpringMVC可以根据状态码自动找到error目录下对应的以状态码命名的html页面,即发生错误,会通过DefaultErrorViewResolver以error/HTTP状态码作为视图ViewName去寻找前端页面
public class DefaultErrorViewResolver implements ErrorViewResolver, Ordered { private static final Map<Series, String> SERIES_VIEWS; static {//给Map中放入一些信息,客户端错误是4xx,服务端错误是5xx Map<Series, String> views = new EnumMap<>(Series.class); views.put(Series.CLIENT_ERROR, "4xx"); views.put(Series.SERVER_ERROR, "5xx"); SERIES_VIEWS = Collections.unmodifiableMap(views); } ...其他代码 @Override//解析得到视图对象 public ModelAndView resolveErrorView(HttpServletRequest request, HttpStatus status, Map<String, Object> model) { ModelAndView modelAndView = resolve(String.valueOf(status.value()), model);//String.valueOf(status.value())是拿到异常的状态码的精确值,调用resolve方法来解析异常生成ModelAndView,对就是下面那两个方法,woc串起来了,所以白页怎么回事 if (modelAndView == null && SERIES_VIEWS.containsKey(status.series())) {//如果精确值找不到对应的视图且SERIES_VIEWS中包含状态码的系列 modelAndView = resolve(SERIES_VIEWS.get(status.series()), model);//调用resolve方法得到modelAndView,其中就有要跳转的页面,这里面传参给viewName的SERIES_VIEWS.get(status.series())是HTTP状态码,注意:在SERIES_VIEWS.get(status.series())中貌似就解决了500到5xx的过程,这里的过程不清楚,弹幕说的;已讲:status.series()获取的是HtppStatus的series属性,是Series枚举类型,值有1,2,3,4,5;就是对应的4xx,5xx;即有精确的页面就找精确页面,没有就找模糊的页面 } return modelAndView; } //这个就是resolveErrorView方法中调用的resolve方法 private ModelAndView resolve(String viewName, Map<String, Object> model) { String errorViewName = "error/" + viewName;//拼接成error/HTTP状态码,从这里就能看出,SpringMVC底层支持error目录下直接用状态码给对应对应的html页面取名,因为视图名就是error/HTTP状态码,此例中是error/500 TemplateAvailabilityProvider provider = this.templateAvailabilityProviders.getProvider(errorViewName, this.applicationContext);//通过模板引擎判断有没有这个error/500页面,有provider就是null if (provider != null) { return new ModelAndView(errorViewName, model);//如果没有就创建ModelAndView以error/500作为视图名并返回,以错误信息封装的model作为model放到请求域中 } return resolveResource(errorViewName, model);//如果有就调用resolveResource方法获取ModelAndView } //这个就是resolveResource方法 private ModelAndView resolveResource(String viewName, Map<String, Object> model) { for (String location : this.resources.getStaticLocations()) { try { Resource resource = this.applicationContext.getResource(location); resource = resource.createRelative(viewName + ".html");//视图名称会带上html if (resource.exists()) {//这儿是判断对应资源存在的 return new ModelAndView(new HtmlResourceView(resource), model);//最终返回带error/500.html页面创建的ModelAndView } } catch (Exception ex) { } } return null; } ...其他代码 }1
2
3
4
5
6
7
8
9
10
11
12
13
14
15
16
17
18
19
20
21
22
23
24
25
26
27
28
29
30
31
32
33
34
35
36
37
38
39
40
41
42
43
44
45
46
47
48
49
# 异常处理流程
注意:如果控制器方法中的参数无法通过请求参数赋值会报400错误,会提示需要的参数不存在
完整流程
第一步:执行目标方法handle
目标方法执行期间有任何异常都会被catch到并在RequestMappingHandlerAdapter的invokeHandlerMethod方法的finally语句块中使用webRequest.requestComplete方法将AbstractRequestAttributes属性设置为false,标志当前请求结束,
并且使用dispatchException进行封装所有的异常
第二步:执行视图解析流程【页面渲染】processDispatchResult
在该方法中调用processHandlerException处理控制器方法执行过程中发生的异常,并返回ModelAndView赋值给原本执行完handle方法返回的mv
遍历所有的handlerExceptionResolver,看谁能处理当前异常,所有的处理器异常解析器都保存在handlerExceptionResolvers这个List集合中
所有的处理器异常解析器都实现了接口HandleExceptionResolver,这个接口中只有一个resolveException方法,拿到HttpServletRequest、HttpServletResponse对象、控制器方法处理器、以及控制器方法发生的异常对象;自定义处理器异常解析器也要返回ModelAndView,要决定跳转到那个页面,页面中要放哪些数据
【HandleExceptionResolver接口】
![]()
系统默认的处理器异常解析器包含:
![]()
DefaultErrorAttributes
HandlerExceptionResolverComposite【注意这是一个处理器异常解析器的组合,里面还有三个处理器异常解析器】
- ExceptionHandlerExceptionResolver
- ResponseStatusExceptionResolver
- DefaultHandlerExceptionResolver
首先遍历第一个处理器异常解析器DefaultErrorAttributes
调用该解析器的resolveException方法作用是把异常信息放入请求域,这个解析器不会返回ModelAndView,只会返回null,必然会继续遍历后续处理器异常解析器
再遍历其他三个处理器异常解析器
结果很尴尬,三个里面有两个都是处理特定注解的异常的,剩下一个没讲干啥的;总之没有一个能处理,直接把异常抛出到doDispatch方法,一抛出去有被catch捕获到
第四步:第二步无法解析的异常继续手动抛出,被捕获后执行triggerAfterCompletion方法
这个方法就是拦截器的倒序最后一步,对异常处理没啥意义,这个执行完,当前请求就执行完了,也就是当前请求压根没有执行异常的处理逻辑,但是下一次请求进来请求路径直接变成了/error;
即当前请求发生异常,但是没有人能够处理,那么SpringMVC又会liji 再发一次请求,请求的路径的URI直接变成/error,即没人能够处理的异常会把异常信息放在请求域转发到/error【原因是异常没处理最终会交给tomcat处理,Tomcat底层支持异常请求转发,springboot把转发路径默认设置成了/error】
第五步:没人处理的错误会带着异常或者错误信息转发到/error,会被BasicErrorController即SpringMVC中专门处理/error请求的控制器匹配直接再次通过handle方法去执行对应/error的控制器方法,从请求域中拿到错误信息封装到model中,然后调用resolveErrorView方法遍历错误视图解析器集合errorViewResolvers里面默认的由异常机制自动配置的DefaultErrorViewResolver的resolveErrorView方法把响应状态码作为错误页的地址拼接成error/HTTP状态码.html来获取ModelAndView,即模板引擎最终响应error/5xx.html
![]()
protected void doDispatch(HttpServletRequest request, HttpServletResponse response) throws Exception { ... //第一步:反射调用处理器方法 // Actually invoke the handler.通过处理器适配器真正执行handler目标方法,传入请求、响应对象,以及匹配的handler;在handle()方法中调用了handleInternal()方法 mv = ha.handle(processedRequest, response, mappedHandler.getHandler()); ... } //注意:这两中被捕获的异常,即所有的异常都会被封装到dispatchException中 catch (Exception ex) {//Exception可以捕获 dispatchException = ex; } catch (Throwable err) {//最大类型的Throwable也可以捕获 dispatchException = new NestedServletException("Handler dispatch failed", err); } //第二步:处理派发最终的结果,这一步执行前,整个页面还没有跳转过去;注意没有发生异常,这个派发最终结果的方法会执行,发生了异常,这个派发最终结果的方法还是会执行;这里面的mv因为handle方法没有正确执行,这个mv当前是空的,已确定;此时此例中的dispatchException是数学运算异常 processDispatchResult(processedRequest, response, mappedHandler, mv, dispatchException); } catch (Exception ex) {//异常上面三个处理器异常解析器搞不定数学运算异常就会手动抛出来,被这儿或者下面捕捉到 //第四步 triggerAfterCompletion(processedRequest, response, mappedHandler, ex);//抛出的异常被捕捉到触发triggerAfterCompletion方法 } catch (Throwable err) { ... } }1
2
3
4
5
6
7
8
9
10
11
12
13
14
15
16
17
18
19
20
21
22
23
24
25
26【doDispatch方法中的processDispatchResult方法】
@SuppressWarnings("serial") public class DispatcherServlet extends FrameworkServlet { private void processDispatchResult(HttpServletRequest request, HttpServletResponse response,@Nullable HandlerExecutionChain mappedHandler, @Nullable ModelAndView mv,@Nullable Exception exception) throws Exception {//这最后一个参数exceptionption接收的就是dispatchException,这里是数学运算异常 boolean errorView = false;//先搞一个errorView为false if (exception != null) {//异常不为空就会进入这个流程 if (exception instanceof ModelAndViewDefiningException) {//判断异常是否ModelAndView定义异常 logger.debug("ModelAndViewDefiningException encountered", exception); mv = ((ModelAndViewDefiningException) exception).getModelAndView(); } else { Object handler = (mappedHandler != null ? mappedHandler.getHandler() : null);//不是ModelAndView定义异常就会跳转到这里,拿到原生的handler //第三步:调用processHandlerException方法处理控制器发生的异常并返回ModelAndView,解析不了也不返回了,直接抛异常终止后续代码执行 mv = processHandlerException(request, response, handler, exception);//调用处理控制器异常processHandlerException方法来处理控制器方法发生的异常,并把处理的结果保存成ModelAndView,这个ModelAndView就是传参进来的mv,也就是原来用来接收handle方法返回的ModelAndView errorView = (mv != null); } } ... } }1
2
3
4
5
6
7
8
9
10
11
12
13
14
15
16
17
18
19
20
21
22【processDispatchResult方法中的processHandlerException方法】
@SuppressWarnings("serial") public class DispatcherServlet extends FrameworkServlet { @Nullable protected ModelAndView processHandlerException(HttpServletRequest request, HttpServletResponse response,@Nullable Object handler, Exception ex) throws Exception { // Success and error responses may use different content types request.removeAttribute(HandlerMapping.PRODUCIBLE_MEDIA_TYPES_ATTRIBUTE);//移除request中的一些属性,暂时不管 // Check registered HandlerExceptionResolvers... ModelAndView exMv = null;//准备了一个ModelAndView,该方法结束后会返回该ModelAndView if (this.handlerExceptionResolvers != null) {//如果处理器异常解析器不为空,示例中只有两个,分别是DefaultErrorAttributes和HandlerExceptionResolverComposite for (HandlerExceptionResolver resolver : this.handlerExceptionResolvers) {//挨个遍历异常解析器 //异常解析器挨个对异常进行处理,处理得到的结果赋值给ModelAndView exMv = resolver.resolveException(request, response, handler, ex); if (exMv != null) {//如果不为空就跳出循环 break;//除了第一个处理器异常解析器把异常放到请求域中,没有一个解析器能解析该异常 } } } if (exMv != null) {//这里没执行,因为没有一个处理器异常解析器能解析该异常的 if (exMv.isEmpty()) { request.setAttribute(EXCEPTION_ATTRIBUTE, ex); return null; } // We might still need view name translation for a plain error model... if (!exMv.hasView()) { String defaultViewName = getDefaultViewName(request); if (defaultViewName != null) { exMv.setViewName(defaultViewName); } } if (logger.isTraceEnabled()) { logger.trace("Using resolved error view: " + exMv, ex); } else if (logger.isDebugEnabled()) { logger.debug("Using resolved error view: " + exMv); } WebUtils.exposeErrorRequestAttributes(request, ex, getServletName()); return exMv;//如果不为空进行一些日志操作并判断ModelAndView中是否是有视图,都没问题就返回该ModelAndView } throw ex;//处理期间有任何异常都会抛出去*****?这里是不是讲的有问题?是如果处理不了该异常就会把这个异常抛出去,就是处理不了,所有的异常解析器都处理不了,这个异常直接被抛出去了 } }1
2
3
4
5
6
7
8
9
10
11
12
13
14
15
16
17
18
19
20
21
22
23
24
25
26
27
28
29
30
31
32
33
34
35
36
37
38
39
40
41
42
43
【第三步的所有异常解析器的解析过程】
【以下均为processHandlerException方法中遍历处理器异常解析器的resolveException方法】
DefaultErrorAttributes即第一个异常解析器先来处理异常,把异常信息保存到request域中,并且返回null,这个异常信息貌似就是最初的doDispatch方法中那个直接放在请求域中,返回null意味着还会继续遍历处理器异常解析器,这里也说明异常解析器必须解析出结果,不解析出结果不算完事
【DefaultErrorAttributes中的resolveException方法】
@Order(Ordered.HIGHEST_PRECEDENCE) public class DefaultErrorAttributes implements ErrorAttributes, HandlerExceptionResolver, Ordered { @Override public ModelAndView resolveException(HttpServletRequest request, HttpServletResponse response, Object handler,Exception ex) { storeErrorAttributes(request, ex);//保存错误的属性信息 return null; } private void storeErrorAttributes(HttpServletRequest request, Exception ex) { request.setAttribute(ERROR_INTERNAL_ATTRIBUTE, ex);//给请求域中放入ex,这个ex其实就是最初的dispatchException,key是一个很长的字符串就是DefaultErrorAttributes的全限定类名.ERROR } }1
2
3
4
5
6
7
8
9
10
11执行处理器异常解析器的组合的resolveException方法会跳去执行HandlerExceptionResolverComposite中的resolveException方法,在该方法中对三个处理器异常解析器进行处理
【HandlerExceptionResolverComposite中的resolveException方法】
public class HandlerExceptionResolverComposite implements HandlerExceptionResolver, Ordered { @Override @Nullable public ModelAndView resolveException( HttpServletRequest request, HttpServletResponse response, @Nullable Object handler, Exception ex) { if (this.resolvers != null) { for (HandlerExceptionResolver handlerExceptionResolver : this.resolvers) { ModelAndView mav = handlerExceptionResolver.resolveException(request, response, handler, ex); if (mav != null) { return mav; } } } return null; } }1
2
3
4
5
6
7
8
9
10
11
12
13
14
15
16
17
【ExceptionHandlerExceptionResolver中的resolveException方法】
只要控制器方法上没有标注ExceptionHandler注解就会返回null,即ExceptionHandlerExceptionResolver异常解析器只能解析控制器方法上标注了ExceptionHandler注解的异常
public abstract class AbstractHandlerExceptionResolver implements HandlerExceptionResolver, Ordered { @Override @Nullable public ModelAndView resolveException( HttpServletRequest request, HttpServletResponse response, @Nullable Object handler, Exception ex) { if (shouldApplyTo(request, handler)) {//先判断能不能解析该异常,不能解析直接返回null,判断原理是拿到handler,传入父类的shouldApplyTo方法判断异常映射里面有没有,有啥?雷神说后面再说,无语;说这里要结合@ExceptionHandler注解来分析?这里的handler不是发生异常的Handler吗,为什么雷神说要找到标注了@ExceptionHandler的控制器方法,执行找@ExceptionHandler的控制器方法的代码在哪里 prepareResponse(ex, response); ModelAndView result = doResolveException(request, response, handler, ex);//这一步是解析异常, if (result != null) { // Print debug message when warn logger is not enabled. if (logger.isDebugEnabled() && (this.warnLogger == null || !this.warnLogger.isWarnEnabled())) { logger.debug(buildLogMessage(ex, request) + (result.isEmpty() ? "" : " to " + result)); } // Explicitly configured warn logger in logException method. logException(ex, request); } return result; } else { return null; } } }1
2
3
4
5
6
7
8
9
10
11
12
13
14
15
16
17
18
19
20
21
22
23
24【resolveException方法中的doResolveException方法】
public abstract class AbstractHandlerMethodExceptionResolver extends AbstractHandlerExceptionResolver { @Override @Nullable protected final ModelAndView doResolveException( HttpServletRequest request, HttpServletResponse response, @Nullable Object handler, Exception ex) { HandlerMethod handlerMethod = (handler instanceof HandlerMethod ? (HandlerMethod) handler : null);//拿到目标方法 return doResolveHandlerMethodException(request, response, handlerMethod, ex);//调用doResolveHandlerMethodException方法进行解析 } }1
2
3
4
5
6
7
8
9
10【doResolveException方法的doResolveHandlerMethodException方法】
public class ExceptionHandlerExceptionResolver extends AbstractHandlerMethodExceptionResolver implements ApplicationContextAware, InitializingBean { @Override @Nullable protected ModelAndView doResolveHandlerMethodException(HttpServletRequest request,HttpServletResponse response, @Nullable HandlerMethod handlerMethod, Exception exception) { ServletInvocableHandlerMethod exceptionHandlerMethod = getExceptionHandlerMethod(handlerMethod, exception);//先来看目标方法有没有ExceptionHandler注解,这个后面再说, if (exceptionHandlerMethod == null) { return null;//只要没有使用相应注解,doResolveHandlerMethodException就会返回null,后面都不执行 } ... } }1
2
3
4
5
6
7
8
9
10
11
12
13
【ResponseStatusExceptionResolver的resolveException方法,直接继承的父类的】
这个异常解析器的作用是如果控制器方法上标注了@ResponseStatus注解,出现错误以后直接给一个响应状态码,这个也不能解析,但是具体原理没讲,包括能解析怎么创建ModelAndView,这里肯定是没有这个注解直接判断返回null了;对自定义异常标注了@ResponseStatus注解的同时会给对应异常一个状态码
public abstract class AbstractHandlerExceptionResolver implements HandlerExceptionResolver, Ordered { @Override @Nullable public ModelAndView resolveException( HttpServletRequest request, HttpServletResponse response, @Nullable Object handler, Exception ex) { if (shouldApplyTo(request, handler)) { prepareResponse(ex, response); ModelAndView result = doResolveException(request, response, handler, ex);//调用doResolveException方法执行解析流程 if (result != null) { // Print debug message when warn logger is not enabled. if (logger.isDebugEnabled() && (this.warnLogger == null || !this.warnLogger.isWarnEnabled())) { logger.debug(buildLogMessage(ex, request) + (result.isEmpty() ? "" : " to " + result)); } // Explicitly configured warn logger in logException method. logException(ex, request); } return result; } else { return null; } } }1
2
3
4
5
6
7
8
9
10
11
12
13
14
15
16
17
18
19
20
21
22
23
24【resolveException方法中的doResolveException方法】
public class ResponseStatusExceptionResolver extends AbstractHandlerExceptionResolver implements MessageSourceAware { @Override @Nullable protected ModelAndView doResolveException( HttpServletRequest request, HttpServletResponse response, @Nullable Object handler, Exception ex) { try { if (ex instanceof ResponseStatusException) {//判断异常是不是ResponseStatusException异常,这是具体的异常类,即自定义异常可以使用继承ResponseStatusException的方式,这里标注了ResponseStatus注解的异常并不是ResponseStatusException异常 return resolveResponseStatusException((ResponseStatusException) ex, request, response, handler); } ResponseStatus status = AnnotatedElementUtils.findMergedAnnotation(ex.getClass(), ResponseStatus.class);//判断异常上是否标注了ResponseStatus注解,有就返回status,即status不为null if (status != null) { return resolveResponseStatus(status, request, response, handler, ex);//把注解的信息解析出来返回一个ModelAndView,调用的resolveResponseStatus方法会拿到注解的错误状态码和错误原因,利用statusCode,reason,response创建ModelAndView进行返回,resolveResponseStatus方法还会直接调用response.sendError直接跳去对应状态码的错误页;执行response.sendError相当于直接给Tomcat发送/error请求【和没人能处理的/error是一样的】,当前请求立即结束,里面后续创建的ModelAndView实际上创建了对象,但是View和model全是null,作用是结束循环让这个请求结束 } if (ex.getCause() instanceof Exception) { return doResolveException(request, response, handler, (Exception) ex.getCause()); } } catch (Exception resolveEx) { if (logger.isWarnEnabled()) { logger.warn("Failure while trying to resolve exception [" + ex.getClass().getName() + "]", resolveEx); } } return null; } }1
2
3
4
5
6
7
8
9
10
11
12
13
14
15
16
17
18
19
20
21
22
23
24
25
26
27
28
【DefaultHandlerExceptionResolver的resolveException方法】
woc只说了这个也不能解析,多一嘴都没提,后来补上了
- 这个控制器异常解析器是专门来处理SpringMVC自己的底层异常的
public abstract class AbstractHandlerExceptionResolver implements HandlerExceptionResolver, Ordered {//这是从父类直接继承过来的,没啥好说的,几个处理器异常解析器都是这个方法 @Override @Nullable public ModelAndView resolveException( HttpServletRequest request, HttpServletResponse response, @Nullable Object handler, Exception ex) { if (shouldApplyTo(request, handler)) { prepareResponse(ex, response); ModelAndView result = doResolveException(request, response, handler, ex);//进来就直奔各个子类的doResolveException方法 if (result != null) { // Print debug message when warn logger is not enabled. if (logger.isDebugEnabled() && (this.warnLogger == null || !this.warnLogger.isWarnEnabled())) { logger.debug(buildLogMessage(ex, request) + (result.isEmpty() ? "" : " to " + result)); } // Explicitly configured warn logger in logException method. logException(ex, request); } return result; } else { return null; } } }1
2
3
4
5
6
7
8
9
10
11
12
13
14
15
16
17
18
19
20
21
22
23
24【resolveException方法中的doResolveException方法】
public class DefaultHandlerExceptionResolver extends AbstractHandlerExceptionResolver {//这个处理器就是专门处理SpringMVC底层的异常 @Override @Nullable protected ModelAndView doResolveException( HttpServletRequest request, HttpServletResponse response, @Nullable Object handler, Exception ex) { try { if (ex instanceof HttpRequestMethodNotSupportedException) {//判断是否请求方式不支持的异常 return handleHttpRequestMethodNotSupported( (HttpRequestMethodNotSupportedException) ex, request, response, handler); } else if (ex instanceof HttpMediaTypeNotSupportedException) {//是不是媒体类型不支持的异常 return handleHttpMediaTypeNotSupported( (HttpMediaTypeNotSupportedException) ex, request, response, handler); } else if (ex instanceof HttpMediaTypeNotAcceptableException) { return handleHttpMediaTypeNotAcceptable( (HttpMediaTypeNotAcceptableException) ex, request, response, handler); } else if (ex instanceof MissingPathVariableException) { return handleMissingPathVariable( (MissingPathVariableException) ex, request, response, handler); } else if (ex instanceof MissingServletRequestParameterException) {//缺少形参对应的请求参数异常 return handleMissingServletRequestParameter( (MissingServletRequestParameterException) ex, request, response, handler); } ... }1
2
3
4
5
6
7
8
9
10
11
12
13
14
15
16
17
18
19
20
21
22
23
24
25
26
27
28
29【doResolveException方法中的handleMissingServletRequestParameter方法】
public class DefaultHandlerExceptionResolver extends AbstractHandlerExceptionResolver { protected ModelAndView handleMissingServletRequestParameter(MissingServletRequestParameterException ex, HttpServletRequest request, HttpServletResponse response, @Nullable Object handler) throws IOException { response.sendError(HttpServletResponse.SC_BAD_REQUEST, ex.getMessage());//还是一样的逻辑,response.sendError就是tomcat发送/error请求给SpringMVC,SpringMVC再次调用组件BasicErrorController使用DefaultErrorViewReslover进行处理,处理不了响应SpringMVC默认的白页,正常情况下没人能够处理这个/error请求,tomcat会响应自己的丑陋错误页 return new ModelAndView(); } }1
2
3
4
5
6
7
8【tomcat的丑陋错误页】
![]()
好家伙,除了第一个处理器异常解析器把异常放到请求域中,没有一个解析器能解析该异常
【第四步】
【doDispatch方法中的triggerAfterCompletion方法】
这特么就是拦截器最后一步所有已经执行了的拦截器执行AfterCompletion方法,对异常处理没啥意义
@SuppressWarnings("serial") public class DispatcherServlet extends FrameworkServlet { private void triggerAfterCompletion(HttpServletRequest request, HttpServletResponse response, @Nullable HandlerExecutionChain mappedHandler, Exception ex) throws Exception { if (mappedHandler != null) { mappedHandler.triggerAfterCompletion(request, response, ex); } throw ex; } }1
2
3
4
5
6
7
8
9
10
11
【第五步】
【BasicErrorController中的errorHtml方法中的resolveErrorView方法】
public abstract class AbstractErrorController implements ErrorController { protected ModelAndView resolveErrorView(HttpServletRequest request, HttpServletResponse response, HttpStatus status,Map<String, Object> model) { for (ErrorViewResolver resolver : this.errorViewResolvers) {//遍历所有的ErrorViewResolver ModelAndView modelAndView = resolver.resolveErrorView(request, status, model);//还是看谁能产生ModelAndView,这里面只有一个DefaultErrorViewResolver,具体的处理过程看组件那部分 if (modelAndView != null) { return modelAndView; } } return null; } }1
2
3
4
5
6
7
8
9
10
11【errorViewResolvers中的错误视图解析器】
DefaultErrorViewResolver这玩意就是自动配置类给底层配置的
![]()
# 定制错误处理逻辑
自定义错误页
- error/404.html、error/5xx.html、有精确错误状态码页面就精确匹配,没有就找4xx.html,如果都没有就触发白页
@ControllerAdvice+@ExceptionHandler处理全局异常
【异常处理器的代码实例】
/** * @描述 处理整个web controller的异常 */ @Slf4j @ControllerAdvice//注解@ControllerAdvice也是一个组件,该注解上标注了@Component注解 public class GlobalExceptionHandler { //标注了@ExceptionHandler表示当前是一个异常处理器,可以指定该处理器处理哪些异常 @ExceptionHandler({ArithmeticException.class,NullPointerException.class}) public String handleArithException(Exception e){//注意异常处理器中Exception类型的参数会自动封装对应异常的异常信息 //使用日志打印记录异常 log.error("异常是:{}",e); return "login";//这里和普通控制器是一样的,既可以返回视图名称,也可以返回ModelAndView } }1
2
3
4
5
6
7
8
9
10
11
12
13
14@ResponseStatus+自定义异常
@ResponseStatus标注在异常类上,可以用value属性执行异常对应状态码,用reason属性指定异常原因
底层发生当次异常请求后在遍历控制器异常解析器的时候会直接调用ResponseStatusExceptionResolver 的resolveException方法,把responseStatus注解的信息解析出来直接调用response.sendError(statusCode,resolvedReason)通知tomcat拿着错误状态码和错误信息直接发送/error请求,spring接收/error请求直接像无法处理的请求再次发送/error一样进行处理最终匹配到4xx,5xx,没有就匹配白页,response.sendError方法返回一个view和model均为空的ModelAndView,结束对处理器异常解析器的循环结束当前请求
【自定义@ResponseStatus标注异常实例】
@ResponseStatus(value = HttpStatus.FORBIDDEN,reason = "用户数量太多!!!")//HttpStatus是枚举,里面有超多值,分别对应不同的状态码,点进去仅能看见,FORBIDDEN是403 public class UserTooManyException extends RuntimeException{ public UserTooManyException() { } public UserTooManyException(String msg) { super(msg); } }1
2
3
4
5
6
7
8
9Spring底层的异常,如参数类型转换异常
- 控制器方法需要的形参请求参数不存在框架会自动抛异常,然后进入异常处理流程,遍历所有处理器异常解析器,第一个DefaultErrorAttributes把异常放在请求域继续执行,接下来遍历其他三个异常解析器,前两个一个是处理加了ExceptionHandler注解的,一个是处理异常加了ResponseStatus注解的,两个都不行
- 来到第三个异常解析器DefaultHandlerExceptionResolver,这个异常就是专门处理SpringMVC框架底层的异常,这里以MissingServletRequestParameterException异常讲解SpringMVC底层对框架自身异常的处理逻辑
- 实际上就是再调用response.sendError方法让tomcat发送/error请求被BasicErrorController匹配到然后调用DefaultErrorViewResolver来处理解析错误视图,解析不了响应SpringMVC的白页,没有SpringMVC会响应tomcat自己的丑陋白页
所有的异常解析器都实现了HandlerExceptionResolver
【接口HandlerExceptionResolver】
![]()
我们可以通过实现这个接口自定义控制器异常解析器,自定义异常解析器实现该接口然后使用@Component注解将其放入IoC容器中
要点1:自定义异常解析器会直接放在处理器异常解析器组合后面,即处理器异常解析器集合由原来的两个变成三个,由于自定义异常解析器被放在了最后,很多异常压根轮不到自定义异常解析器进行处理,此时给自定义异常解析器使用order注解通过设定value属性值为Ordered接口的HIGHEST_PRECEDENCE属性可以设定自定义异常解析器的优先级为最高优先级(数字越小优先级越高)
【修改了优先级后的处理器异常解析器集合】
![]()
自定义处理器异常解析器可以自定义返回ModelAndView,设置跳转视图和请求域数据,不设置也要创建ModelAndView,目的是为了让其他处理器异常解析器不再进行遍历,注意如果自定义异常解析器不进行筛选拦截所有异常,SpringMVC所带的所有异常处理机制都会失效
所以只要把自定义处理器异常解析器的优先级调高,就会作为默认的全局异常处理规则,很灵活,可以拦截所有异常按自己的逻辑进行处理,也可以拦部分异常,放行其他异常给Spring来处理
【处理器异常解析器集合】
![]()
【自定义处理器异常解析器实例】
@Order(Ordered.HIGHEST_PRECEDENCE)//优先级,数字越小,优先级越高 @Component public class CustomerHandlerExceptionResolver implements HandlerExceptionResolver { @Override public ModelAndView resolveException(HttpServletRequest request, HttpServletResponse response, Object handler, Exception ex) { //也可以学SpringMVC直接发送错误请求/error去找BasicErrorController进行处理,提供对应请求码的错误页面即可,woc这个有异常也要捕获 try { response.sendError(511,"我自己定义的控制器异常解析器"); } catch (IOException e) { e.printStackTrace(); } return new ModelAndView();//可以自定义返回ModelAndView,设置跳转视图和请求域数据,不设置也要创建ModelAndView,目的是为了让其他处理器异常解析器不再进行遍历,注意如果自定义异常解析器不进行筛选拦截所有异常,SpringMVC所带的所有异常处理机制都会失效 } }1
2
3
4
5
6
7
8
9
10
11
12
13
14ErrorViewResolver
- 这个一般不会自定义,因为Spring底层的异常处理逻辑大都是让tomcat自己发一个/error请求,该请求就会被BasicErrorController匹配调用这个错误页视图解析器解析状态码跳转对应的错误页【两种方式都会让tomcat自己发送/error请求:一种自己直接response.sendError;第二种没有任何人能处理的异常即所有异常解析器都返回null】
# Web原生组件注入
Servlet、Filter、Listener
具体内容参考官方文档spring-boot-features7.4,使用@WebServlet、@WebFilter、@WebListener注解标注的类可以使用@ServletComponentScan注解自动注册【前面三个注解都是在Servlet规范中的】
# 两个注解组合注入
@ServletComponentScan+原生注解【@WebServlet | @WebFilter | @WebListener】的方式
使用原生继承了HttpServlet的Servlet
作用是移植工程追求迅速上线可以直接把原生servlet全copy过来先不改代码扫一下就能用
【原生Servlet实例】
@WebServlet(urlPatterns = "/my")//@WebServlet注解是Servlet3.0规范提供的注解
public class MyServlet extends HttpServlet {
@Override
protected void doGet(HttpServletRequest request, HttpServletResponse response) throws ServletException, IOException {
response.getWriter().write("6666");
}
}
2
3
4
5
6
7
注意1:此时是不能直接访问/my请求的,会报错404;需要在主配置类上添加@ServletComponentScan注解指定basePackages属性具体要扫描的包和子包,自动对目标包下写好的servlet进行扫描【只有标注了对应原生注解且实现了对应接口的类才能被扫描】
@ServletComponentScan(basePackages = "com.atlisheng.admin") @SpringBootApplication public class Boot05WebAdminApplication { public static void main(String[] args) { SpringApplication.run(Boot05WebAdminApplication.class, args); } }1
2
3
4
5
6
7注意2:这种原生Servlet的方式会直接响应,不会被Spring的拦截器进行拦截
使用原生实现了Filter接口的Filter
【原生Filter实例】
@Slf4j @WebFilter("/css/*")//可以设置Filter拦截访问静态资源的所有请求,注意拦截所有单*是Servlet的写法, // 双*是Spring家的写法,使用原生Servlet需要使用单*表示所有路径 public class MyFilter implements Filter { @Override public void init(FilterConfig filterConfig) throws ServletException { //这个是用于过滤器初始化的 log.info("MyFilter正在初始化"); } @Override public void destroy() { //这个方法用于过滤器销毁 log.info("MyFilter正在销毁"); } @Override public void doFilter(ServletRequest request, ServletResponse response, FilterChain chain) throws IOException, ServletException { //这里面写业务逻辑 log.info("MyFilter正在工作"); //Filter工作需要filter链的doFilter方法进行放行 chain.doFilter(request,response); } }1
2
3
4
5
6
7
8
9
10
11
12
13
14
15
16
17
18
19
20
21
22使用原生实现了监听器接口的Listener
【原生Listener实例】
@Slf4j @WebListener//?这个不写默认是啥路径,监听器是否只针对时刻 public class MyServletContextListener implements ServletContextListener {//监听应用上下文的创建和销毁 @Override public void contextInitialized(ServletContextEvent sce) {//监听当前项目的初始化 log.info("MyServletContextListener监听到项目初始化完成"); } @Override public void contextDestroyed(ServletContextEvent sce) { log.info("MyServletContextListener监听到项目销毁");//直接点stop相当于拔电源,是监听不到项目的销毁的,那么如何相当于停项目呢 } }1
2
3
4
5
6
7
8
9
10
11
12
13
# 使用RegistrationBean注入
ServletRegistrationBean、FilterRegistrayionBean、ServletListenerRegistrationBean
以ServletRegistrationBean为例,这种用法是直接在配置类中向容器注册一个ServletRegistrationBean组件,而没有添加原生@WebServlet注解的Servlet可以直接创建一个servlet对象,直接通过构造方法向ServletRegistrationBean传入对应servlet和映射路径,映射路径是可变数量字符串参数
Filter和Listener的注入方式是一样的
【使用RegistrationBean注入Web原生组件的实例】
//(proxyBeanMethods = true)是保证依赖的组件始终是单实例的
@Configuration//注意这个配置类的@Configuration注解不要设置(proxyBeanMethods = false),因为有了这个设置有组件依赖,
// 一个组件被多次依赖就会创建多个对象,功能上不会有大问题,但是会导致容器中有很多冗余的对象
public class MyRegistConfig {
@Bean
public ServletRegistrationBean myServlet(){
MyServlet myServlet=new MyServlet();
return new ServletRegistrationBean(myServlet,"/my","/my02");
}
@Bean
public FilterRegistrationBean myFilter(){
MyFilter myFilter=new MyFilter();
//方式一
//return new FilterRegistrationBean(myFilter,myServlet());//注意FilterRegistrationBean的构造方法可以传参ServletRegistrationBean,该组件对应的Servlet对应的映射路径都会对过滤器起作用,
//方式二
//FilterRegistrationBean的构造方法不能直接写映射路径,只能通过setUrlPatterns方法传参字符串的list集合来设置映射路径,原因不明,记住就行
//Arrays.asList("/my","/css/*")就可以把一串可变数量的字符串参数转换成list集合
FilterRegistrationBean filterRegistrationBean=new FilterRegistrationBean(myFilter);
//这个路径设置可以实现以不同的请求路径访问servlet可以控制哪些路径需要经过filter
filterRegistrationBean.setUrlPatterns(Arrays.asList("/my","/css/*"));
return filterRegistrationBean;
}
@Bean//这个是监听时间点的,有些监听器不需要设置请求路径
public ServletListenerRegistrationBean myListener(){
MyServletContextListener myServletContextListener=new MyServletContextListener();
return new ServletListenerRegistrationBean(myServletContextListener);
}
}
2
3
4
5
6
7
8
9
10
11
12
13
14
15
16
17
18
19
20
21
22
23
24
25
26
27
28
29
30
# DispatchServlet注入原理
原生Servlet匹配的映射请求不会被Spring拦截的原理
dsadj
目前SpringBoot中有两个Servlet,一个是注入的Web原生servlet即myServlet,另一个是最大的派发处理器DispatcherServlet【前端控制器】
MyServlet-->处理/my请求
DispatcherServlet-->处理/请求
DispatcherServlet对应的自动配置类DispatcherServletAutoConfiguration
在自动配置包下的web模块下的servlet包下
DispatcherServlet注册步骤
第一步:SpringBoot会给容器中放一个DispatcherServlet,对应的名字为dispatcherServlet
- DispatcherServlet属性绑定的是WebMvcProperties,对应的配置项前缀是spring.mvc
第二步:给容器配置文件上传解析器
第三步:以RegistrationBean的方式将从容器中拿到dispatcherServlet将DispatcherServlet组件以Web原生Servlet的形式注册到IoC容器中,这里面确定了DispatcherServlet的请求匹配映射规则为"/",通过修改属性spring.mvc.servlet.path可以更改DispatcherServlet的对应匹配路径前缀
@AutoConfigureOrder(Ordered.HIGHEST_PRECEDENCE) @AutoConfiguration(after = ServletWebServerFactoryAutoConfiguration.class) @ConditionalOnWebApplication(type = Type.SERVLET) @ConditionalOnClass(DispatcherServlet.class) public class DispatcherServletAutoConfiguration { /** * The bean name for a DispatcherServlet that will be mapped to the root URL "/". */ public static final String DEFAULT_DISPATCHER_SERVLET_BEAN_NAME = "dispatcherServlet"; /** * The bean name for a ServletRegistrationBean for the DispatcherServlet "/". */ public static final String DEFAULT_DISPATCHER_SERVLET_REGISTRATION_BEAN_NAME = "dispatcherServletRegistration"; @Configuration(proxyBeanMethods = false)//配置类DispatcherServletConfiguration @Conditional(DefaultDispatcherServletCondition.class) @ConditionalOnClass(ServletRegistration.class) @EnableConfigurationProperties(WebMvcProperties.class) protected static class DispatcherServletConfiguration { @Bean(name = DEFAULT_DISPATCHER_SERVLET_BEAN_NAME)//给容器中放DispatcherServlet,这里的name常量就是dispatcherServlet,注意啊,这里只有@Bean注解,没有@WebServlet注解,这里注册的dispatcherServlet就是一个普通的Bean,此时还不是一个合格的Servlet public DispatcherServlet dispatcherServlet(WebMvcProperties webMvcProperties) {//DispatcherSertvlet中的属性都是绑定在WebMvcProperties中,前缀是SpringMVC DispatcherServlet dispatcherServlet = new DispatcherServlet(); dispatcherServlet.setDispatchOptionsRequest(webMvcProperties.isDispatchOptionsRequest()); dispatcherServlet.setDispatchTraceRequest(webMvcProperties.isDispatchTraceRequest()); dispatcherServlet.setThrowExceptionIfNoHandlerFound(webMvcProperties.isThrowExceptionIfNoHandlerFound());//比如webMvcProperties中的isThrowExceptionIfNoHandlerFound() ,DispatcherServlet中如果没有异常处理器能处理错误是否要抛出异常 dispatcherServlet.setPublishEvents(webMvcProperties.isPublishRequestHandledEvents()); dispatcherServlet.setEnableLoggingRequestDetails(webMvcProperties.isLogRequestDetails()); return dispatcherServlet; } @Bean//给容器配置文件上传解析器 @ConditionalOnBean(MultipartResolver.class) @ConditionalOnMissingBean(name = DispatcherServlet.MULTIPART_RESOLVER_BEAN_NAME) public MultipartResolver multipartResolver(MultipartResolver resolver) { // Detect if the user has created a MultipartResolver but named it incorrectly return resolver; } } @Configuration(proxyBeanMethods = false)//配置类DispatcherServletRegistrationConfiguration @Conditional(DispatcherServletRegistrationCondition.class) @ConditionalOnClass(ServletRegistration.class) @EnableConfigurationProperties(WebMvcProperties.class) @Import(DispatcherServletConfiguration.class) protected static class DispatcherServletRegistrationConfiguration { @Bean(name = DEFAULT_DISPATCHER_SERVLET_REGISTRATION_BEAN_NAME) @ConditionalOnBean(value = DispatcherServlet.class, name = DEFAULT_DISPATCHER_SERVLET_BEAN_NAME)//配置了DispatcherServletRegistrationBean,这个类继承于ServletRegistrationBean,这里面直接从容器中拿的dispatcherServlet组件,这才是通过RegistrationBean的方式将DispatcherServlet以Web原生Servlet的形式注册到IoC容器中 public DispatcherServletRegistrationBean dispatcherServletRegistration(DispatcherServlet dispatcherServlet, WebMvcProperties webMvcProperties, ObjectProvider<MultipartConfigElement> multipartConfig) { DispatcherServletRegistrationBean registration = new DispatcherServletRegistrationBean(dispatcherServlet, webMvcProperties.getServlet().getPath());//通过webMvcProperties.getServlet().getPath()拿到的DispatcherServlet的匹配映射路径,这个拿到的东西就是字符串"/",可以看出对应绑定的是webMvcProperties中的servlet属性的path属性,即可以通过spring.mvc.servlet.path来修改DispatcherServlet的匹配映射路径,如果修改spring.mvc.servlet.path=/mvc/,那么DispatcherServlet只能处理以/mvc/起头的请求路径 registration.setName(DEFAULT_DISPATCHER_SERVLET_BEAN_NAME); registration.setLoadOnStartup(webMvcProperties.getServlet().getLoadOnStartup()); multipartConfig.ifAvailable(registration::setMultipartConfig); return registration; } } @Order(Ordered.LOWEST_PRECEDENCE - 10) private static class DefaultDispatcherServletCondition extends SpringBootCondition { ... } @Order(Ordered.LOWEST_PRECEDENCE - 10) private static class DispatcherServletRegistrationCondition extends SpringBootCondition { ... } }1
2
3
4
5
6
7
8
9
10
11
12
13
14
15
16
17
18
19
20
21
22
23
24
25
26
27
28
29
30
31
32
33
34
35
36
37
38
39
40
41
42
43
44
45
46
47
48
49
50
51
52
53
54
55
56
57
58
59
60
61
62
63
64
65
66
67
68
69
70
71
72
73
74
# 嵌入式Servlet容器
# Web容器自动配置原理
对应官方文档的7.4.3章节
嵌入式Servlet容器的作用即创建SpringBoot应用时,无需外置部署服务器,应用中自带服务器,应用一启动就能够直接使用,默认使用的就是tomcat;原理SpringBoot说是使用了一种特殊的IoC容器ServletWebServerApplicationContext:IoC容器是ApplicationContext类,如果SpringBoot发现当前是一个web应用,IoC容器就会变成ServletWebServerApplicationContext【ServletWeb服务器的IoC容器】,该IoC容器继承了ApplicationContext接口,即IoC容器接口;
ServletWebServerApplicationContext的作用是当SpringBoot启动引导的过程中会搜索一个ServletWebServerFactory【ServletWeb服务器工厂】,这个工厂的作用就是生产ServletWeb服务器
SpringBoot底层一般有很多的WebServer工厂,TomcatServletWebServerFactory、JettyServletWebServerFactory、UndertowServletWebServerFactory
【SpringBoot底层支持的Web服务器】
- 注意UndertowWebServer不支持JSP
原理
关于对Web服务器的自动配置
在自动配置包下的web包下的servlet下的有一个ServletWebFactoryAutoConfiguration即Web服务器自动配置类
ServletWebFactoryAutoConfiguration通过Import注解导入ServletWebServerFactoryConfiguration配置类,在这个配置类中根据系统中到底导入哪个Web服务器的包动态判断需要配置哪种Web服务器工厂【web-starter场景默认导入的是tomcat的包,所以系统底层默认配置的是Tomcat的web服务器工厂TomcatServletWebServerFactory】
最后由TomcatServletWebServerFactory创建Tomcat服务器TomcatWebServer并启动,由于TomcatWebServer的构造器会执行初始化方法initialize....,在执行该方法过程中直接调用TomcatWebServer的start方法,执行完该方法tomcat就启动了,即创建服务器对象的时候tomcat服务器也一并启动了
所谓的内嵌服务器就是Spring来调用tomcat启动服务器的代码而已
【ServletWebFactoryAutoConfiguration】
@Configuration(proxyBeanMethods = false) @AutoConfigureOrder(Ordered.HIGHEST_PRECEDENCE) @ConditionalOnClass(ServletRequest.class) @ConditionalOnWebApplication(type = Type.SERVLET) @EnableConfigurationProperties(ServerProperties.class) @Import({ ServletWebServerFactoryAutoConfiguration.BeanPostProcessorsRegistrar.class, ServletWebServerFactoryConfiguration.EmbeddedTomcat.class,//通过ServletWebServerFactoryAutoConfiguration导入了ServletWebServerFactoryConfigurationweb服务器工厂的配置类 ServletWebServerFactoryConfiguration.EmbeddedJetty.class, ServletWebServerFactoryConfiguration.EmbeddedUndertow.class }) public class ServletWebServerFactoryAutoConfiguration { @Bean//配置ServletWeb服务器工厂的定制化器ServletWebServerFactoryCustomizer,这个定制化器的作用就是web服务器配好了以后,可以通过定制化器在后续修改工厂的相关信息,在其中的customize方法中把配置文件的信息拿到修改对应旧工厂中的属性信息 public ServletWebServerFactoryCustomizer servletWebServerFactoryCustomizer(ServerProperties serverProperties) { return new ServletWebServerFactoryCustomizer(serverProperties); } ... }1
2
3
4
5
6
7
8
9
10
11
12
13
14
15
16
17【ServletWebServerFactoryConfiguration】
@Configuration(proxyBeanMethods = false) class ServletWebServerFactoryConfiguration {//SpringBoot就在这个类中给底层配置了三个常用工厂 @Configuration(proxyBeanMethods = false) @ConditionalOnClass({ Servlet.class, Tomcat.class, UpgradeProtocol.class })//条件配置,如果系统中有Servlet类,有tomcat类;即如果应用中导了tomcat的依赖,服务器中就会配置一个Tomcat的工厂 @ConditionalOnMissingBean(value = ServletWebServerFactory.class, search = SearchStrategy.CURRENT) static class EmbeddedTomcat { @Bean//给容器放了一个TomcatServletWebServerFactory TomcatServletWebServerFactory tomcatServletWebServerFactory( ObjectProvider<TomcatConnectorCustomizer> connectorCustomizers, ObjectProvider<TomcatContextCustomizer> contextCustomizers, ObjectProvider<TomcatProtocolHandlerCustomizer<?>> protocolHandlerCustomizers) { TomcatServletWebServerFactory factory = new TomcatServletWebServerFactory(); factory.getTomcatConnectorCustomizers() .addAll(connectorCustomizers.orderedStream().collect(Collectors.toList())); factory.getTomcatContextCustomizers() .addAll(contextCustomizers.orderedStream().collect(Collectors.toList())); factory.getTomcatProtocolHandlerCustomizers() .addAll(protocolHandlerCustomizers.orderedStream().collect(Collectors.toList())); return factory; } } /** * Nested configuration if Jetty is being used. */ @Configuration(proxyBeanMethods = false) @ConditionalOnClass({ Servlet.class, Server.class, Loader.class, WebAppContext.class })//条件配置,如果系统中导入的是Jetty中的Server类,就配置一个JettyServletWebServerFactory @ConditionalOnMissingBean(value = ServletWebServerFactory.class, search = SearchStrategy.CURRENT) static class EmbeddedJetty { @Bean//给容器放了一个JettyServletWebServerFactory JettyServletWebServerFactory JettyServletWebServerFactory( ObjectProvider<JettyServerCustomizer> serverCustomizers) { JettyServletWebServerFactory factory = new JettyServletWebServerFactory(); factory.getServerCustomizers().addAll(serverCustomizers.orderedStream().collect(Collectors.toList())); return factory; } } /** * Nested configuration if Undertow is being used. */ @Configuration(proxyBeanMethods = false) @ConditionalOnClass({ Servlet.class, Undertow.class, SslClientAuthMode.class })//如果导入的是Undertow的包,就会放undertow的服务器工厂UndertowServletWebServerFactory @ConditionalOnMissingBean(value = ServletWebServerFactory.class, search = SearchStrategy.CURRENT) static class EmbeddedUndertow { @Bean//给容器中放了一个UndertowServletWebServerFactory UndertowServletWebServerFactory undertowServletWebServerFactory( ObjectProvider<UndertowDeploymentInfoCustomizer> deploymentInfoCustomizers, ObjectProvider<UndertowBuilderCustomizer> builderCustomizers) { UndertowServletWebServerFactory factory = new UndertowServletWebServerFactory(); factory.getDeploymentInfoCustomizers() .addAll(deploymentInfoCustomizers.orderedStream().collect(Collectors.toList())); factory.getBuilderCustomizers().addAll(builderCustomizers.orderedStream().collect(Collectors.toList())); return factory; } } }1
2
3
4
5
6
7
8
9
10
11
12
13
14
15
16
17
18
19
20
21
22
23
24
25
26
27
28
29
30
31
32
33
34
35
36
37
38
39
40
41
42
43
44
45
46
47
48
49
50
51
52
53
54
55
56
57
58
59
60
61
62【ServletWebServerApplicationContext】
ServletWeb服务器的IoC容器
public class ServletWebServerApplicationContext extends GenericWebApplicationContext implements ConfigurableWebServerApplicationContext { private static final Log logger = LogFactory.getLog(ServletWebServerApplicationContext.class); ... @Override public final void refresh() throws BeansException, IllegalStateException { try { super.refresh(); } catch (RuntimeException ex) {//如果有异常 WebServer webServer = this.webServer; if (webServer != null) { webServer.stop();//如果有异常异常一被捕获到Web服务器就停了 } throw ex; } } @Override protected void onRefresh() {//容器一启动就会调用这个方法,作用是创建web服务器 super.onRefresh(); try { createWebServer();//创建web服务器 } catch (Throwable ex) { throw new ApplicationContextException("Unable to start web server", ex); } } @Override protected void doClose() { if (isActive()) { AvailabilityChangeEvent.publish(this, ReadinessState.REFUSING_TRAFFIC); } super.doClose(); } //这个就是onRefresh方法调用的创建web服务器方法 private void createWebServer() { WebServer webServer = this.webServer;//开始web服务器默认是空 ServletContext servletContext = getServletContext(); if (webServer == null && servletContext == null) { ServletWebServerFactory factory = getWebServerFactory();//获取web服务器工厂,在刚好值引入一个web服务器依赖的情况下肯定能找到,即web服务器工厂恰好自动配置了一个 this.webServer = factory.getWebServer(getSelfInitializer());//调用web服务器工厂的getWebServer方法拿到web服务器,这一步执行完web服务器就有了,这里返回的WebServer对象,WebServer中的start方法就定义了服务器如何启动 getBeanFactory().registerSingleton("webServerGracefulShutdown", new WebServerGracefulShutdownLifecycle(this.webServer)); getBeanFactory().registerSingleton("webServerStartStop", new WebServerStartStopLifecycle(this, this.webServer)); } else if (servletContext != null) { try { getSelfInitializer().onStartup(servletContext); } catch (ServletException ex) { throw new ApplicationContextException("Cannot initialize servlet context", ex); } } initPropertySources(); } //这个就是上面方法调用的获取web服务器工厂方法 protected ServletWebServerFactory getWebServerFactory() { // Use bean names so that we don't consider the hierarchy String[] beanNames = getBeanFactory().getBeanNamesForType(ServletWebServerFactory.class);//去IoC容器中找ServletWebServerFactory组件,而且可能会找到多个 if (beanNames.length == 0) {//如果没有找到会抛异常,提示当前web项目中没有web服务器工厂 throw new ApplicationContextException("Unable to start ServletWebServerApplicationContext due to missing " + "ServletWebServerFactory bean."); } if (beanNames.length > 1) {//如果大于一个,也会抛异常,说当前web项目的服务器工厂太多 throw new ApplicationContextException("Unable to start ServletWebServerApplicationContext due to multiple " + "ServletWebServerFactory beans : " + StringUtils.arrayToCommaDelimitedString(beanNames)); } return getBeanFactory().getBean(beanNames[0], ServletWebServerFactory.class);//如果刚好只有一个就去IoC容器中找那个web服务器工厂 } ... }1
2
3
4
5
6
7
8
9
10
11
12
13
14
15
16
17
18
19
20
21
22
23
24
25
26
27
28
29
30
31
32
33
34
35
36
37
38
39
40
41
42
43
44
45
46
47
48
49
50
51
52
53
54
55
56
57
58
59
60
61
62
63
64
65
66
67
68
69
70
71
72
73
74
75
76
77【createWebServer方法中的factory.getWebServer方法】
public class TomcatServletWebServerFactory extends AbstractServletWebServerFactory implements ConfigurableTomcatWebServerFactory, ResourceLoaderAware { @Override public WebServer getWebServer(ServletContextInitializer... initializers) { if (this.disableMBeanRegistry) { Registry.disableRegistry(); } //以前外置服务器是用户自己来启动tomcat服务器,而SpringBoot内嵌tomcat是通过创建Tomcat对象直接通过程序实现了 Tomcat tomcat = new Tomcat(); File baseDir = (this.baseDirectory != null) ? this.baseDirectory : createTempDir("tomcat"); tomcat.setBaseDir(baseDir.getAbsolutePath()); for (LifecycleListener listener : this.serverLifecycleListeners) { tomcat.getServer().addLifecycleListener(listener); } Connector connector = new Connector(this.protocol); connector.setThrowOnFailure(true); tomcat.getService().addConnector(connector);//配置好连接器 customizeConnector(connector); tomcat.setConnector(connector); tomcat.getHost().setAutoDeploy(false);//配置好端口 configureEngine(tomcat.getEngine());//配置Tomcat引擎 for (Connector additionalConnector : this.additionalTomcatConnectors) { tomcat.getService().addConnector(additionalConnector); } prepareContext(tomcat.getHost(), initializers); return getTomcatWebServer(tomcat);//返回tomcatweb服务器 } }1
2
3
4
5
6
7
8
9
10
11
12
13
14
15
16
17
18
19
20
21
22
23
24
25
26
27
28
# 切换其他Web服务器
在官方文档Using SpringBoot中的1.5starters中有starter-undertow、starter-tomcat、starter-jetty
服务器是由web场景starter-web导入的,默认就是导入的starter-tomcat,此时直接在pom.xml的starter-web中用exclusions标签排除starter-tomcat依赖,然后单独引入目标服务器依赖
引入其他web服务器pom.xml设置
<dependency> <groupId>org.springframework.boot</groupId> <artifactId>spring-boot-starter-web</artifactId> <exclusions> <exclusion> <groupId>org.springframework.boot</groupId> <artifactId>spring-boot-starter-tomcat</artifactId> </exclusion> </exclusions> </dependency> <dependency> <groupId>org.springframework.boot</groupId> <artifactId>spring-boot-starter-undertow</artifactId> </dependency>1
2
3
4
5
6
7
8
9
10
11
12
13
14
# 自定义服务器配置
更改服务器的一些默认配置
定制化web服务器,官方文档spring-boot-features7.4.4
第一种定制方式是修改配置文件
- 所有关于服务器的配置属性前缀都是server,原因是服务器自动配置类ServletWebServerFactoryAutoConfiguration绑定的文件是Serverproperties,服务器的取值来源都来自Serverproperties,web服务器工厂创建web服务器时会根据工厂定制化器中的serverproperties来确定服务器的属性值;而Serverproperties绑定的配置属性都以server为前缀,Serverproperties类中的属性包括端口号port、地址address【这是什么地址?】、错误页error、安全连接相关信息ssl、Servlet有关的同样信息servlet
- server.undertow.accesslog.dir=/tmp表示指定访问undertow日志的临时目录
- server.servlet.session.timeout=60m表示设置session的超时时间为60分钟
第二种方式是直接自定义ServletWebServerFactory并将该组件添加到容器中,推荐自定义ConfigurableServletWebServerFactory,这两都是接口,后者继承了前者
创建以后SpringBoot底层会自动调用该工厂根据相应属性创建web服务器
【自定义ConfigurableServletWebServerFactory示例】
@Bean public ConfigurableServletWebServerFactory webServerFactory() { TomCatServletWebServerFactory factory =new TomCatServletWebServerFactory(); factory.setPort(9000); factory.setSessionTimeout(10,TimeUnit.MINUTES); factory.setErrorPage(new ErrorPage(HttpStatus.NOT_FOUND,"/notfound.html")); return factory; }1
2
3
4
5
6
7
8第三种是自定义
WebServerFactoryCustomizer<ConfigurableServletWebServerFactory>
通过自定义的工厂化定制器将配置文件的值与ServletWebServerFactory进行绑定
Spring底层经常出现这种定制化器,这更像Spring的一种设计规则,只要给底层配置了自定义定制化器,就可以改变某些东西的默认行为
【原始的工厂定制化器】
public class ServletWebServerFactoryCustomizer implements WebServerFactoryCustomizer<ConfigurableServletWebServerFactory>, Ordered { ... @Override public void customize(ConfigurableServletWebServerFactory factory) { PropertyMapper map = PropertyMapper.get().alwaysApplyingWhenNonNull(); map.from(this.serverProperties::getPort).to(factory::setPort); map.from(this.serverProperties::getAddress).to(factory::setAddress); map.from(this.serverProperties.getServlet()::getContextPath).to(factory::setContextPath); map.from(this.serverProperties.getServlet()::getApplicationDisplayName).to(factory::setDisplayName); map.from(this.serverProperties.getServlet()::isRegisterDefaultServlet).to(factory::setRegisterDefaultServlet); map.from(this.serverProperties.getServlet()::getSession).to(factory::setSession); map.from(this.serverProperties::getSsl).to(factory::setSsl); map.from(this.serverProperties.getServlet()::getJsp).to(factory::setJsp); map.from(this.serverProperties::getCompression).to(factory::setCompression); map.from(this.serverProperties::getHttp2).to(factory::setHttp2); map.from(this.serverProperties::getServerHeader).to(factory::setServerHeader); map.from(this.serverProperties.getServlet()::getContextParameters).to(factory::setInitParameters); map.from(this.serverProperties.getShutdown()).to(factory::setShutdown); } }1
2
3
4
5
6
7
8
9
10
11
12
13
14
15
16
17
18
19
20【定制工厂定制化器实例】
@Component public class MyWebServerFactoryCustomizer implements WebServerFactoryCustomizer<ConfigurableServletWebServerFactory> { @Override public void customize(ConfigurableServletWebServerFactory server) { server.setPort(9000); } }1
2
3
4
5
6
7
# 定制化原理
自动配置原理套路分析
- 引入starter-XXX场景-->xxxxAutoConfiguration-->导入xxx组件-->绑定xxxProperties-->绑定配置文件项
常见定制化方式
第一种:编写自定义配置类xxxConfiguation,使用@Bean注解或者@Component注解替换或增加容器中的默认组件,如视图解析器、参数解析器,处理器异常解析器等
第二种:修改配置文件中的配置属性,这种是比较常用的
第三种:自定义xxxxCustomizer即xxxx定制化器,相当于选择性修改工厂创建对象时的部分默认值
第四种:编写一个配置类实现WebMvcConfigurer接口,重写接口中的各种方法来实现定制
第五种:如果想修改SpringMVC非常底层的组件,如RequestMappingHandlerMapping、RequestMappingHandlerAdapter、ExceptionHandlerExceptionResolver可以给容器中添加一个WebMvcRegistrations组件
【添加WebMvcRegistrations组件示例】
@Bean public WebMvcRegistrations webMvcRegistrations(){ return new WebMvcRegistrations() { @Override//这种方式可以重新定义HandlerMapping的底层行为,但是太过底层,没有完全搞清楚SpringMVC的底层原理不建议这么做 public RequestMappingHandlerMapping getRequestMappingHandlerMapping() { return WebMvcRegistrations.super.getRequestMappingHandlerMapping(); } @Override public RequestMappingHandlerAdapter getRequestMappingHandlerAdapter() { return WebMvcRegistrations.super.getRequestMappingHandlerAdapter(); } @Override public ExceptionHandlerExceptionResolver getExceptionHandlerExceptionResolver() { return WebMvcRegistrations.super.getExceptionHandlerExceptionResolver(); } }; }1
2
3
4
5
6
7
8
9
10
11
12
13
14
15
16
17
18
19第六种:如果用户想完全控制SpringMVC,可以添加一个用@Configuration注解标注的配置类,该配置类由@EnableWebMvc注解标注
【@EnableWebMvc注解实例】
@EnableWebMvc//这个注解表示用户全面接管SpringMVC,所有的静态资源、视图解析器、欢迎页等等所有的Spring官方的自动配置全部失效,必须自己来定义所有的事情比如静态资源的访问等全部底层行为 @Configuration public class AdminWebConfig implements WebMvcConfigurer { /** * @param registry 注册表 * @描述 定义静态资源行为 * @author Earl * @version 1.0.0 * @创建日期 2023/06/06 * @since 1.0.0 */ @Override public void addResourceHandlers(ResourceHandlerRegistry registry) { /**意思是访问"/aa/**" 的所有请求都去 "classpath:/static/ 下面对**内容"进行匹配*/ registry.addResourceHandler("/aa/**")//添加静态资源处理,需要传参静态资源的请求路径, .addResourceLocations("classpath:/static/");//传参对应static目录下的所有资源路径 } @Override public void addInterceptors(InterceptorRegistry registry) { registry.addInterceptor(new LoginInterceptor()) .addPathPatterns("/**")//所有请求都会被拦截包括静态资源 .excludePathPatterns("/","/login","/css/**","/fonts/**","/images/**","/js/**","/aa/**"); } }1
2
3
4
5
6
7
8
9
10
11
12
13
14
15
16
17
18
19
20
21
22
23
24
25全面接管SpringMVC的原理
SpringMVC的所有自动配置功能都在WebMvcAutoConfiguration中,这个类中有对静态资源、欢迎页、视图解析器等等一堆配置
一旦使用@enableWebMvc注解,会用@Import注解导入DelegatingWebMvcConfiguration
DelegatingWebMvcConfiguration的作用
作用1:把系统中的所有WebMvcConfigurer拿到,把这些WebMvcConfigurer的所有功能定制合起来一起生效
作用2:这个类继承了WebMvcConfigurationSupport,根据父类中的行为会自动配置了一些非常底层的组件,比如HandlerMapping、内容协商管理器;这些组件依赖的组件都是从容器中获取
这个类只保证SpringMVC最基本的使用,只有核心组件,如RequestMappingHandlerMapping、Adapter等
核心:WebMvcAutoConfiguration中的配置能生效的必要条件是
条件配置@ConditionalOnMissingBean(WebMvcConfigurationSupporties.class),即没有WebMvcConfigurationSupporties才生效,但是@enableWebMvc注解导入了DelegatingWebMvcConfiguration就相当于有了其父类WebMvcConfigurationSupport,即@enableWebMvc注解会导致SpringMVC配置类WebMvcAutoConfiguration没生效
这时候只能由WebMvcAutoConfiguration配置的支持Rest风格的过滤器、各种消息转换器等等,都需要自己来进行配置
@Retention(RetentionPolicy.RUNTIME) @Target(ElementType.TYPE) @Documented @Import(DelegatingWebMvcConfiguration.class)//导入了DelegatingWebMvcConfiguration public @interface EnableWebMvc { }1
2
3
4
5
6【DelegatingWebMvcConfiguration】
@Configuration(proxyBeanMethods = false) public class DelegatingWebMvcConfiguration extends WebMvcConfigurationSupport { private final WebMvcConfigurerComposite configurers = new WebMvcConfigurerComposite(); @Autowired(required = false) public void setConfigurers(List<WebMvcConfigurer> configurers) {//把系统中的所有WebMvcConfigurer拿到,把这些WebMvcConfigurer的所有功能定制一起生效 if (!CollectionUtils.isEmpty(configurers)) { this.configurers.addWebMvcConfigurers(configurers); } } ... }1
2
3
4
5
6
7
8
9
10
11
12
# 数据访问
# 导入JDBC场景
SQL部分
导入数据开发场景-->引入自动配置类-->导入数据源相关组件-->数据源配置项和属性配置文件绑定
在Using SpringBoot中的starter中有很多以data开始的都是整个数据库访问相关的场景,如jdbc、jpa、redis
用户在上述流程中的角色是导入相关场景,配置属性配置文件
数据源的自动配置
导入JDBC场景
<dependency> <groupId>org.springframework.boot</groupId> <artifactId>spring-boot-starter-data-jdbc</artifactId> </dependency>1
2
3
4【场景导入的依赖】
![]()
这里面缺少JDBC驱动,官方因为不知道用户使用的是那个版本和哪种数据库,所以数据库驱动由用户自己引入,但是SpringBoot对mysql驱动由默认版本仲裁,一般都自己指定自己的版本
【修改版本的两种方式】
【 方式一】
<!--SpringBoot不会在JDBC场景提供数据库驱动,因为Spring不知道用户用什么数据库和哪个版本的数据库--> <!-- https://mvnrepository.com/artifact/mysql/mysql-connector-java --> <dependency> <groupId>mysql</groupId> <artifactId>mysql-connector-java</artifactId> <version>8.0.27</version> </dependency>1
2
3
4
5
6
7【方式二】
<properties> <java.version>1.8</java.version> <!-- 重新声明版本(maven的属性就近优先原则)子工程有就以子工程为主 --> <mysql.version>8.0.27</mysql.version> </properties> <dependencies> <!--SpringBoot不会在JDBC场景提供数据库驱动,因为Spring不知道用户用什么数据库和哪个版本的数据库--> <!-- https://mvnrepository.com/artifact/mysql/mysql-connector-java --> <dependency> <groupId>mysql</groupId> <artifactId>mysql-connector-java</artifactId> <!--<version>8.0.27</version>--> <version>${mysql.version}</version> </dependency> </dependencies>1
2
3
4
5
6
7
8
9
10
11
12
13
14
15【当前本机SpringBoot的mysql驱动默认版本】
<mysql.version>8.0.33</mysql.version>1分析自动配置原理
数据相关的jdbc自动配置在AutoConfigure中的data包下的jdbc包下,这里面是用来找JDBC的接口类,还有一个jdbc大包,这个包下是对整个数据库相关的配置,该包下的有关配置类见5.1.2
# 自动配置的类
# DataSourceAutoConfiguration
数据源的自动配置类
全局配置文件修改数据源相关配置属性的前缀:spring.datasource
数据库连接池的配置,容器中没有DataSource才自动配置
底层配置好的连接池是:HikariDataSource,这个DataSourceConfiguration.Hikari.class类中已经默认自动配置了spring.datasource.type=com.zaxxer.hikari.HikariDataSource
关于数据源自动配置的原理讲的不清楚,以后再自己研究,先记结论
@AutoConfiguration(before = SqlInitializationAutoConfiguration.class)
@ConditionalOnClass({ DataSource.class, EmbeddedDatabaseType.class })
@ConditionalOnMissingBean(type = "io.r2dbc.spi.ConnectionFactory")//没有基于响应式编程的数据库连接池的相关类ConnectionFactory才会自动配置下列组件,即不用响应式技术栈才会配置原生的数据源
@EnableConfigurationProperties(DataSourceProperties.class)//跟数据源有关的所有配置都在DataSourceProperties中与全局配置文件中前缀为spring.datasourcr的配置属性绑定
@Import(DataSourcePoolMetadataProvidersConfiguration.class)
public class DataSourceAutoConfiguration {
@Configuration(proxyBeanMethods = false)
@Conditional(EmbeddedDatabaseCondition.class)
@ConditionalOnMissingBean({ DataSource.class, XADataSource.class })
@Import(EmbeddedDataSourceConfiguration.class)//导入嵌入式数据源的配置,没有做什么
protected static class EmbeddedDatabaseConfiguration {
}
@Configuration(proxyBeanMethods = false)
@Conditional(PooledDataSourceCondition.class)
@ConditionalOnMissingBean({ DataSource.class, XADataSource.class })//当容器中没有配数据源DataSource的时候下面内容才生效
@Import({ DataSourceConfiguration.Hikari.class, DataSourceConfiguration.Tomcat.class,
DataSourceConfiguration.Dbcp2.class, DataSourceConfiguration.OracleUcp.class,
DataSourceConfiguration.Generic.class, DataSourceJmxConfiguration.class //这个DataSourceConfiguration.Hikari.class类中已经默认自动配置了spring.datasource.type=com.zaxxer.hikari.HikariDataSource
})
protected static class PooledDataSourceConfiguration {//池化数据源的配置
}
...
}
2
3
4
5
6
7
8
9
10
11
12
13
14
15
16
17
18
19
20
21
22
23
24
25
26
27
【DataSourceTransactionManagerAutoConfiguration】
事务管理器的自动配置类
【JdbcTemplateAutoConfiguration】
JdbcTemplate的自动配置类,JdbcTemplate可以用来对数据库进行CRUD的小组件,这里面跟JDBC相关的配置都在JdbcProperties中,前缀是spring.jdbc
给容器中导入组件JdbcTemplate,通过修改前缀是spring.jdbc的配置属性可以修改jdbcTemplate
只有当容器中没有数据源DataSource这个类才会自动配置数据源
【JndiDataSourceAutoConfiguration】
Jndi的自动配置类
【XADataSourceAutoConfiguration】
分布式事务相关的配置
# 数据源的配置属性
数据源是用来执行数据库CRUD操作的,数据源就是提供连接对象的
- 【配置属性实例】
spring:
datasource:
url: jdbc:mysql://localhost:3306/db_account
username: root
password: Haworthia0715
driver-class-name: com.mysql.jdbc.Driver #这个是数据库驱动
#type: com.zaxxer.hikari.HikariDataSource #这个已经被默认配置好了
2
3
4
5
6
7
配置了数据库相关场景,但是没有配置数据源配置属性SpringBoot项目启动会报错,成功的标志就是应用正常启动且没有报错
JdbcTemplate配置实例
@Slf4j @SpringBootTest class Boot05WebAdminApplicationTests { //这个用@Autowired注解要报红 @Resource JdbcTemplate jdbcTemplate; @Test void contextLoads() { Long aLong = jdbcTemplate.queryForObject("select count(*) from emp", Long.class); log.info("emp表中记录总数:{}",aLong); } }1
2
3
4
5
6
7
8
9
10
11
12
13
14
15配置德鲁伊druid数据源
HikariDataSource数据源是目前世面上性能最好的数据源产品,实际开发中也比较喜欢使用阿里的druid德鲁伊数据源,该数据源有针对数据源的完善解决方案,包括:数据源的全方位监控、防止SQL的注入攻击等等
SpringBoot整合第三方的技术有两种方式
# 方式一
方式1:自己引入一大堆东西
根据Druid官方文档引入相关依赖
第一步 创建数据源
<dependency> <groupId>com.alibaba</groupId> <artifactId>druid</artifactId> <version>1.1.17</version> </dependency> <!--以前Spring的配置方法--> <bean id="dataSource" class="com.alibaba.druid.pool.DruidDataSource" destroy-method="close"> <property name="url" value="${jdbc.url}" /> <property name="username" value="${jdbc.username}" /> <property name="password" value="${jdbc.password}" /> <property name="maxActive" value="20" /> <property name="initialSize" value="1" /> <property name="maxWait" value="60000" /> <property name="minIdle" value="1" /> <property name="timeBetweenEvictionRunsMillis" value="60000" /> <property name="minEvictableIdleTimeMillis" value="300000" /> <property name="testWhileIdle" value="true" /> <property name="testOnBorrow" value="false" /> <property name="testOnReturn" value="false" /> <property name="poolPreparedStatements" value="true" /> <property name="maxOpenPreparedStatements" value="20" /> </bean>1
2
3
4
5
6
7
8
9
10
11
12
13
14
15
16
17
18
19
20
21
22
23
24配置Druid的监控页
以前的项目需要在web.xml中配一个监控页StatViewServlet,对应的拦截路径是/druid/*,访问http://110.76.43.235:9000/druid/index.html就会来到内置监控页面首页,监控页里面有数据源的很多详细信息,SQL监控【只要对数据库有操作,SQL监控中就会有内容】
在SpringBoot中开启监控页还是一样的逻辑
打开druid的监控统计功能
需要使用Druid内置的StatFilter,用于统计监控信息,需要配置StatFilter,有以下三种配置方式
- 方式一:别名配置
StatFilter的别名是stat,这个别名映射配置信息保存在druid-xxx.jar!/META-INF/druid-filter.properties。
在spring中使用别名配置方式如下:
相当于通过数据源的filters属性设置属性值stat来开启的
<bean id="dataSource" class="com.alibaba.druid.pool.DruidDataSource" init-method="init" destroy-method="close"> ... ... <property name="filters" value="stat" /> </bean>1
2
3
4【别名配置实例】
@ConfigurationProperties("spring.datasource")//这个注解的作用是指定组件的属性和属性配置文件中对应前缀的同名属性进行绑定 @Bean public DataSource dataSource() throws SQLException { DruidDataSource druidDataSource=new DruidDataSource(); //druidDataSource.setUrl();//也可以手动设置数据源的属性值 //开启德鲁伊数据源监控统计功能 druidDataSource.setFilters("stat"); return druidDataSource; }1
2
3
4
5
6
7
8
9
【以下两种方式暂时不讲】
- 方式二:组合配置
StatFilter可以和其他的Filter配置使用,比如:
<bean id="dataSource" class="com.alibaba.druid.pool.DruidDataSource" init-method="init" destroy-method="close"> ... ... <property name="filters" value="stat,log4j" /> </bean>1
2
3
4在上面的配置中,StatFilter和Log4jFilter组合使用。
- 方式三:通过proxyFilters属性配置
别名配置是通过filters属性配置的,filters属性的类型是String。如果需要通过bean的方式配置,使用proxyFilters属性。
<bean id="stat-filter" class="com.alibaba.druid.filter.stat.StatFilter"> <property name="slowSqlMillis" value="10000" /> <property name="logSlowSql" value="true" /> </bean> <bean id="dataSource" class="com.alibaba.druid.pool.DruidDataSource" init-method="init" destroy-method="close"> ... ... <property name="filters" value="log4j" /> <property name="proxyFilters"> <list> <ref bean="stat-filter" /> </list> </property> </bean>1
2
3
4
5
6
7
8
9
10
11
12
13
14其中filters和proxyFilters属性是组合关系的,不是替换的,在上面的配置中,dataSource有了两个Filter,StatFilter和Log4jFilter。
内置监控中的Web关联监控配置WebStatFilter
WebStatFilter用于采集Jdbc相关的数据,即展示在web应用和URI监控下的相关数据;可以监控到具体的Web请求的一些信息和请求的请求次数等等
# 配置_配置WebStatFilter
# web.xml配置
在web.xml中放一个拦截所有请求的WebStatFilter,SpringBoot仍然可以采用一样的逻辑
注意所有静态页的请求、监控页的请求都不要拦截,这些请求全部排除掉,而且注意exclusions是初始化参数,需要在使用来进行设置
<filter> <filter-name>DruidWebStatFilter</filter-name> <filter-class>com.alibaba.druid.support.http.WebStatFilter</filter-class> <init-param> <!--以下静态资源请求和监控页的请求需要排除掉--> <param-name>exclusions</param-name> <param-value>*.js,*.gif,*.jpg,*.png,*.css,*.ico,/druid/*</param-value> </init-param> </filter> <filter-mapping> <filter-name>DruidWebStatFilter</filter-name> <url-pattern>/*</url-pattern> </filter-mapping>1
2
3
4
5
6
7
8
9
10
11
12
13【WebStatFilter配置实例】
@Bean public FilterRegistrationBean webStatFilter(){ WebStatFilter webStatFilter=new WebStatFilter(); FilterRegistrationBean<WebStatFilter> filterRegistrationBean=new FilterRegistrationBean<>(webStatFilter); filterRegistrationBean.setUrlPatterns(Arrays.asList("/*")); filterRegistrationBean.addInitParameter("exclusions","*.js,*.gif,*.jpg,*.png,*.css,*.ico,/druid/*"); return filterRegistrationBean; }1
2
3
4
5
6
7
8【后面的方法没讲,暂时不管】
# exclusions配置
经常需要排除一些不必要的url,比如*.js,/jslib/*等等。配置在init-param中。比如:
<init-param> <param-name>exclusions</param-name> <param-value>*.js,*.gif,*.jpg,*.png,*.css,*.ico,/druid/*</param-value> </init-param>1
2
3
4# sessionStatMaxCount配置
缺省sessionStatMaxCount是1000个。你可以按需要进行配置,比如:
<init-param> <param-name>sessionStatMaxCount</param-name> <param-value>1000</param-value> </init-param>1
2
3
4# sessionStatEnable配置
你可以关闭session统计功能,比如:
<init-param> <param-name>sessionStatEnable</param-name> <param-value>false</param-value> </init-param>1
2
3
4# principalSessionName配置
你可以配置principalSessionName,使得druid能够知道当前的session的用户是谁。比如:
<init-param> <param-name>principalSessionName</param-name> <param-value>xxx.user</param-value> </init-param>1
2
3
4根据需要,把其中的xxx.user修改为你user信息保存在session中的sessionName。
注意:如果你session中保存的是非string类型的对象,需要重载toString方法。
# principalCookieName
如果你的user信息保存在cookie中,你可以配置principalCookieName,使得druid知道当前的user是谁
<init-param> <param-name>principalCookieName</param-name> <param-value>xxx.user</param-value> </init-param>1
2
3
4根据需要,把其中的xxx.user修改为你user信息保存在cookie中的cookieName
# profileEnable
druid 0.2.7版本开始支持profile,配置profileEnable能够监控单个url调用的sql列表。
<init-param> <param-name>profileEnable</param-name> <param-value>true</param-value> </init-param>1
2
3
4配置防御SQL注入攻击的防火墙过滤器
# 配置 wallfilter
# 使用缺省配置的WallFilter
单独配置一个filter在数据源的filters属性中
<bean id="dataSource" class="com.alibaba.druid.pool.DruidDataSource" init-method="init" destroy-method="close"> ... <property name="filters" value="wall"/> </bean>1
2
3
4# 结合其他Filter一起使用
多个filter一切使用,直接在filters属性值中用逗号分隔关键字即可
WallFilter可以结合其他Filter一起使用,例如:
<bean id="dataSource" class="com.alibaba.druid.pool.DruidDataSource" init-method="init" destroy-method="close"> ... <property name="filters" value="wall,stat"/> </bean>1
2
3
4这样,拦截检测的时间不在StatFilter统计的SQL执行时间内。
【WallFilter配置实例】
@ConfigurationProperties("spring.datasource")//这个注解的作用是指定组件的属性和属性配置文件中对应前缀的同名属性进行绑定 @Bean public DataSource dataSource() throws SQLException { DruidDataSource druidDataSource=new DruidDataSource(); //druidDataSource.setUrl();//也可以手动设置数据源的属性值 //开启德鲁伊数据源监控统计功能 druidDataSource.setFilters("stat,wall"); return druidDataSource; }1
2
3
4
5
6
7
8
9配置Spring关联监控
这里没做演示,直接跳过了,只讲了第一个和第二个方法,也只是浅谈了一下
# 配置_Druid和Spring关联监控配置
Druid提供了Spring和Jdbc的关联监控。
# 配置spring
com.alibaba.druid.support.spring.stat.DruidStatInterceptor是一个标准的Spring MethodInterceptor。可以灵活进行AOP配置。
Spring AOP的配置文档: http://static.springsource.org/spring/docs/current/spring-framework-reference/html/aop-api.html
# 按类型拦截配置
<bean id="druid-stat-interceptor" class="com.alibaba.druid.support.spring.stat.DruidStatInterceptor"> </bean> <bean id="druid-type-proxyCreator" class="com.alibaba.druid.support.spring.stat.BeanTypeAutoProxyCreator"> <!-- 所有ABCInterface的派生类被拦截监控 --> <property name="targetBeanType" value="xxxx.ABCInterface" /> <property name="interceptorNames"> <list> <!--这个组件会用到上面的druid-stat-interceptor组件--> <value>druid-stat-interceptor</value> </list> </property> </bean>1
2
3
4
5
6
7
8
9
10
11
12
13
14# 方法名正则匹配拦截配置
<bean id="druid-stat-interceptor" class="com.alibaba.druid.support.spring.stat.DruidStatInterceptor"> </bean> <bean id="druid-stat-pointcut" class="org.springframework.aop.support.JdkRegexpMethodPointcut" scope="prototype"> <property name="patterns"> <!--这是常用来指定包名的东西--> <list> <value>com.mycompany.service.*</value> <value>com.mycompany.dao.*</value> </list> </property> </bean> <!--这是aop的功能--> <aop:config> <aop:advisor advice-ref="druid-stat-interceptor" pointcut-ref="druid-stat-pointcut" /> </aop:config>1
2
3
4
5
6
7
8
9
10
11
12
13
14
15
16
17
18
19
20有些情况下,可能你需要配置proxy-target-class,例如:
<aop:config proxy-target-class="true"> <aop:advisor advice-ref="druid-stat-interceptor" pointcut-ref="druid-stat-pointcut" /> </aop:config>1
2
3
4##按照BeanId来拦截配置
<bean id="druid-stat-interceptor" class="com.alibaba.druid.support.spring.stat.DruidStatInterceptor"> </bean> <bean class="org.springframework.aop.framework.autoproxy.BeanNameAutoProxyCreator"> <property name="proxyTargetClass" value="true" /> <property name="beanNames"> <list> <!-- 这里配置需要拦截的bean id列表 --> <value>xxx-dao</value> <value>xxx-service</value> </list> </property> <property name="interceptorNames"> <list> <value>druid-stat-interceptor</value> </list> </property> </bean>1
2
3
4
5
6
7
8
9
10
11
12
13
14
15
16
17
18
19
20开启监控页的登录功能
# 1.2 配置监控页面访问密码
需要配置Servlet的
loginUsername和loginPassword这两个初始参数。具体可以参考: 为Druid监控配置访问权限(配置访问监控信息的用户与密码) (opens new window)
示例如下:
<!-- 配置 Druid 监控信息显示页面 --> <servlet> <servlet-name>DruidStatView</servlet-name> <servlet-class>com.alibaba.druid.support.http.StatViewServlet</servlet-class> <init-param> <!-- 允许清空统计数据 --> <param-name>resetEnable</param-name> <param-value>true</param-value> </init-param> <init-param> <!-- 用户名 --> <param-name>loginUsername</param-name> <param-value>druid</param-value> </init-param> <init-param> <!-- 密码 --> <param-name>loginPassword</param-name> <param-value>druid</param-value> </init-param> </servlet> <servlet-mapping> <servlet-name>DruidStatView</servlet-name> <url-pattern>/druid/*</url-pattern> </servlet-mapping>1
2
3
4
5
6
7
8
9
10
11
12
13
14
15
16
17
18
19
20
21
22
23
24【监控页登录配置实例】
@Bean public ServletRegistrationBean statViewServlet(){ StatViewServlet statViewServlet=new StatViewServlet(); ServletRegistrationBean<StatViewServlet> registrationBean=new ServletRegistrationBean<>(statViewServlet,"/druid/*"); registrationBean.addInitParameter("loginUsername","admin"); registrationBean.addInitParameter("loginPassword","123456"); return registrationBean; }1
2
3
4
5
6
7
8配置黑白名单
没讲,只提了一嘴
# 2. 配置allow和deny
StatViewSerlvet展示出来的监控信息比较敏感,是系统运行的内部情况,如果你需要做访问控制,可以配置allow和deny这两个参数。比如:
<servlet> <servlet-name>DruidStatView</servlet-name> <servlet-class>com.alibaba.druid.support.http.StatViewServlet</servlet-class> <init-param> <param-name>allow</param-name> <param-value>128.242.127.1/24,128.242.128.1</param-value> </init-param> <init-param> <param-name>deny</param-name> <param-value>128.242.127.4</param-value> </init-param> </servlet>1
2
3
4
5
6
7
8
9
10
11
12# 判断规则
- deny优先于allow,如果在deny列表中,就算在allow列表中,也会被拒绝。
- 如果allow没有配置或者为空,则允许所有访问
# ip配置规则
配置的格式
<IP> 或者 <IP>/<SUB_NET_MASK_size>1
2
3其中
128.242.127.1/24124表示,前面24位是子网掩码,比对的时候,前面24位相同就匹配。
# 不支持IPV6
由于匹配规则不支持IPV6,配置了allow或者deny之后,会导致IPV6无法访问。
凡是用set方法设置对象属性值的都可以去全局配置文件直接指定配置属性值来达到相同的效果
# 方式二
方式2:找对应的官方的starter,根据starter中的自动配置类自动配置场景
第一步:引入官方的starter
官方starter会引入所有的组件
<dependency> <groupId>com.alibaba</groupId> <artifactId>druid-spring-boot-starter</artifactId> <version>1.1.17</version> </dependency>1
2
3
4
5【druid的自动配置类】
@Configuration @ConditionalOnClass({DruidDataSource.class})//系统里面有DruidDataSource这个类即可配置 @AutoConfigureBefore({DataSourceAutoConfiguration.class})//在Spring的数据源自动配置之前先进行配置的,因为spring有默认的数据源HikariDataSource,如果Spring默认的数据源先配置druid就不会生效,先配置druid那么官方的HikariDataSource就不会生效 @EnableConfigurationProperties({DruidStatProperties.class, DataSourceProperties.class})//所有的属性都绑定在DruidStatProperties和DataSourceProperties;前缀分别为spring.datasource.druid和spring.datasource @Import({DruidSpringAopConfiguration.class, DruidStatViewServletConfiguration.class, DruidWebStatFilterConfiguration.class, DruidFilterConfiguration.class})//DruidSpringAopConfiguration这个是配置监控页spring监控的,配置项是spring.datasource.druid.aop-patterns; public class DruidDataSourceAutoConfigure { private static final Logger LOGGER = LoggerFactory.getLogger(DruidDataSourceAutoConfigure.class); public DruidDataSourceAutoConfigure() { } @Bean(initMethod = "init")//放了数据源,放的是DruidDataSourceWrapper装饰器 @ConditionalOnMissingBean public DataSource dataSource() { LOGGER.info("Init DruidDataSource"); return new DruidDataSourceWrapper(); } }1
2
3
4
5
6
7
8
9
10
11
12
13
14
15
16
17
18导入了组件数据源 DruidDataSourceWrapper
DruidSpringAopConfiguration这个是配置监控页spring监控的,配置项是spring.datasource.druid. aop-patterns;
DruidStatViewServletConfiguration是配置监控页的,配置项spring.datasource.druid.stat-view-servlet;【其中spring.datasource.druid.stat-view-servlet.enabled默认为true,表示监控页的功能是默认开启的】,这里面的配置属性值都来源于DruidStatProperties.class
DruidWebStatFilterConfiguration是配置WebStatFilter【采集web-jdbc关联监控的数据】,即web监控配置,配置项spring.datasource.druid.web-stat-filter;【其中spring.datasource.druid.web-stat-filter.enabled默认就是true,表示web监控的功能默认是开启的】
DruidFilterConfiguration是配置底层需要的所有Druid的过滤器,默认开启都是false需要在配置文件进行开启
private static final String FILTER_STAT_PREFIX = "spring.datasource.druid.filter.stat"; private static final String FILTER_CONFIG_PREFIX = "spring.datasource.druid.filter.config"; private static final String FILTER_ENCODING_PREFIX = "spring.datasource.druid.filter.encoding"; private static final String FILTER_SLF4J_PREFIX = "spring.datasource.druid.filter.slf4j"; private static final String FILTER_LOG4J_PREFIX = "spring.datasource.druid.filter.log4j"; private static final String FILTER_LOG4J2_PREFIX = "spring.datasource.druid.filter.log4j2"; private static final String FILTER_COMMONS_LOG_PREFIX = "spring.datasource.druid.filter.commons-log"; private static final String FILTER_WALL_PREFIX = "spring.datasource.druid.filter.wall"; private static final String FILTER_WALL_CONFIG_PREFIX = "spring.datasource.druid.filter.wall.config";1
2
3
4
5
6
7
8
9
第二步:配置全局配置文件
上面只是自动配置了组件,实际上很多功能需要使用全局配置文件进行开启,注意不要又配置了这个还整了方式一的配置,这样两种配置都不会起作用
讲的太少了,还是要去GitHub上面扣文档
druid: stat-view-servlet: #这个下面都是stat-view-servlet监控页的设置 enabled: true #监控页的功能默认也是开启的,这些属性配置项可以在DruidStatProperties(前缀spring.datasource.druid)的内部类StatViewServlet中查看到 login-username: admin login-password: 123456 reset-enable: false #禁用重置按钮,重置按钮就是监控页顶上蓝色的重置按钮 #allow:允许哪里的用户进行访问 #urlPattern:请求路径 #Druid的过滤器相关功能都是false web-stat-filter: enabled: true #这些功能默认都是关闭的 url-pattern: /* #指定匹配的请求路径 exclusions: '*.js,*.gif,*.jpg,*.png,*.css,*.ico,/druid/*' #指定要排除的请求路径,这个也有默认配置,不为空就用用户的,为空就用默认配置,默认配置就是排除静态资源和druid的请求,这是一个字符串,需要使用单引号括起来,注意双引号不会转义 #DruidDataSourceWrapper中的autoAddFilters属性,addAll(filters)方法可以添加filter组件,对应的是开启监控页和防火墙功能 #filters属性是开启一系列功能组件,这里讲的太烂了,这个到底是开启组件功能,还是添加组件;经过测试,只这么写是可以使用SQL监控和SQL防火墙功能,不是必须在filter中指定enabled为true filters: #stat,wall #stat是开启sql监控的,wall是开启防火墙的,经测试,filters和filter都不写两个功能用不了 #filter属性是配置单个组件属性的 filter: stat: slow-sql-millis: 1000 #设置慢查询时间,单位是毫秒;作用是Druid会统计,所有超过1s的sql都是慢查询,StatFilter中有相关的属性列表,默认慢查询是3秒 log-slow-sql: true #是否用日志记录慢查询,默认是false enabled: true #开启StatFilter,只配置filters也可以开启这个功能,单独配置这个也可以开启Sql监控功能,所以这个和filters都可以开启防火墙功能和sql监控功能 wall: config: update-allow: false #这个设置为false相当于所有的更新操作都会被防火墙拦截 drop-table-allow: false #这个设置为false表示不允许删表,所有的删表操作都会被拦截 enabled: true #开启WebStatFilter #这个是配置spring监控的 aop-patterns: com.atlisheng.admin.*1
2
3
4
5
6
7
8
9
10
11
12
13
14
15
16
17
18
19
20
21
22
23
24
25
26
27
28
29
30
31
32
33
34
35- 系统中所有filter:
别名 Filter类名 default com.alibaba.druid.filter.stat.StatFilter stat com.alibaba.druid.filter.stat.StatFilter mergeStat com.alibaba.druid.filter.stat.MergeStatFilter encoding com.alibaba.druid.filter.encoding.EncodingConvertFilter log4j com.alibaba.druid.filter.logging.Log4jFilter log4j2 com.alibaba.druid.filter.logging.Log4j2Filter slf4j com.alibaba.druid.filter.logging.Slf4jLogFilter commonlogging com.alibaba.druid.filter.logging.CommonsLogFilter slf4j 是记录日志的过滤器,比如防火墙执行拦截,监控到异常slf4j都会记录下来
# 整合MyBatis操作
# 整合MyBatis的流程
- 第一步:引入MyBatis的场景启动器
引入场景启动器在GitHub上点入对应starter下的pom.xml【注意版本要选择稳定版,不要选择快照版,从master分支中的标签Tags来切换版本】
- 该场景启动器引入的依赖包括
- 数据库开发的Jdbc场景
- mybatis的自动配置包
- 引入了mybatis框架
- mybatis和spring的整合
<dependency>
<groupId>org.mybatis.spring.boot</groupId>
<artifactId>mybatis-spring-boot-starter</artifactId>
<version>2.1.4</version>
</dependency>
2
3
4
5
- 以前手动配置MyBatis的步骤:编写全局配置文件-->编写Mapper接口-->编写Mapper映射文件【指定namespace为对应mapper接口的全限定类名】-->获取SqlSessionFactory工厂-->通过工厂创建SqlSession-->通过SqlSession找到接口操作数据库
- 添加了Mybatis场景启动器后的自动配置内容
- 配置了SqlSessionFactory
- 配置了SQLSession:自动配置了SqlSessiontemplate,在属性中组合了SqlSession
- 通过@import注解条件配置了AutoConfiguredMapperScannerRegistrar.class,在这里面有个registerBeanDefinitions方法,在该方法中找到所有标注了@Mapper注解的接口,这里规定了只要用户自己写的操作Mybatis接口标注了@Mapper注解就会被自动扫描进来
【MybatisAutoConfiguration】
@Configuration
@ConditionalOnClass({SqlSessionFactory.class, SqlSessionFactoryBean.class})//导入了Mybatis的jar包自然就有这两个类才能配置
@ConditionalOnSingleCandidate(DataSource.class)//整个容器中有且只有一个数据源的时候才能配置
@EnableConfigurationProperties({MybatisProperties.class})//所有对于Mybatis的配置都从配置类MybatisProperties中获取,对应的前缀是mybatis
@AutoConfigureAfter({DataSourceAutoConfiguration.class, MybatisLanguageDriverAutoConfiguration.class})
public class MybatisAutoConfiguration implements InitializingBean {
private static final Logger logger = LoggerFactory.getLogger(MybatisAutoConfiguration.class);
private final MybatisProperties properties;
private final Interceptor[] interceptors;
private final TypeHandler[] typeHandlers;
private final LanguageDriver[] languageDrivers;
private final ResourceLoader resourceLoader;
private final DatabaseIdProvider databaseIdProvider;
private final List<ConfigurationCustomizer> configurationCustomizers;
//构造这个自动配置类的时候就会把MybatisProperties中的配置信息拿到
public MybatisAutoConfiguration(MybatisProperties properties, ObjectProvider<Interceptor[]> interceptorsProvider, ObjectProvider<TypeHandler[]> typeHandlersProvider, ObjectProvider<LanguageDriver[]> languageDriversProvider, ResourceLoader resourceLoader, ObjectProvider<DatabaseIdProvider> databaseIdProvider, ObjectProvider<List<ConfigurationCustomizer>> configurationCustomizersProvider) {
this.properties = properties;
this.interceptors = (Interceptor[])interceptorsProvider.getIfAvailable();
this.typeHandlers = (TypeHandler[])typeHandlersProvider.getIfAvailable();
this.languageDrivers = (LanguageDriver[])languageDriversProvider.getIfAvailable();
this.resourceLoader = resourceLoader;
this.databaseIdProvider = (DatabaseIdProvider)databaseIdProvider.getIfAvailable();
this.configurationCustomizers = (List)configurationCustomizersProvider.getIfAvailable();
}
...
@Bean//给容器中放了一个SqlSessionFactory
@ConditionalOnMissingBean
public SqlSessionFactory sqlSessionFactory(DataSource dataSource) throws Exception {
SqlSessionFactoryBean factory = new SqlSessionFactoryBean();
factory.setDataSource(dataSource);//把数据源放到Mybatissql会话工厂中
factory.setVfs(SpringBootVFS.class);
if (StringUtils.hasText(this.properties.getConfigLocation())) {//这个Properties就是MybatisProperties
factory.setConfigLocation(this.resourceLoader.getResource(this.properties.getConfigLocation()));
}
...
}
private void applyConfiguration(SqlSessionFactoryBean factory) {
...
}
@Bean//给容器中配置了一个SqlSessionTemplate,这里面有一个SqlSession属性,这个份SqlSession用来操作数据库的
@ConditionalOnMissingBean
public SqlSessionTemplate sqlSessionTemplate(SqlSessionFactory sqlSessionFactory) {
ExecutorType executorType = this.properties.getExecutorType();
return executorType != null ? new SqlSessionTemplate(sqlSessionFactory, executorType) : new SqlSessionTemplate(sqlSessionFactory);
}
@Configuration
@Import({MybatisAutoConfiguration.AutoConfiguredMapperScannerRegistrar.class})//导入了一个AutoConfiguredMapperScannerRegistrar.class,这个也要满足条件配置才能生效;在这里面有个registerBeanDefinitions方法,在该方法中找到所有标注了@Mapper注解的接口,这里规定了只要用户自己写的操作Mybatis接口标注了@Mapper注解就会被自动扫描进来
@ConditionalOnMissingBean({MapperFactoryBean.class, MapperScannerConfigurer.class})
public static class MapperScannerRegistrarNotFoundConfiguration implements InitializingBean {
public MapperScannerRegistrarNotFoundConfiguration() {
}
public void afterPropertiesSet() {
MybatisAutoConfiguration.logger.debug("Not found configuration for registering mapper bean using @MapperScan, MapperFactoryBean and MapperScannerConfigurer.");
}
}
public static class AutoConfiguredMapperScannerRegistrar implements BeanFactoryAware, ImportBeanDefinitionRegistrar {
...
}
public void setBeanFactory(BeanFactory beanFactory) {
this.beanFactory = beanFactory;
}
}
}
2
3
4
5
6
7
8
9
10
11
12
13
14
15
16
17
18
19
20
21
22
23
24
25
26
27
28
29
30
31
32
33
34
35
36
37
38
39
40
41
42
43
44
45
46
47
48
49
50
51
52
53
54
55
56
57
58
59
60
61
62
63
64
65
66
67
68
69
70
71
72
【MyBatisProperties】
@ConfigurationProperties(
prefix = "mybatis"
)
public class MybatisProperties {
public static final String MYBATIS_PREFIX = "mybatis";
private static final ResourcePatternResolver resourceResolver = new PathMatchingResourcePatternResolver();
private String configLocation;//配置的是mybatis全局配置文件的路径
private String[] mapperLocations;//配置的是mybatis的mapper文件的路径
private String typeAliasesPackage;
private Class<?> typeAliasesSuperType;
private String typeHandlersPackage;
private boolean checkConfigLocation = false;
private ExecutorType executorType;
private Class<? extends LanguageDriver> defaultScriptingLanguageDriver;
private Properties configurationProperties;
@NestedConfigurationProperty
private Configuration configuration;
...
}
2
3
4
5
6
7
8
9
10
11
12
13
14
15
16
17
18
19
【SqlSessionTemplate】
public class SqlSessionTemplate implements SqlSession, DisposableBean {
private final SqlSessionFactory sqlSessionFactory;
private final ExecutorType executorType;
private final SqlSession sqlSessionProxy;//这个就是整合的SqlSession
private final PersistenceExceptionTranslator exceptionTranslator;
...
}
2
3
4
5
6
7
- 第二步:准备mybatis组件
这里参考Mybatis官方文档
配置Mybatis全局配置文件
在yml文件中使用mybatis.config-location.classpath属性指定mybatis全局配置文件的位置,全局配置文件的Configuration标签里面啥都不用写,但是Configuration标签得在
<?xml version="1.0" encoding="UTF-8" ?> <!DOCTYPE configuration PUBLIC "-//mybatis.org//DTD Config 3.0//EN" "http://mybatis.org/dtd/mybatis-3-config.dtd"> <configuration> </configuration>1
2
3
4
5
6
7准备javaBean类
准备AccountMapper接口
mybatisx插件比较好用,mybatisx是mybatis-plus开发的插件,可以实现mapper和SQL映射文件的跳转,可以联系数据库实现逆向工程生成代码,还有一些语法提示,mybatis-plus官方文档介绍比较详尽
注意Mapper接口一定要标注@Mapper注解
@Mapper public interface AccountMapper { public Account getActById(Long id); }1
2
3
4准备mapper映射文件,该映射文件需要和Mapper接口同名
<?xml version="1.0" encoding="UTF-8" ?> <!DOCTYPE mapper PUBLIC "-//mybatis.org//DTD Mapper 3.0//EN" "http://mybatis.org/dtd/mybatis-3-mapper.dtd"> <mapper namespace="com.atlisheng.admin.mapper.AccountMapper"> <select id="getActById" resultType="com.atlisheng.admin.bean.Account"> select * from account_tbl where id=#{id} </select> </mapper>1
2
3
4
5
6
7
8
9
10在spring全局配置文件中指定Mybatis全局配置文件和Mapper映射文件的类路径下的目录
mybatis: config-location: classpath:mybatis/mybatis-config.xml #全局配置文件位置 mapper-locations: classpath:mybatis/mapper/*.xml #Mapper映射文件位置1
2
3编写Service类
@Service public class AccountService { @Resource AccountMapper accountMapper; public Account getActById(Long id){ return accountMapper.getActById(id); } }1
2
3
4
5
6
7
8编写控制器方法
@ResponseBody @GetMapping("/acct") public Account getById(@RequestParam("id") Long id){ return accountService.getActById(id); }1
2
3
4
5
配置属性配置项
指定配置文件位置
在spring全局配置文件中指定Mybatis全局配置文件和Mapper映射文件的类路径下的目录
mybatis: config-location: classpath:mybatis/mybatis-config.xml #全局配置文件位置 mapper-locations: classpath:mybatis/mapper/*.xml #Mapper映射文件位置1
2
3指定全局配置文件的信息
建议不要写mybatis全局配置文件,直接配置在mybatis.configuration属性下即可
注意:驼峰命名规则默认是false,需要在mybatis全局配置文件的Configuration标签中打开
<settings>
<setting name="mapUnderscoreToCamelCase" value="true"/>
</settings>
2
3
在MybatisProperties中的private Configuration configuration属性中对Mybatis的设置项进行了绑定,同样在全局配置文件中指定对应的属性配置值就相当于在mybatis全局配置文件中进行对应的配置,具体要配的值可以看IDEA的提示,注意一旦使用这种方式就不能使用config-location: classpath:mybatis/mybatis-config.xml来指定全局配置文件,即要么只能在mybatiys全局配置文件中配,要么只能在yml中配置【意味着可以不写mybatis全局配置文件,所有的mybatis的全局配置文件都可以单独放在Configuration配置项中即可】
mybatis:
#config-location: classpath:mybatis/mybatis-config.xml;config-location和configuration不可以共存,mybatis不知道以哪个为准
mapper-locations: classpath:mybatis/mapper/*.xml
configuration: #这个属性下可以指定mybatis全局配置文件中的相关配置
map-underscore-to-camel-case: true
2
3
4
5
# Mybatis纯注解整合
参考Mybatis的GitHub上的starter的Wiki
除了引入Mybatis的starter,还可以在SpringBoot项目初始化的时候选中Mybatis框架,效果是一样的
纯注解写Mapper【如@select注解】可以不用写Mapper映射文件,但是这种方式只适用于简单SQL;好就好在Mapper映射文件和纯注解可以混用,特别复杂的SQL就可以用Mapper映射文件
用@Options注解可以给SQL标签设置属性值,相当于扩展SQL语句的功能
【纯注解的Mapper接口实例】
@Mapper public interface CityMapper { @Select("select * from city where id=#{id}") public City getCityById(Long id); @Insert("insert into city(name,state,country) values (#{name},#{state},#{country});") @Options(useGeneratedKeys = true,keyProperty = "id") public int insertCity(City city); }1
2
3
4
5
6
7
8
9【service】
@Service public class CityService { @Autowired CityMapper cityMapper; public City getCityById(Long id){ return cityMapper.getCityById(id); } public City saveCity(City city){ cityMapper.insertCity(city); return city; } }1
2
3
4
5
6
7
8
9
10
11
12
13
14
15【控制层】
@ResponseBody @PostMapping("/city") public City saveCity(City city){ System.out.println(city); return cityService.saveCity(city); } @GetMapping("/city") @ResponseBody public City getCityById(@RequestParam Long id){ return cityService.getCityById(id); }1
2
3
4
5
6
7
8
9
10
11
12
# 混合模式
简单SQL用注解
复杂SQL还是用SQL映射文件
useGeneratedKeys属性为true,keyProperty为id表示查询返回自增主键,然后赋值给city的id属性1
【Mapper接口】
@Mapper
public interface CityMapper {
@Select("select * from city where id=#{id}")
public City getCityById(Long id);
public int insertCity(City city);
}
2
3
4
5
6
7
【SQL映射文件】
<?xml version="1.0" encoding="UTF-8" ?>
<!DOCTYPE mapper
PUBLIC "-//mybatis.org//DTD Mapper 3.0//EN"
"http://mybatis.org/dtd/mybatis-3-mapper.dtd">
<mapper namespace="com.atlisheng.admin.mapper.CityMapper">
<!--useGeneratedKeys属性为true,keyProperty为id表示查询返回自增主键,然后赋值给city的id属性-->
<insert id="insertCity" useGeneratedKeys="true" keyProperty="id">
insert into city(name,state,country) values (#{name},#{state},#{country});
</insert>
</mapper>
2
3
4
5
6
7
8
9
10
11
【service】
@Service
public class CityService {
@Autowired
CityMapper cityMapper;
public City getCityById(Long id){
return cityMapper.getCityById(id);
}
public City saveCity(City city){
cityMapper.insertCity(city);
return city;
}
}
2
3
4
5
6
7
8
9
10
11
12
13
14
15
【控制层】
@ResponseBody
@PostMapping("/city")
public City saveCity(City city){
System.out.println(city);
return cityService.saveCity(city);
}
@GetMapping("/city")
@ResponseBody
public City getCityById(@RequestParam Long id){
return cityService.getCityById(id);
}
2
3
4
5
6
7
8
9
10
11
12
# 最佳实践
引入mybatis-starter
配置application.yaml,指定mapper-location位置
编写Mapper接口并标注@Mapper注解
简单方法直接使用注解写SQL
复杂方法编写mapper.xml进行绑定映射
每个Mapper上都写@Mapper注解太麻烦,可以直接在主应用类上用@MapperScan注解指定Mapper所在的包,这样每个Mapper接口上就不用标注@Mapper注解了
@MapperScan("com.atlisheng.admin.mapper") @ServletComponentScan(basePackages = "com.atlisheng.admin") @SpringBootApplication public class Boot05WebAdminApplication { public static void main(String[] args) { SpringApplication.run(Boot05WebAdminApplication.class, args); } }1
2
3
4
5
6
7
8
9
10
# 附录
IDEA快捷键:
ctrl + shift + alt + U:在pom.xml文件中使用以分析依赖树的方式显示项目中依赖之间的关系,也可以在pom.xml中右键Diagrams的Show Dependencies显示分析依赖树。Ctrl + Alt + B:查看类的具体实现代码Ctrl+n和双击shift的效果相同- Ctrl + H : 以树形方式展现类继承结构图
- Ctrl + Alt + U : 鼠标放在类上以弹窗的形式用UML类图展现当前类的父类以及实现哪些接口
- Crtl + Alt + Shift + U : 鼠标放在类上以新页面的形式用UML类图展现当前类的父类以及实现哪些接口
- shift+insert:可以直接把复制的类加入到包中,感觉作用像粘贴,笑了就是粘贴,只是为了方便左撇子
- Alt+f7:选中类使用该快捷键或者选中find Usages可以列出一个类的调用者
- 右键方法-->goto-->implement:可以查看对应哪些子类实现了了该方法,按住ctrl点击方法名可能会跳去接口默认实现的方法,以上方法能跳转去子类实现的对应方法,即debug中点击进入方法的效果,不过需要明晰到底去哪个子类中执行了对应的方法
- shift+f6:给文件重命名
- ctrl+n:效果和双击shift是一样的
- alt+鼠标:与鼠标中键的效果相同,块编辑
springBoot应用run方法会返回IoC容器,IoC容器中包含当前应用的所有组件
public static void main(String[] args) { //SpringApplication.run(MainApplication.class, args)会返回IoC容器 ConfigurableApplicationContext run = SpringApplication.run(MainApplication.class, args); //通过IoC容器的getBeanDefinitionNames()方法可以获取所有组件的名字,返回字符串数组 String[] names = run.getBeanDefinitionNames(); //Stream流式编程 Arrays.stream(names).forEach(name->{ System.out.println(name); }); }1
2
3
4
5
6
7
8
9
10从IoC容器中获取组件对象的方法
User user01 = run.getBean("user01", User.class);
通过id和组件的class对象获取组件对象
MyConfig bean = run.getBean(MyConfig.class);
仅通过组件的class对象获取单个组件对象
String[] users = run.getBeanNamesForType(User.class);
从容器中根据类型获取该类型对应的所有组件名字
boolean tom = run.containsBean("tom");
根据名字(id)判断容器中是否存在对应组件,true表示存在,false表示不存在
debug模式下运行至断点位置选中当前行的某段代码右键Evaluate Expression或者alt+F8可以唤出结算界面获取断点行某个代码片段的运算值
SpringBoot的设计思想:
- SpringBoot默认在底层配置好所有的组件,但是如果用户配置了组件就以用户的优先,比如CharacterEncodingFilter,实现方式是条件装配没有当前类型的组件就生效创建组件,有就自动配置组件失效
浏览器快捷键:
- 浏览器使用ctrl+f5是不走缓存发送请求
UrlpathHelper【URL路径帮助器】常用方法介绍
- decodeMatrixVariables()
- 解码路径中的矩阵变量方法
- decodePathVariables()
- 解码路径变量
- decodeRequestString()
- 解码请求字符串
- ...
- decodeMatrixVariables()
浏览器相关操作
- Application中可以查看cookies,自己发给浏览器的cookie浏览器会在原来发回来的cookie后面追加
Map集合的流式编程
可以直接用变量表示key和value然后直接用
model.forEach((name, value) -> {//学到了对Map集合的流式编程,直接用key和value if (value != null) { request.setAttribute(name, value); } else { request.removeAttribute(name); } });1
2
3
4
5
6
7
8HttpServletResponse接口中有所有的Http响应状态码以及相应的状态信息,从345行开始
debug查看对象属性时Byte数组可以View as String
Arrays.asList(headerValueArray);//将字符串数组转成List集合
List<User> users= Arrays.asList(new User("zhangsan","123"), new User("lisi","1234"), new User("wangwu","12345"), new User("zhaoliu","123456"));1
2
3
4设置服务器的前置路径:
- 在属性配置文件中设置属性server.servlet.context-path为自定义上下文路径如/world即可【以后所有的请求都以/world开始】
浏览器中li标签的class="active"属性可以设置选中状态高亮,实现原理是什么,怎么实现公共页面抽取后仍然能实现对应选项高亮?
<ul class="sub-menu-list"> <li class="active"><a href="basic_table.html"> Basic Table</a></li> <li><a href="dynamic_table.html"> Advanced Table</a></li> <li><a href="responsive_table.html"> Responsive Table</a></li> <li><a href="editable_table.html"> Edit Table</a></li> </ul>1
2
3
4
5
6
← SpringCloud Nginx →

